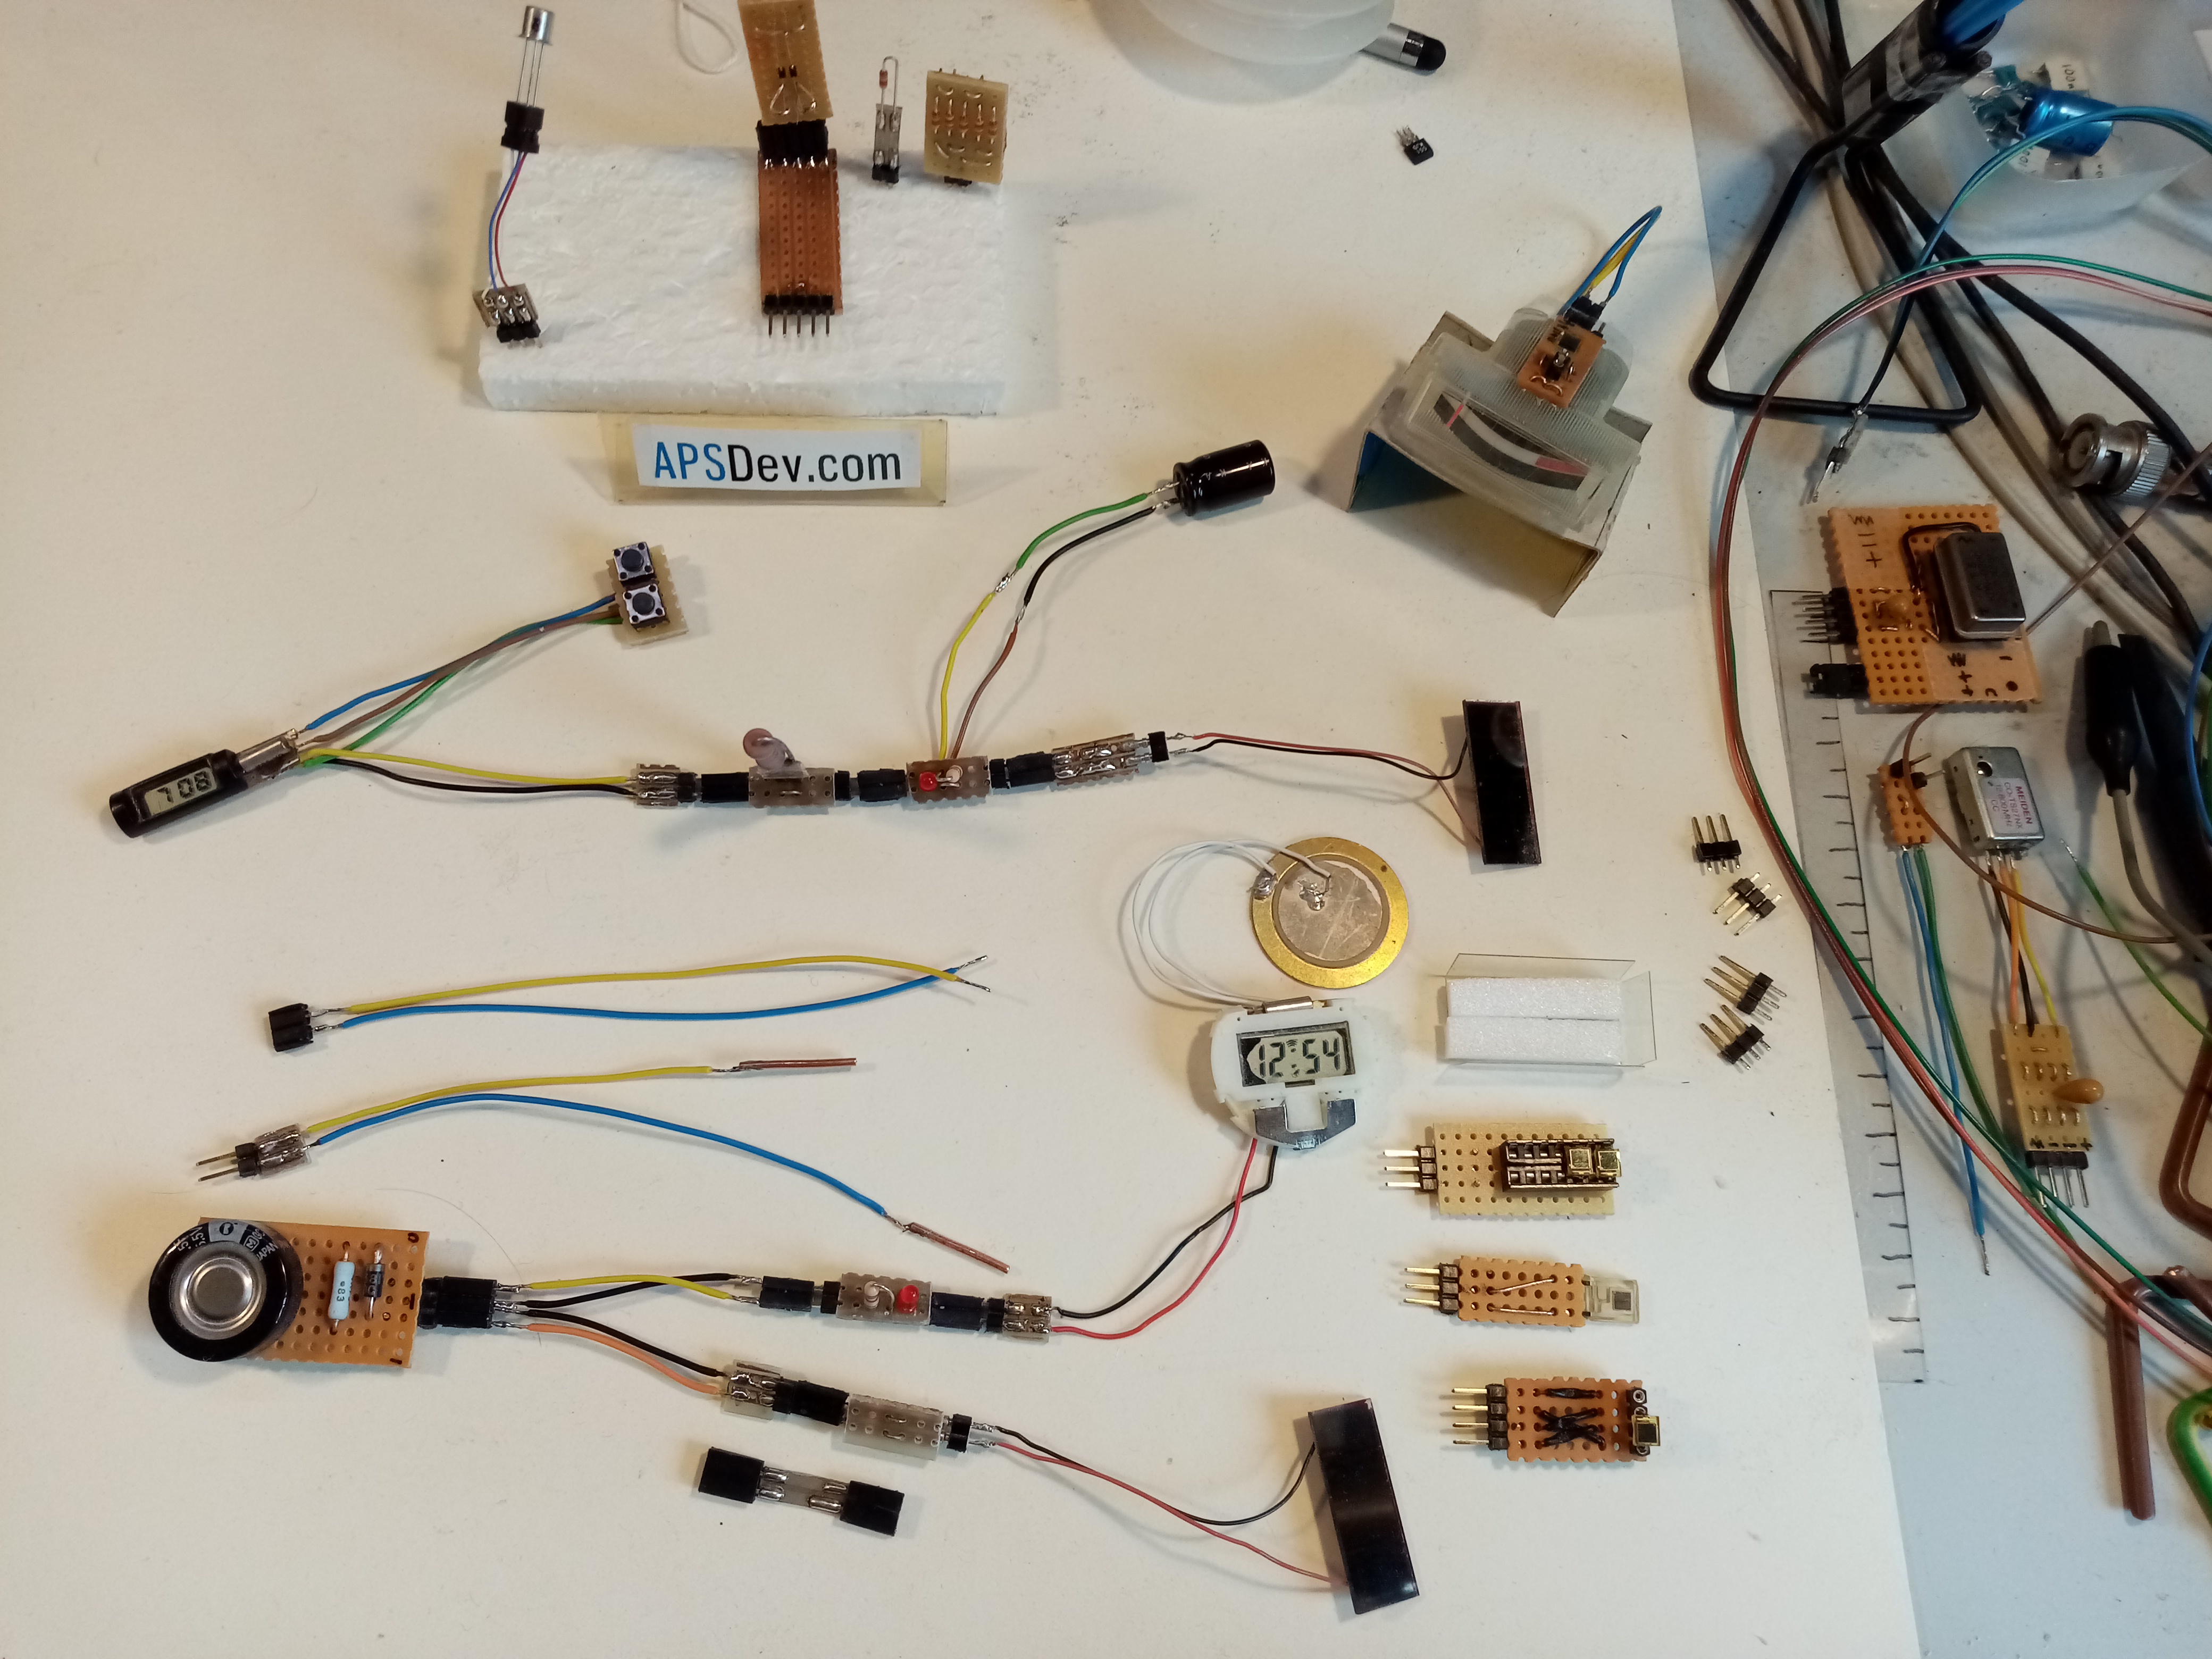
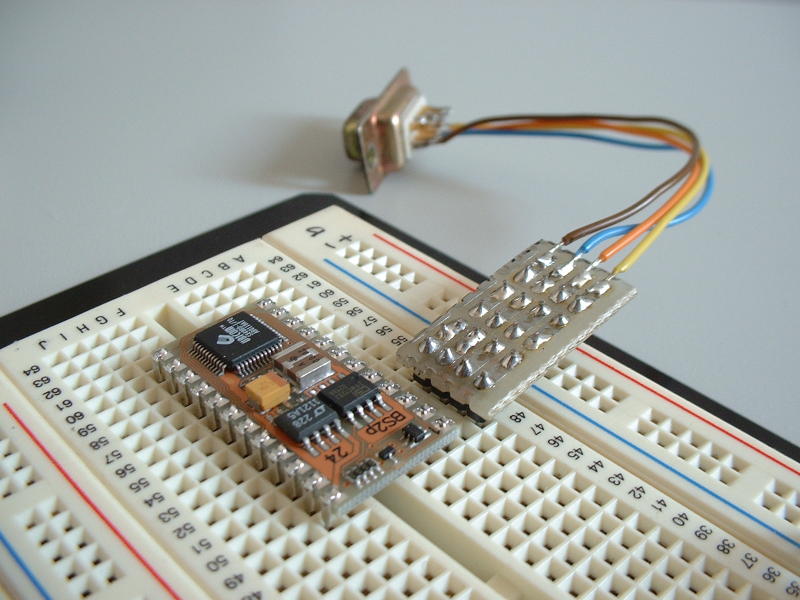
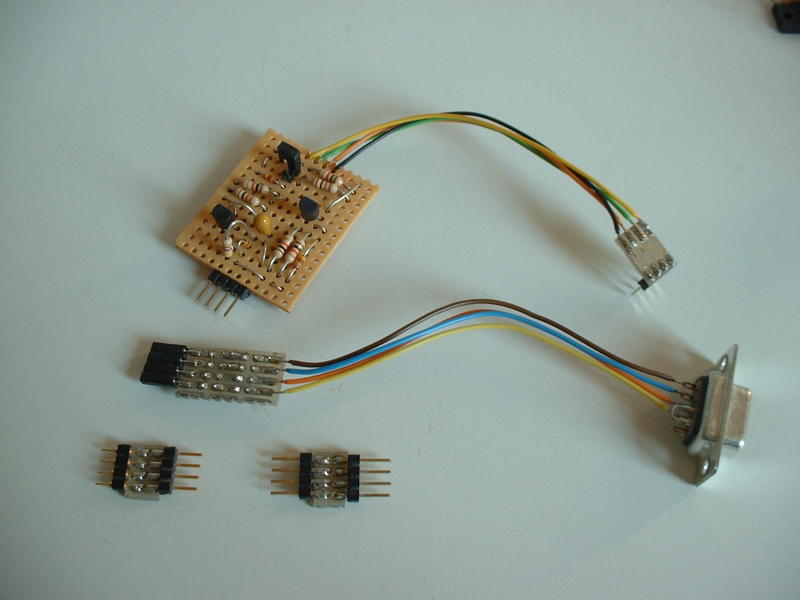
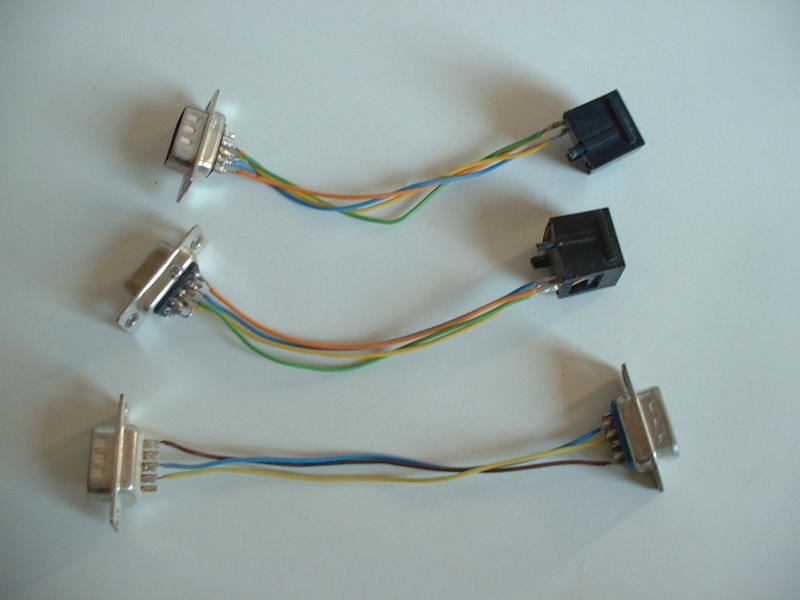
Audio. |
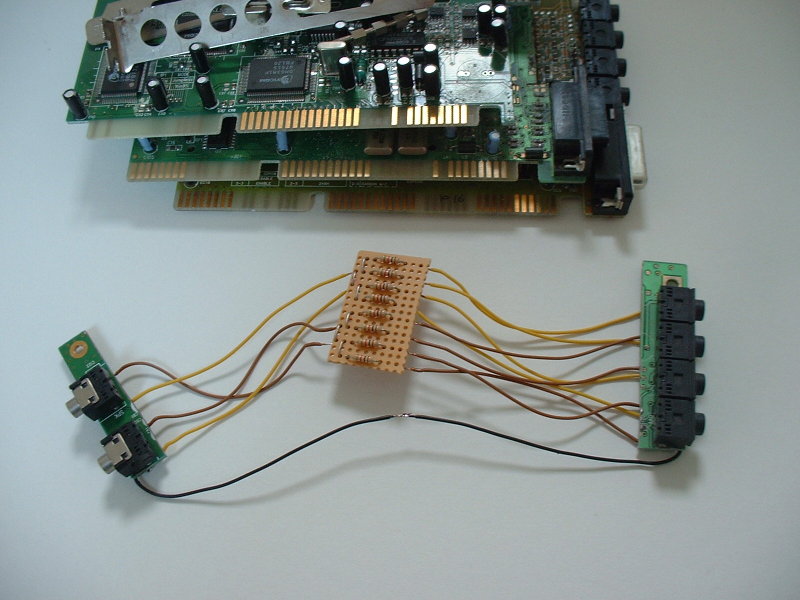 |
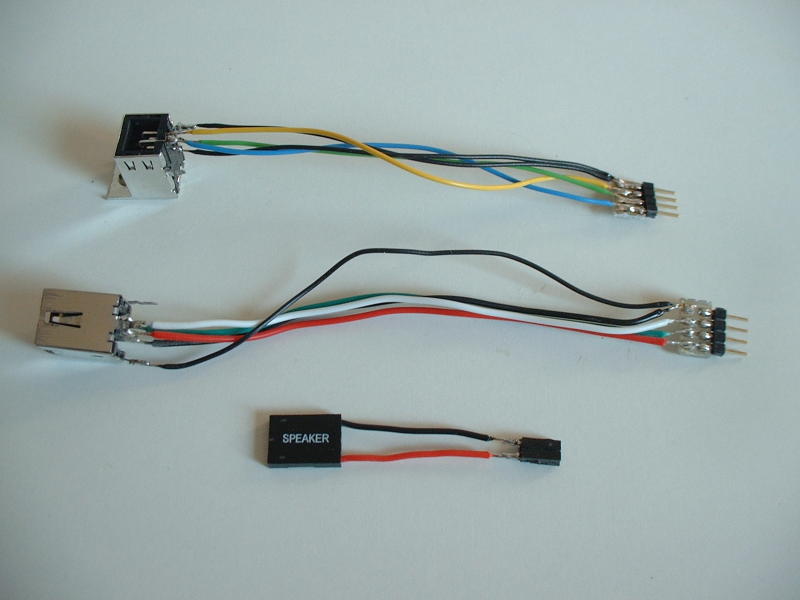
I have this KVM to switch between a PC, Mac, Amiga and linux machine, but it
doesn't switch between Audio .. so with some parts from very old ISA sound and modem cards
i made a little device to connect all the machines to a set of big PC-speakers.
|
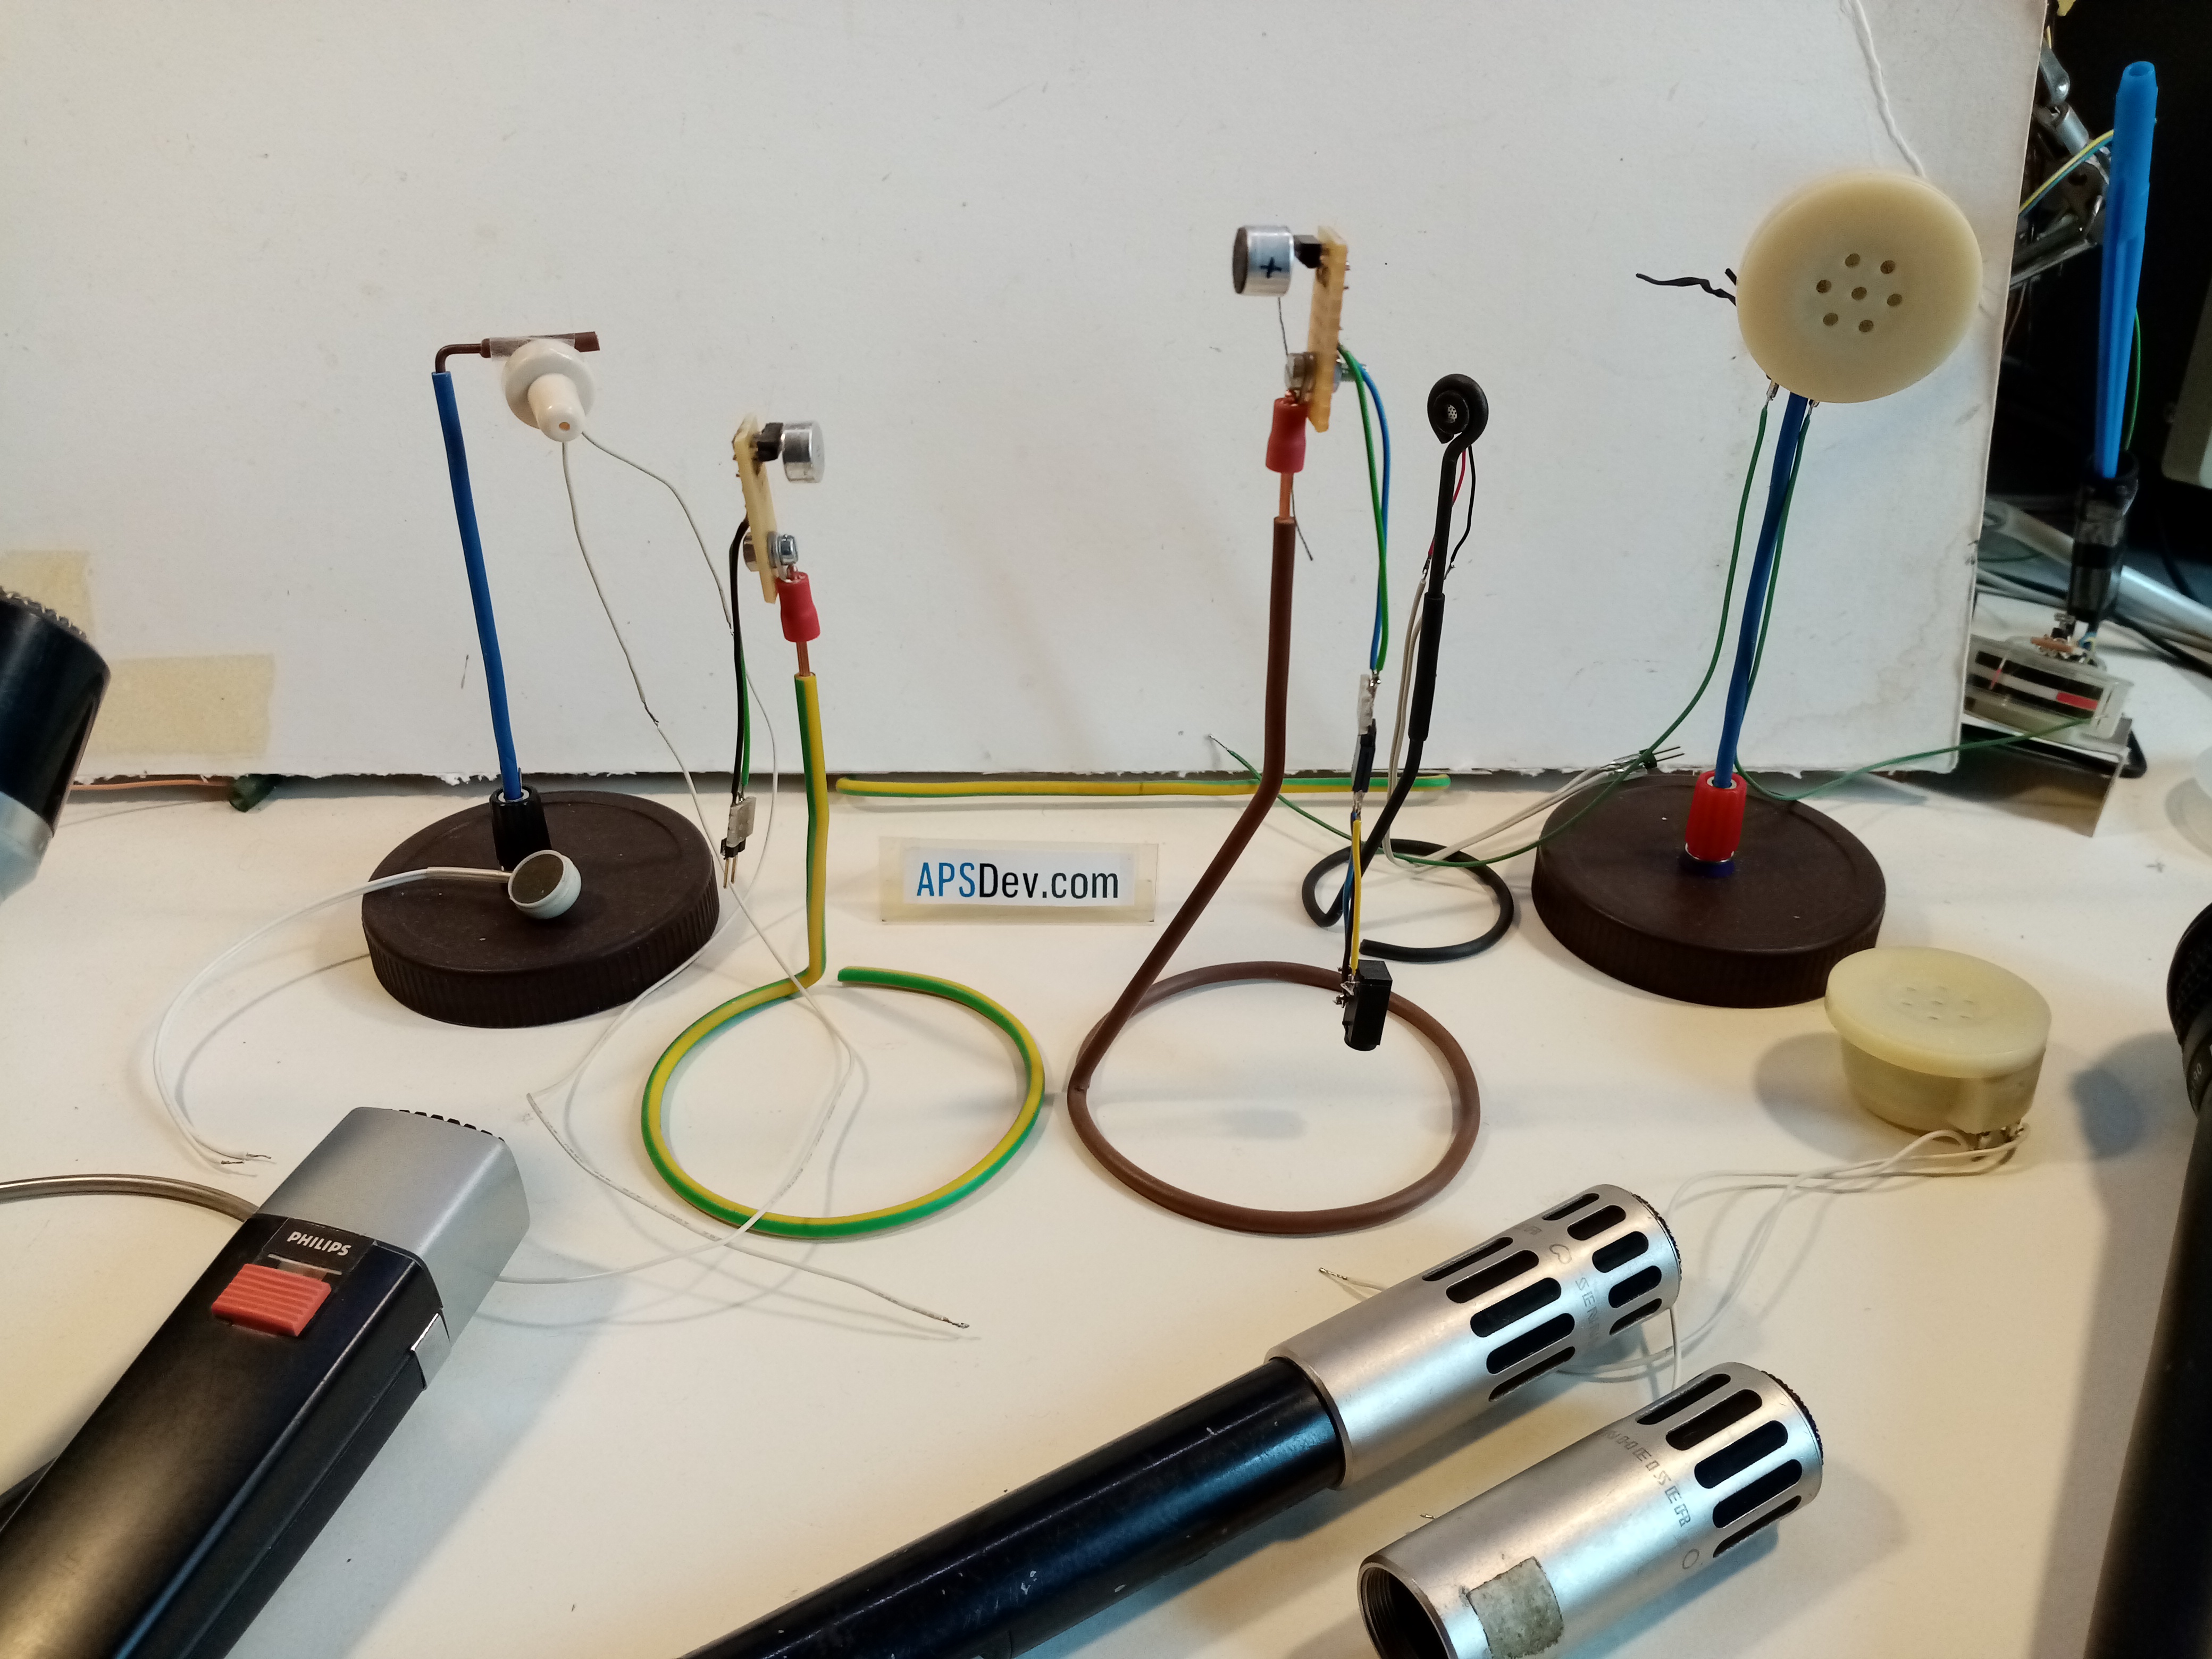
Morse. |
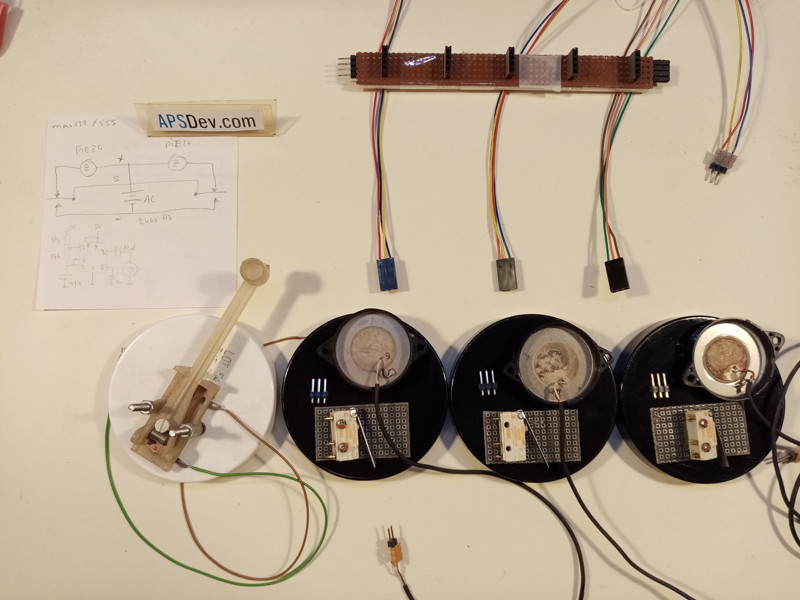 |
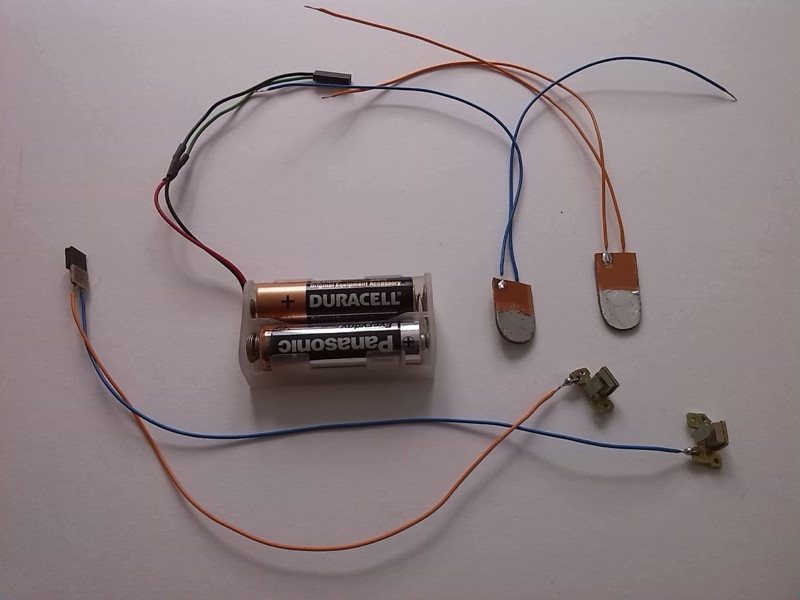
As a kid i had these booklets with instruction to build things like morse devices.
As it was old it was tricky as you needed to make the switch and buzzer yourself from pieces of tin and wire.
And they had disadvantages as all station needed a battery.
So recently someone started to talk about morse, and i realised i could improve the design by adding a third wire
so you only need one battery .. and if you replace the battery with an alternating voltage maybe made
by a 555 you don't need to make buzzers .. you can just use a piezo buzzer or just a speaker.
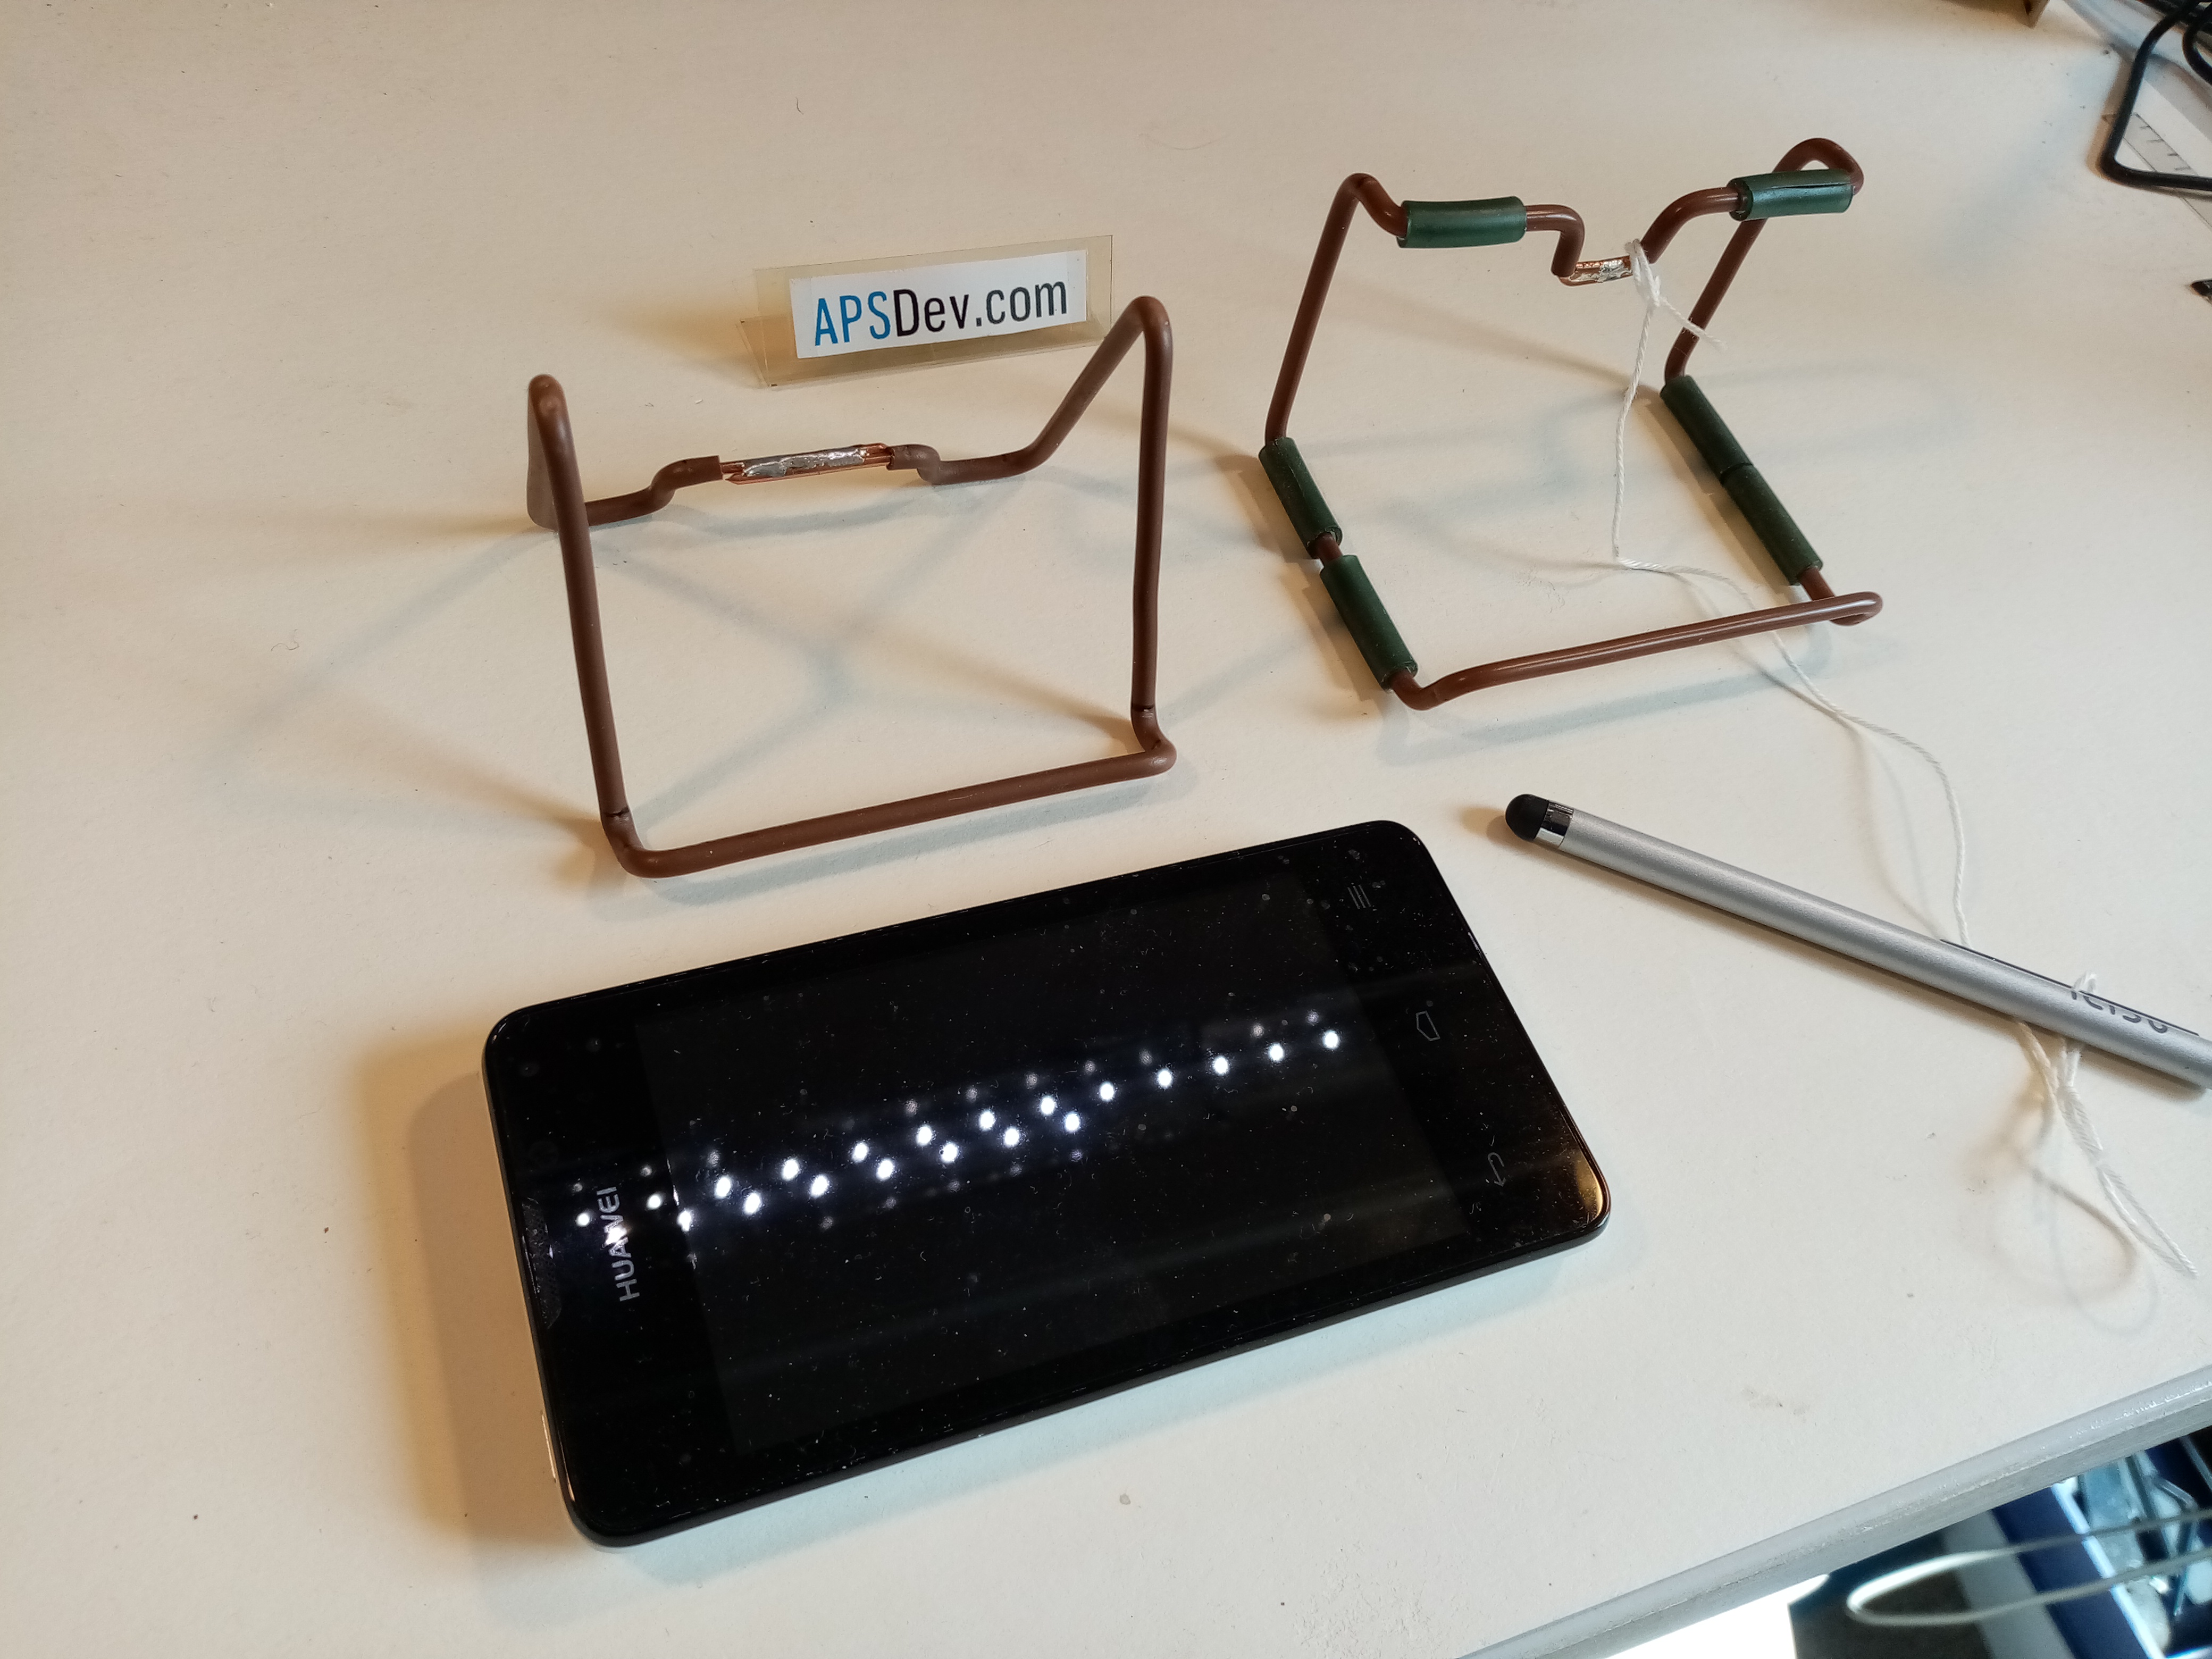
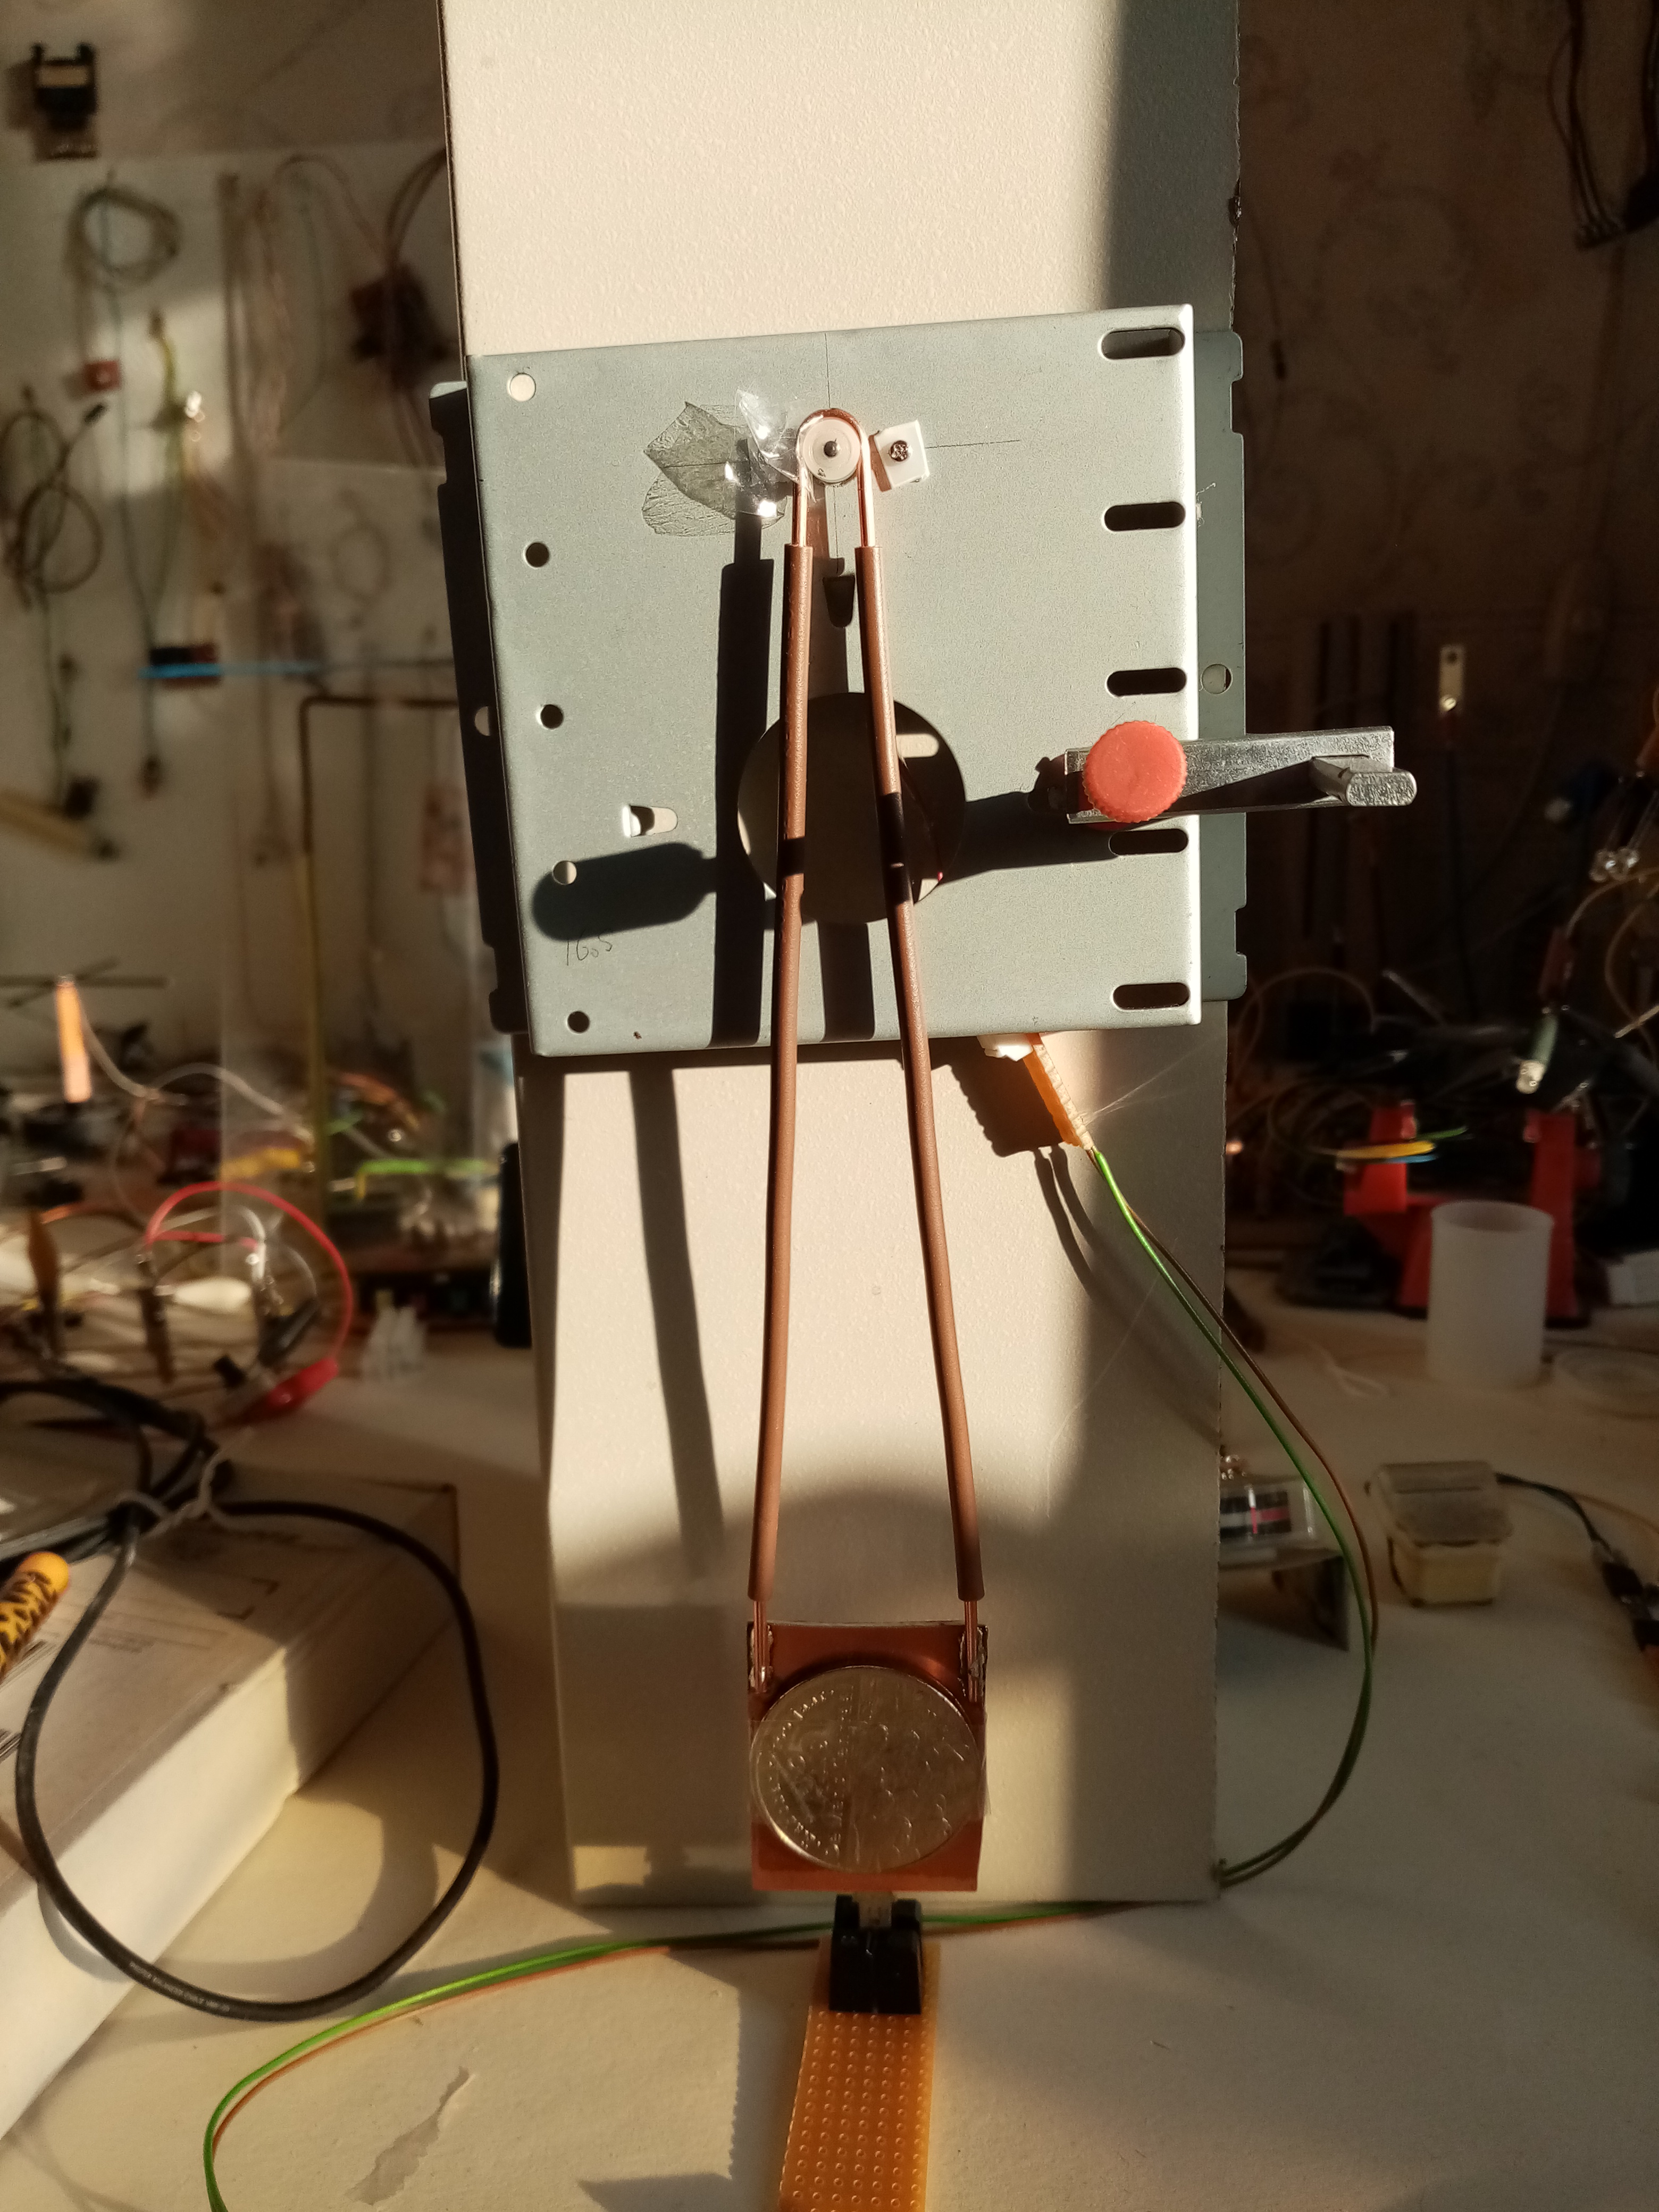
As a kid i had these electronics kits which came with a very simple morse key, i sort of improved on that
by using a switch from an old record player which worked far better, which is pictured at the left on the white base.
|
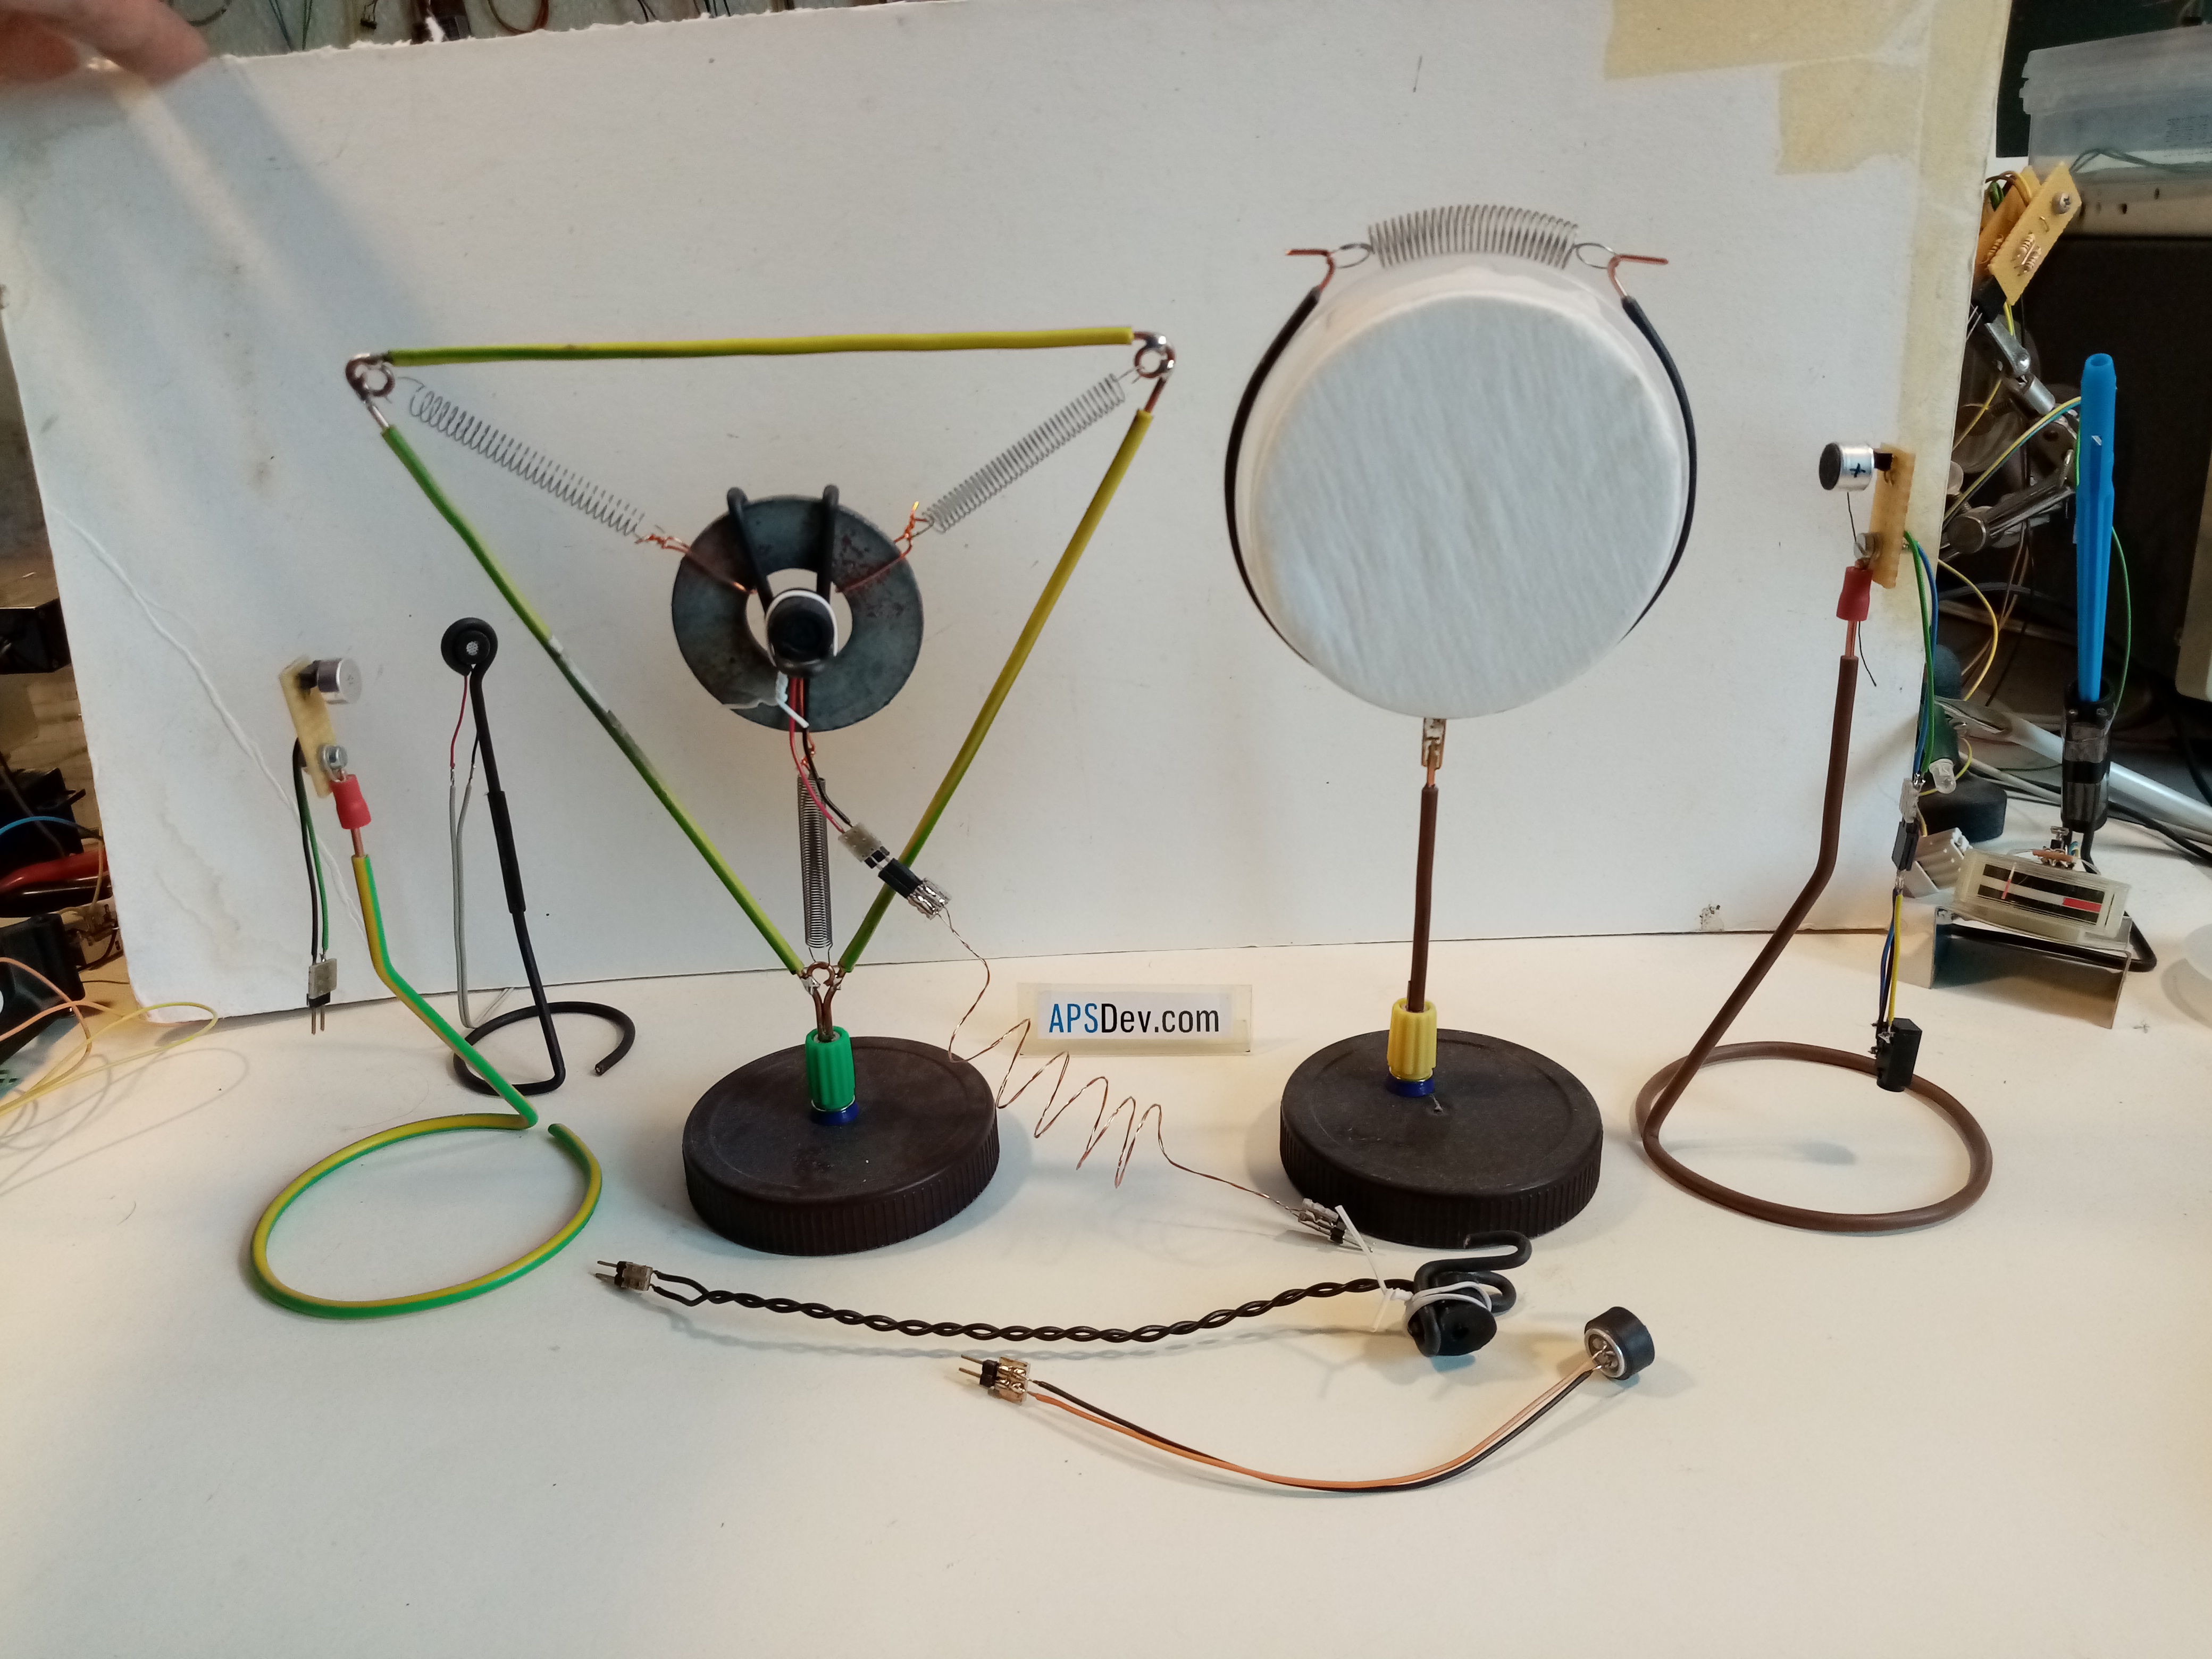
Springy microphone. |
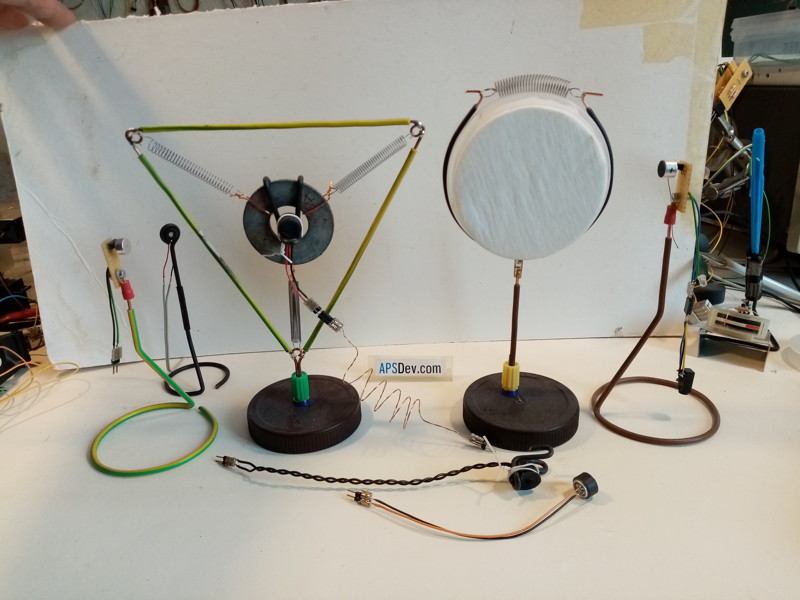 |
In old movies you often see these big microphones with springs on them, they are still
used today actually. There is a good reason that the springs are there.
If you put a microphone on a table it picks up sounds from the table like putting down a cup, of even
steps on the floor that go into the table legs. The springs have a resonant frequency of about 2 Hertz
so they should filter away all frequencies higher than that.
I sort of made the device to demonstrate it and test it. Including a filter to prevent breathing sounds.
|
Foil microphone. |
 |
Food like mashed potato powder comes in these metalized bags, i wondered if i could use them
to make a capacitive microhpone. I did manage to measure the resistance of measuring the resistance of the
metalized layer inside and its a few ohms. But you cant make an electric connection to it so you would need
two electrodes to make it work. But if that doesn't work i have actually aluminium foil to test with.
|
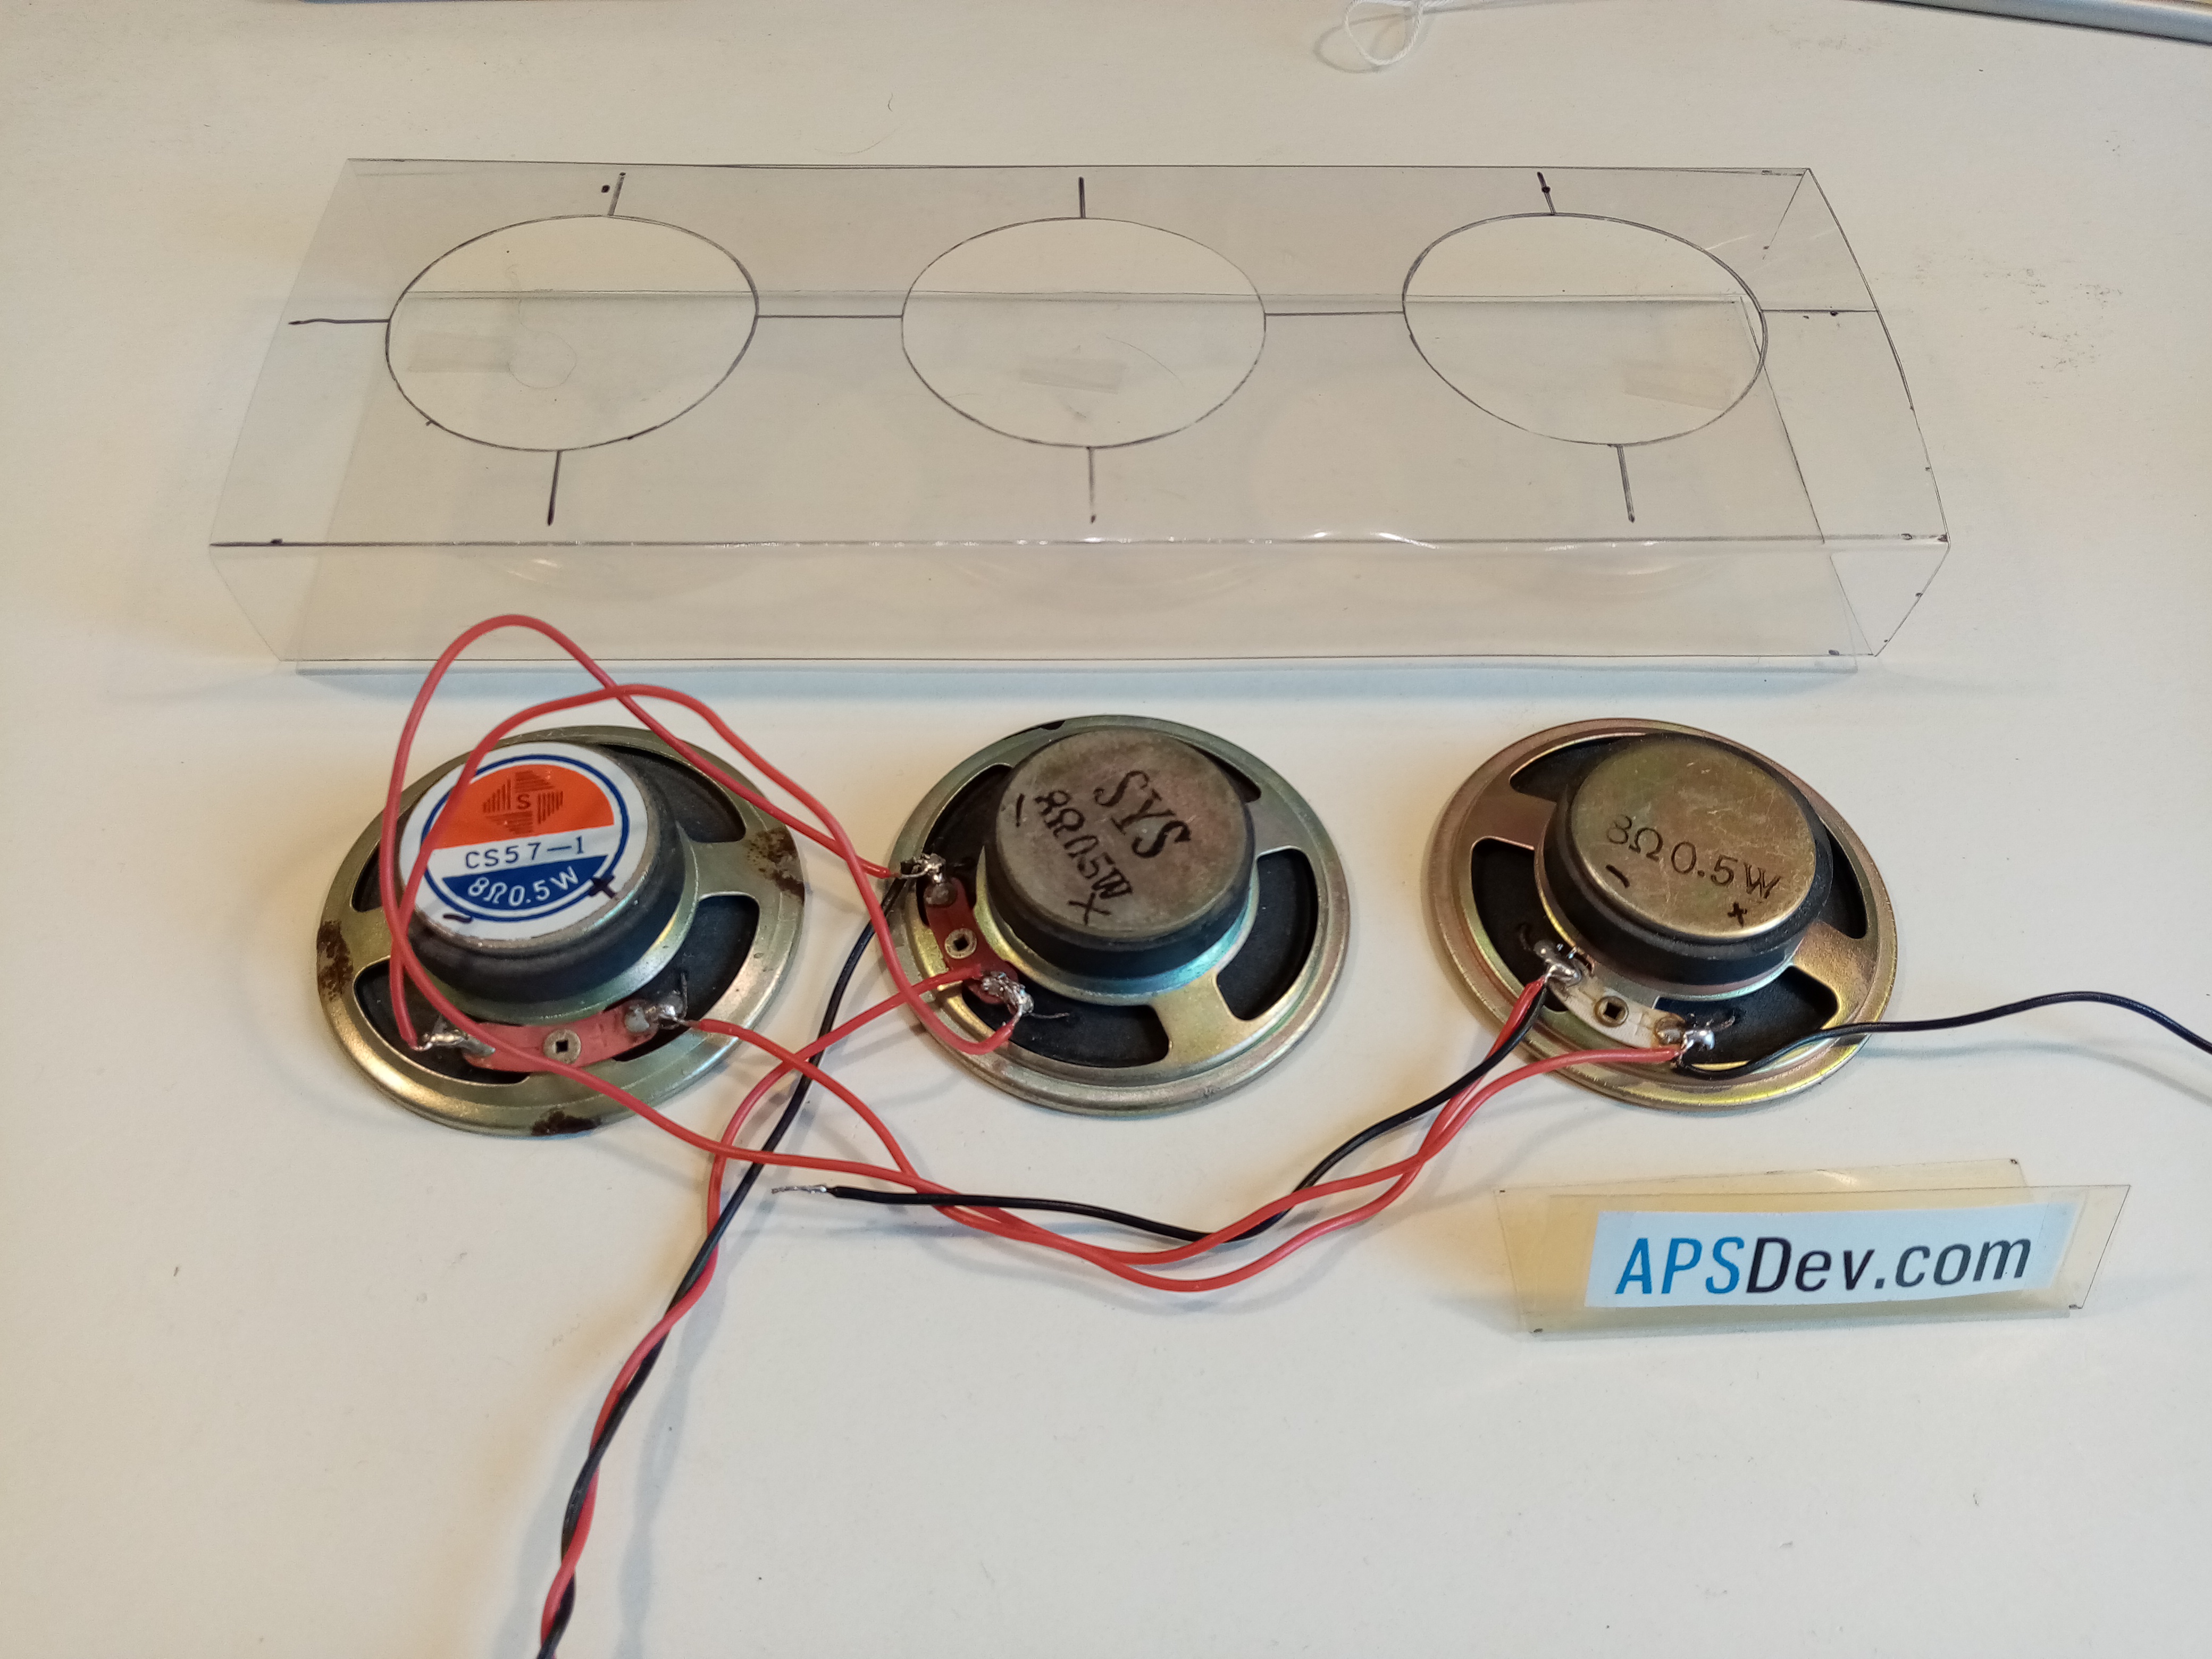
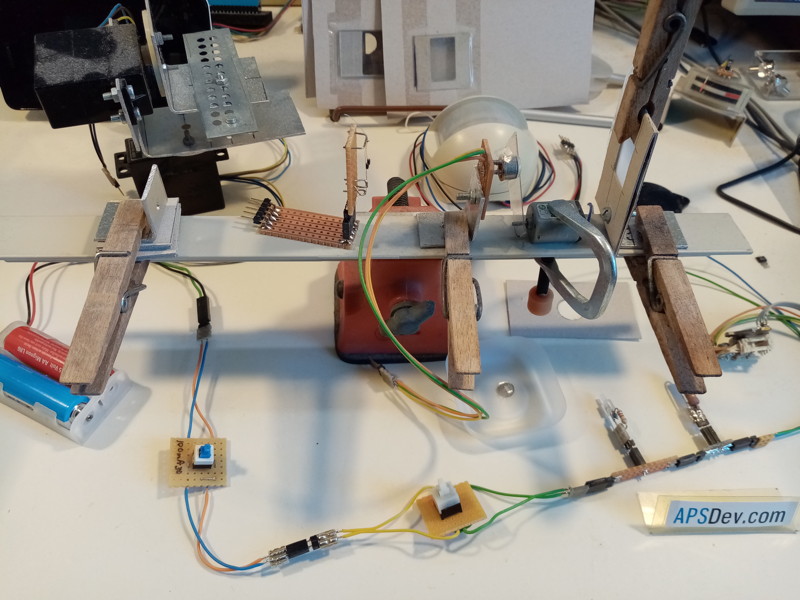
Test microphones. |
 |
So i have a bunch of big microhones, but wanted to do some tests so i made these small ones.
Like i wanted to make a noise cancelling setup on my desk and needed smaller microhpones.
Also i have these flat cone speakers i wanted to compare them with regular speakers.
|
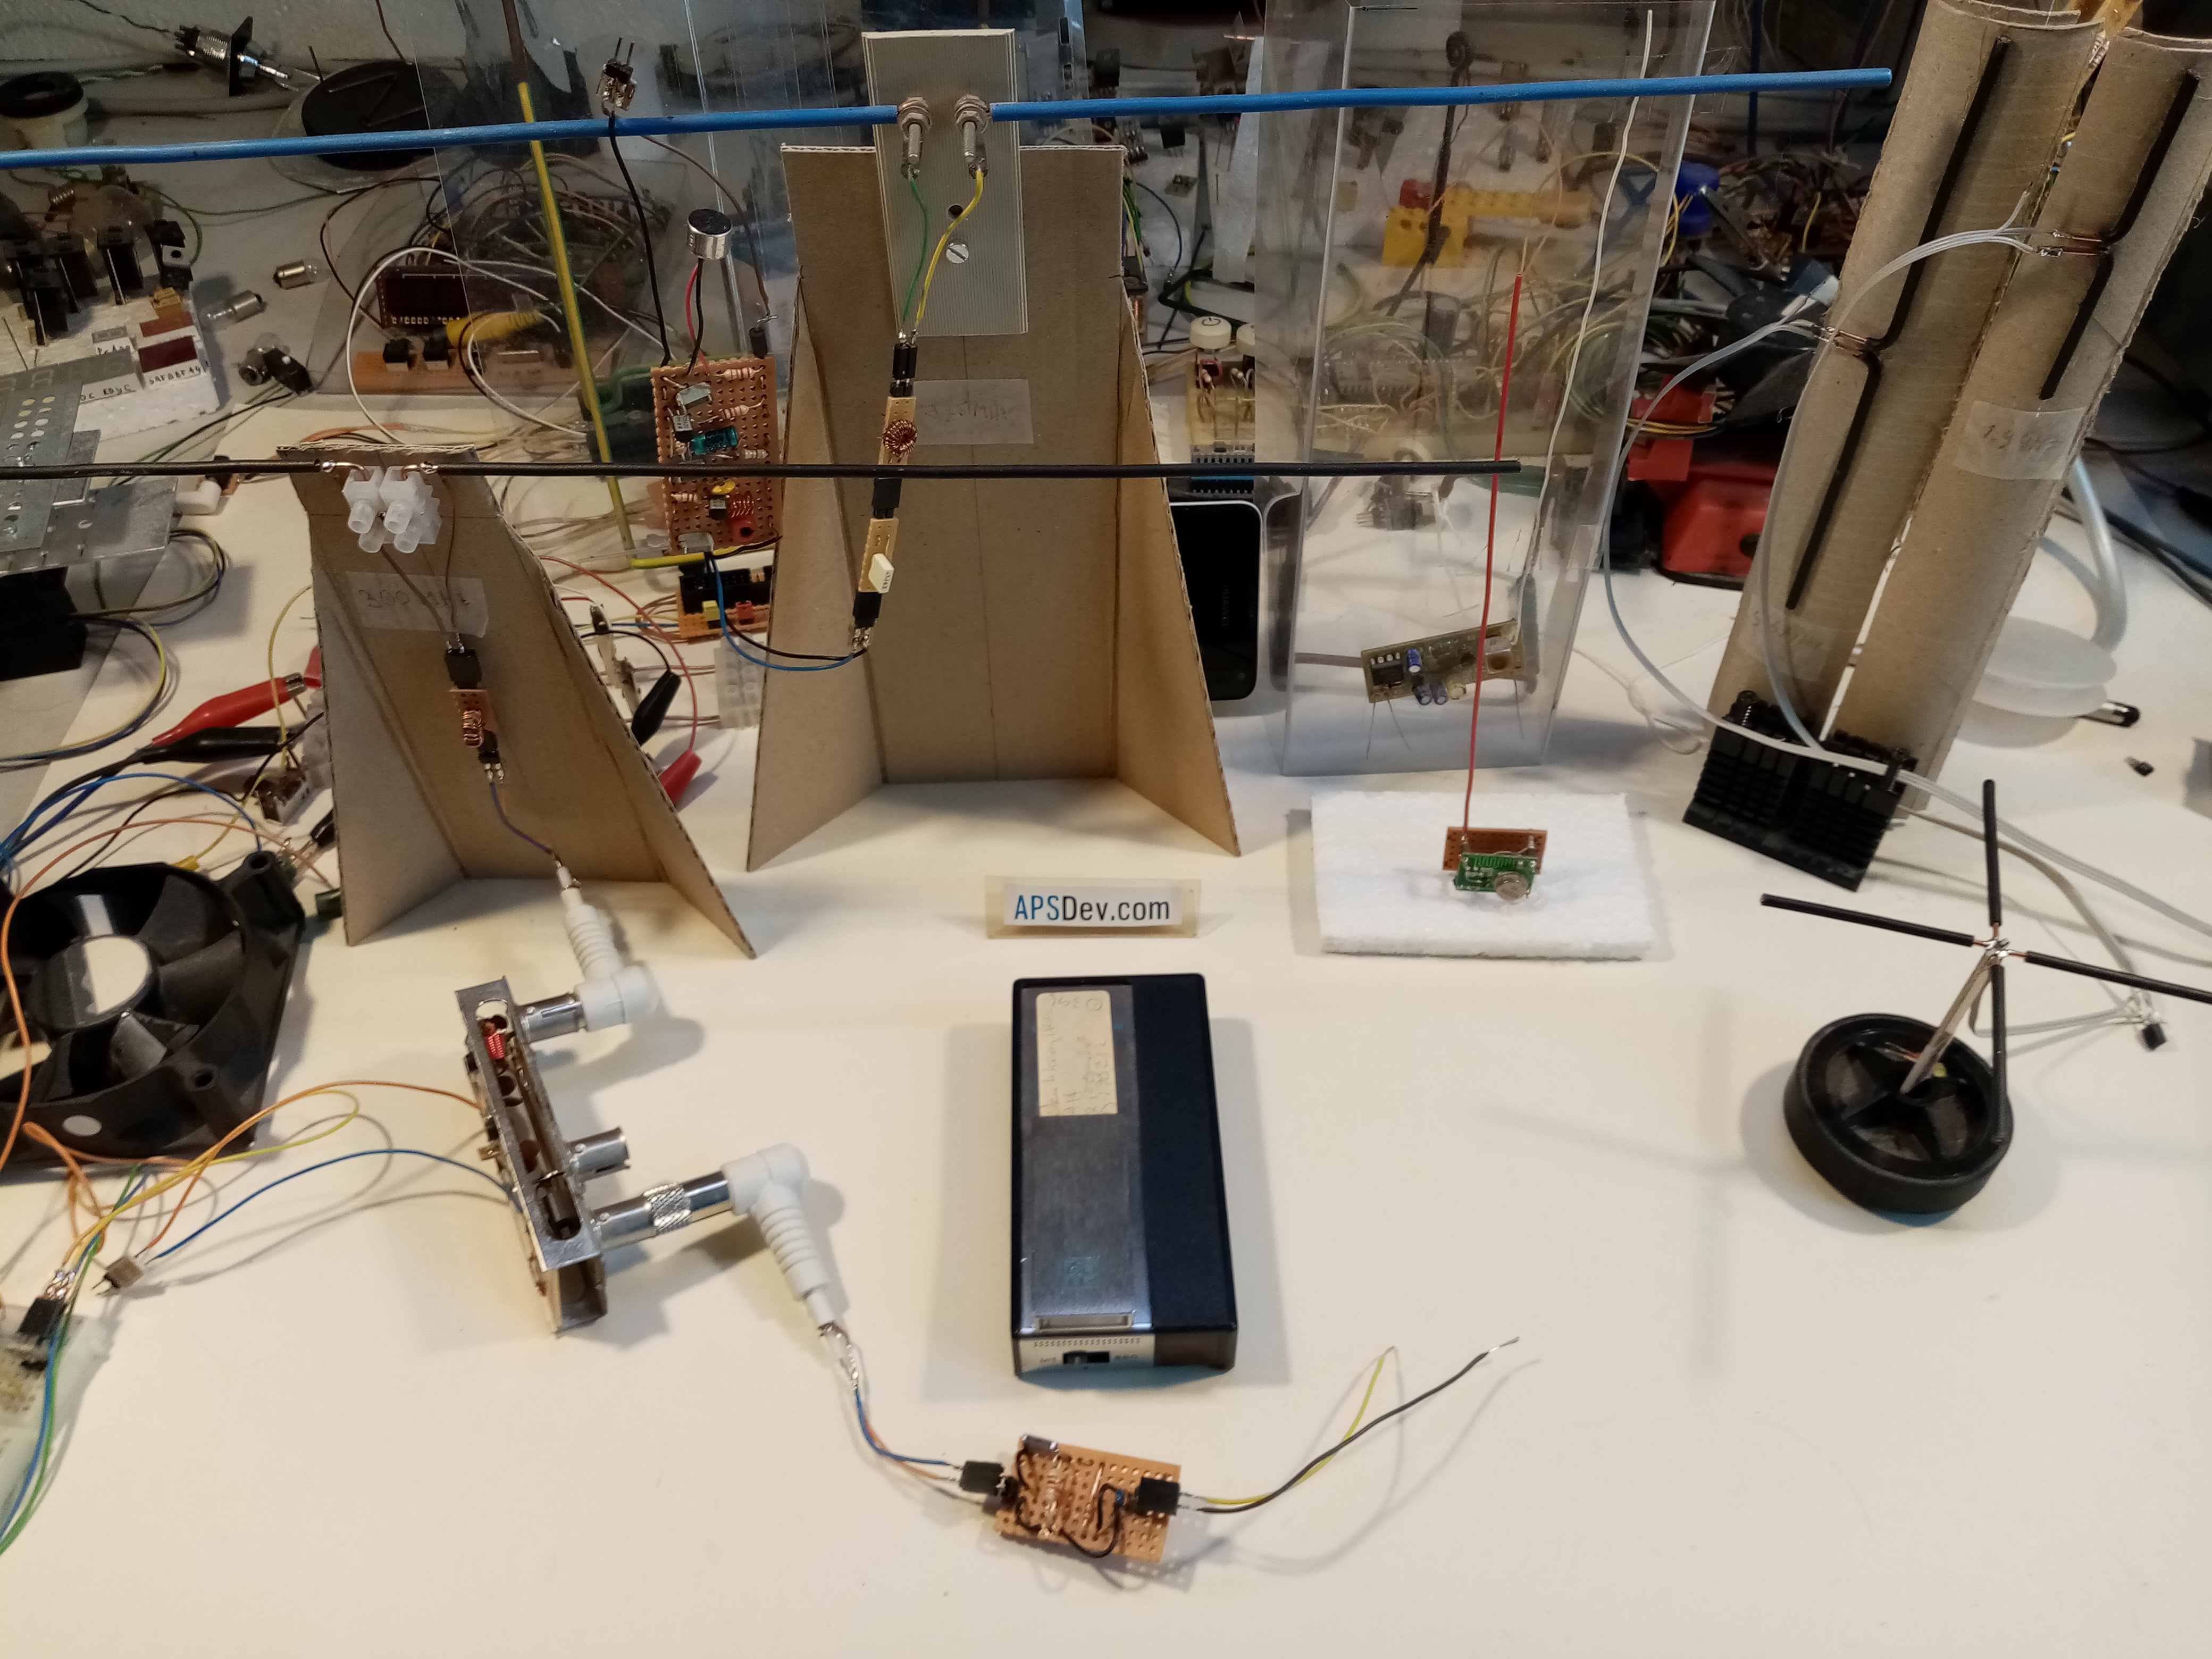
PIR. |
 |
 |
 |
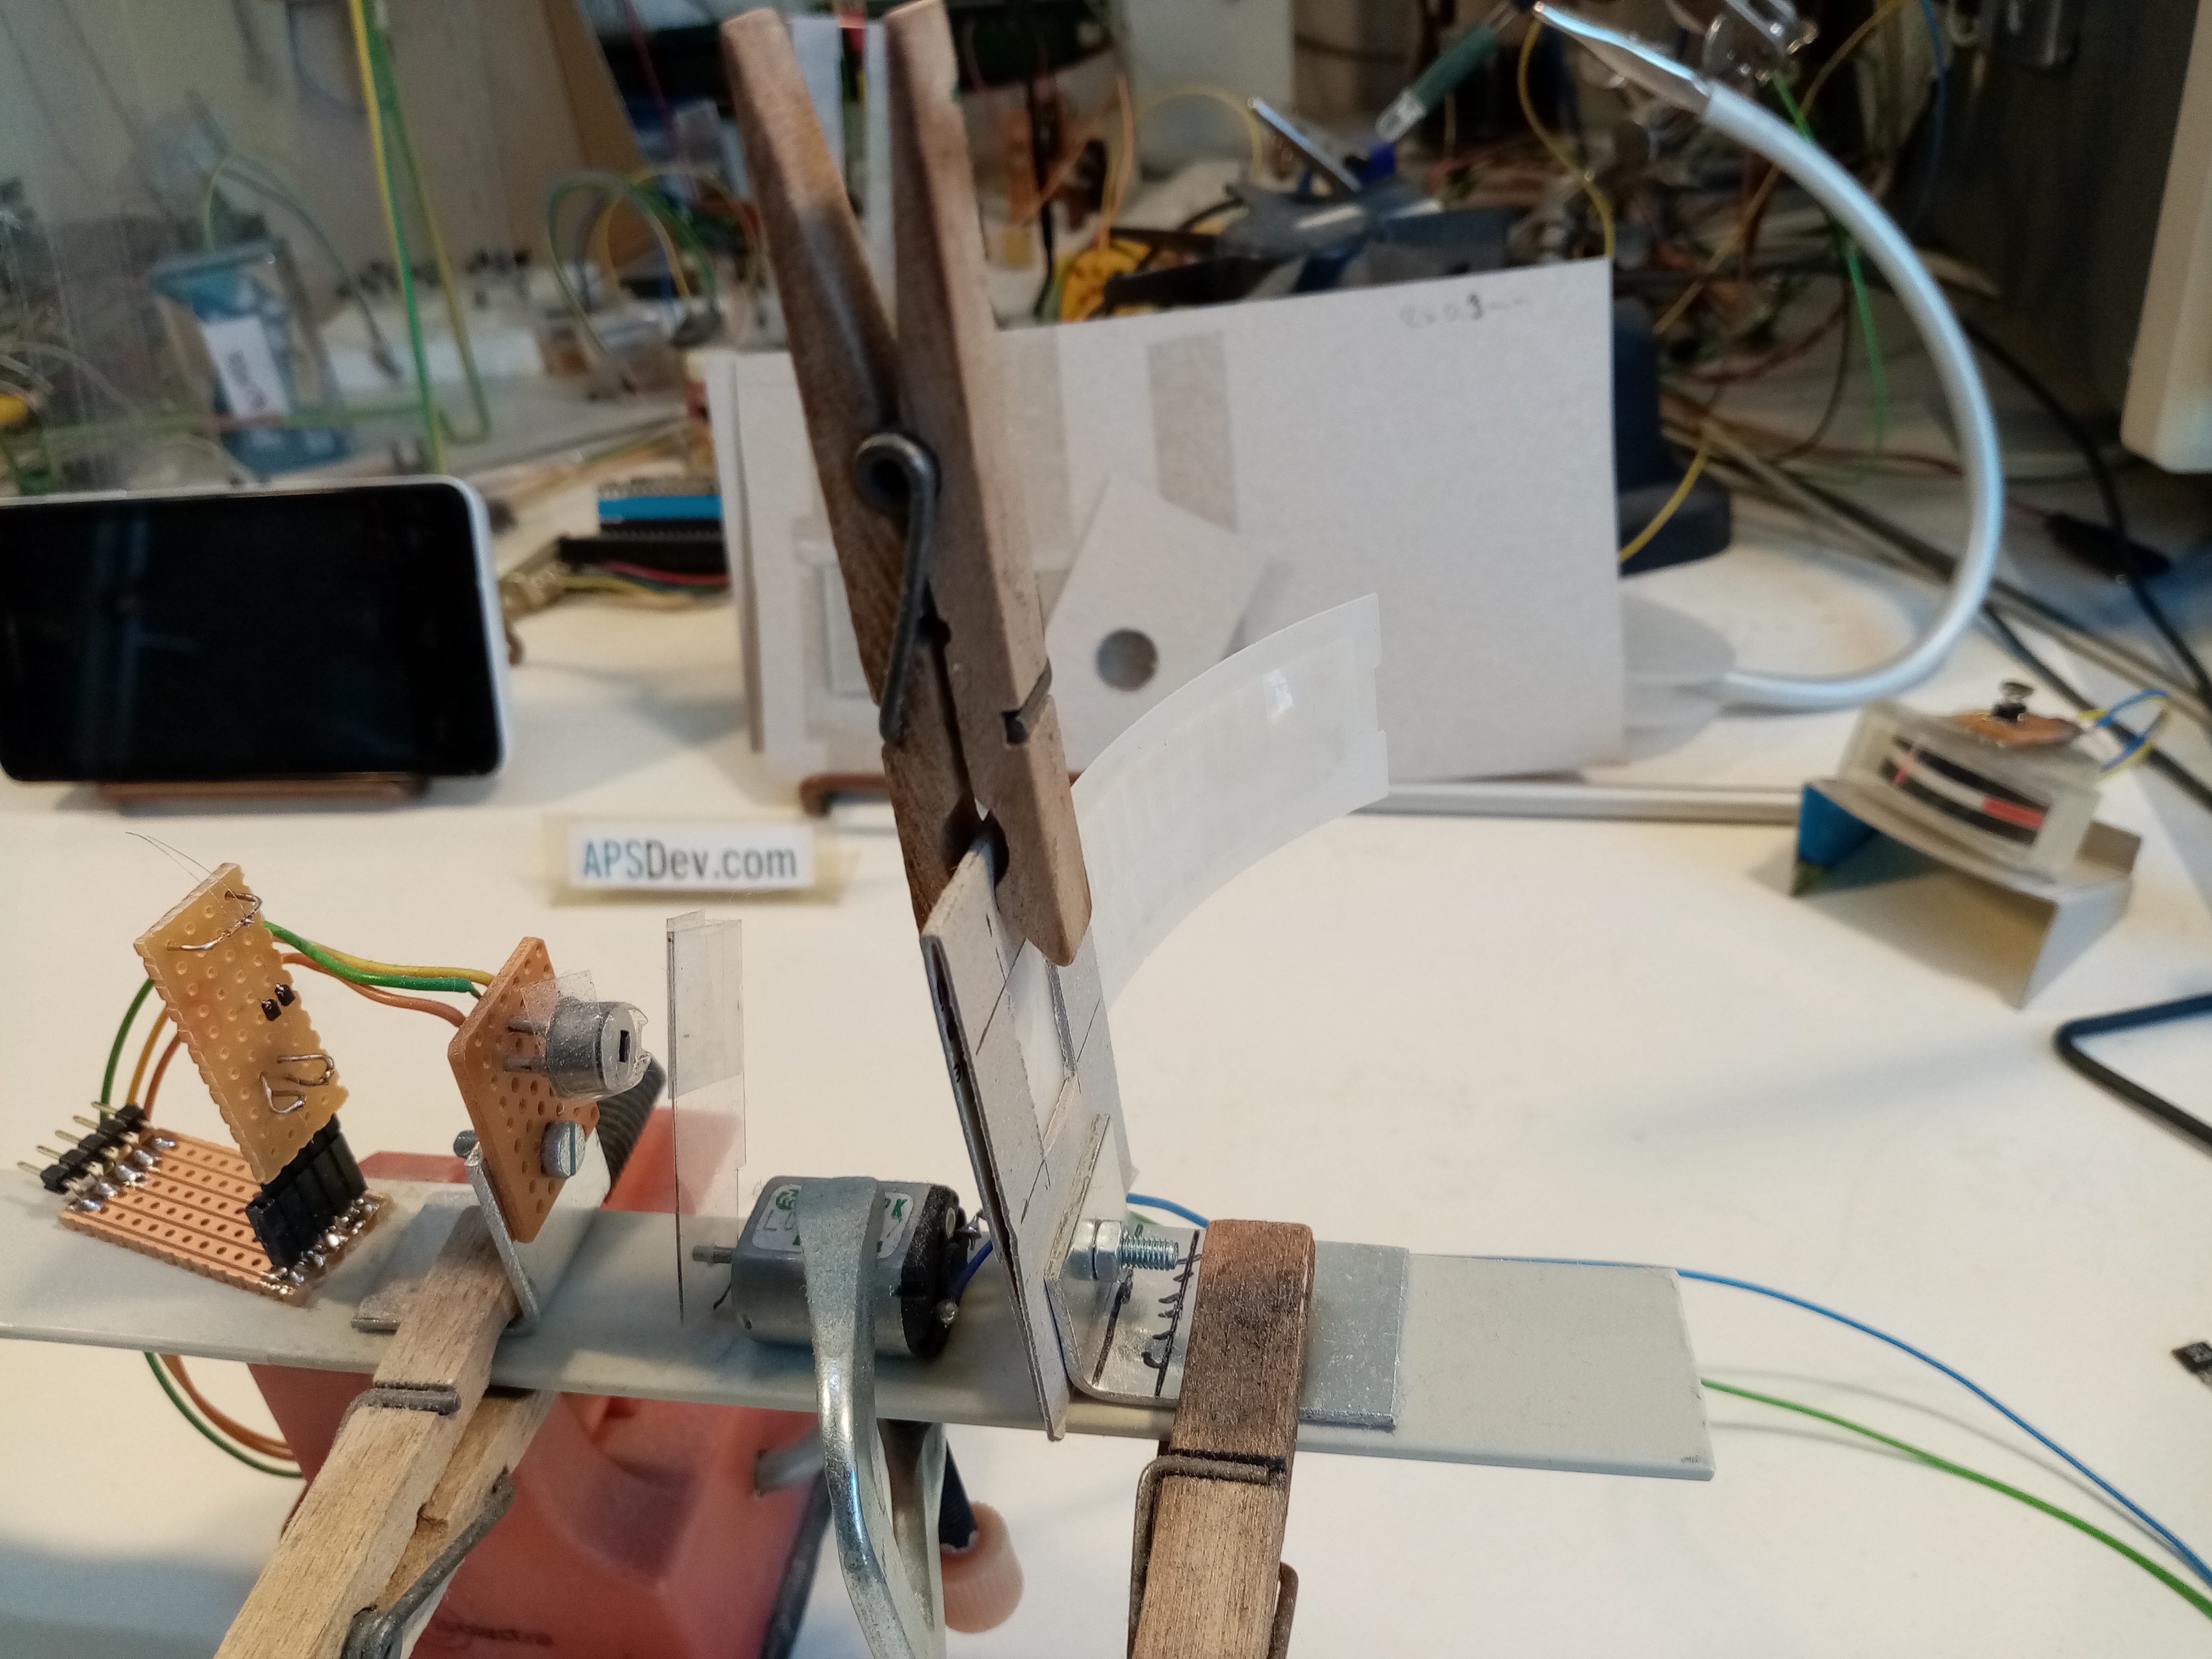
These days you can get cheapish infrared cameras with a reasonable resolution with FLIP lepton sensors.
Long ago i wondered if i could just take the sensor and lens of a motion detector and mount that on some servos.
But that has some problems as the sensor is a piezo and only measures changes in temperature.
Hence the shutter in the test setup.
|
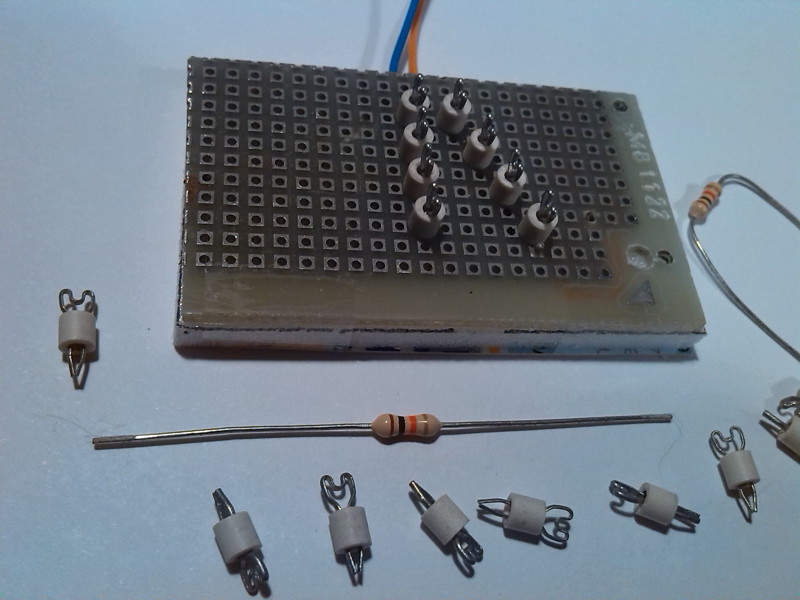
PIR Bolo meter. |
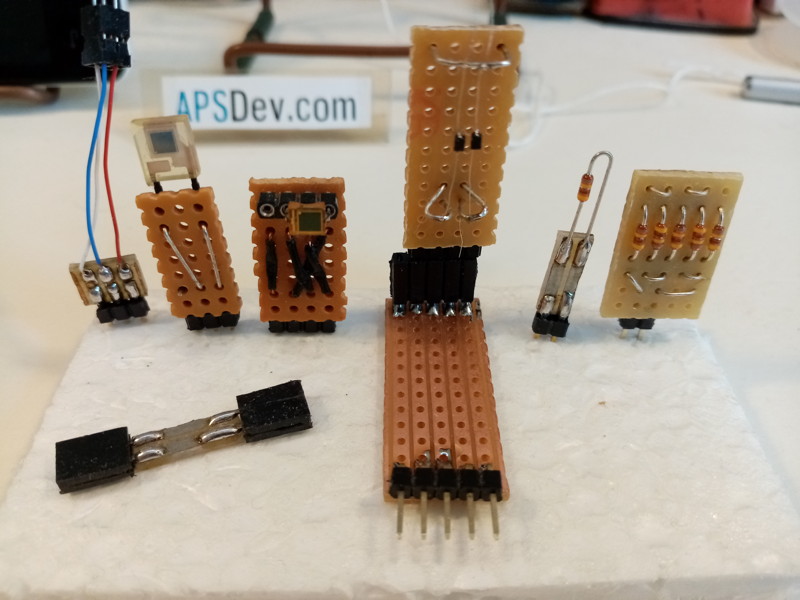 |
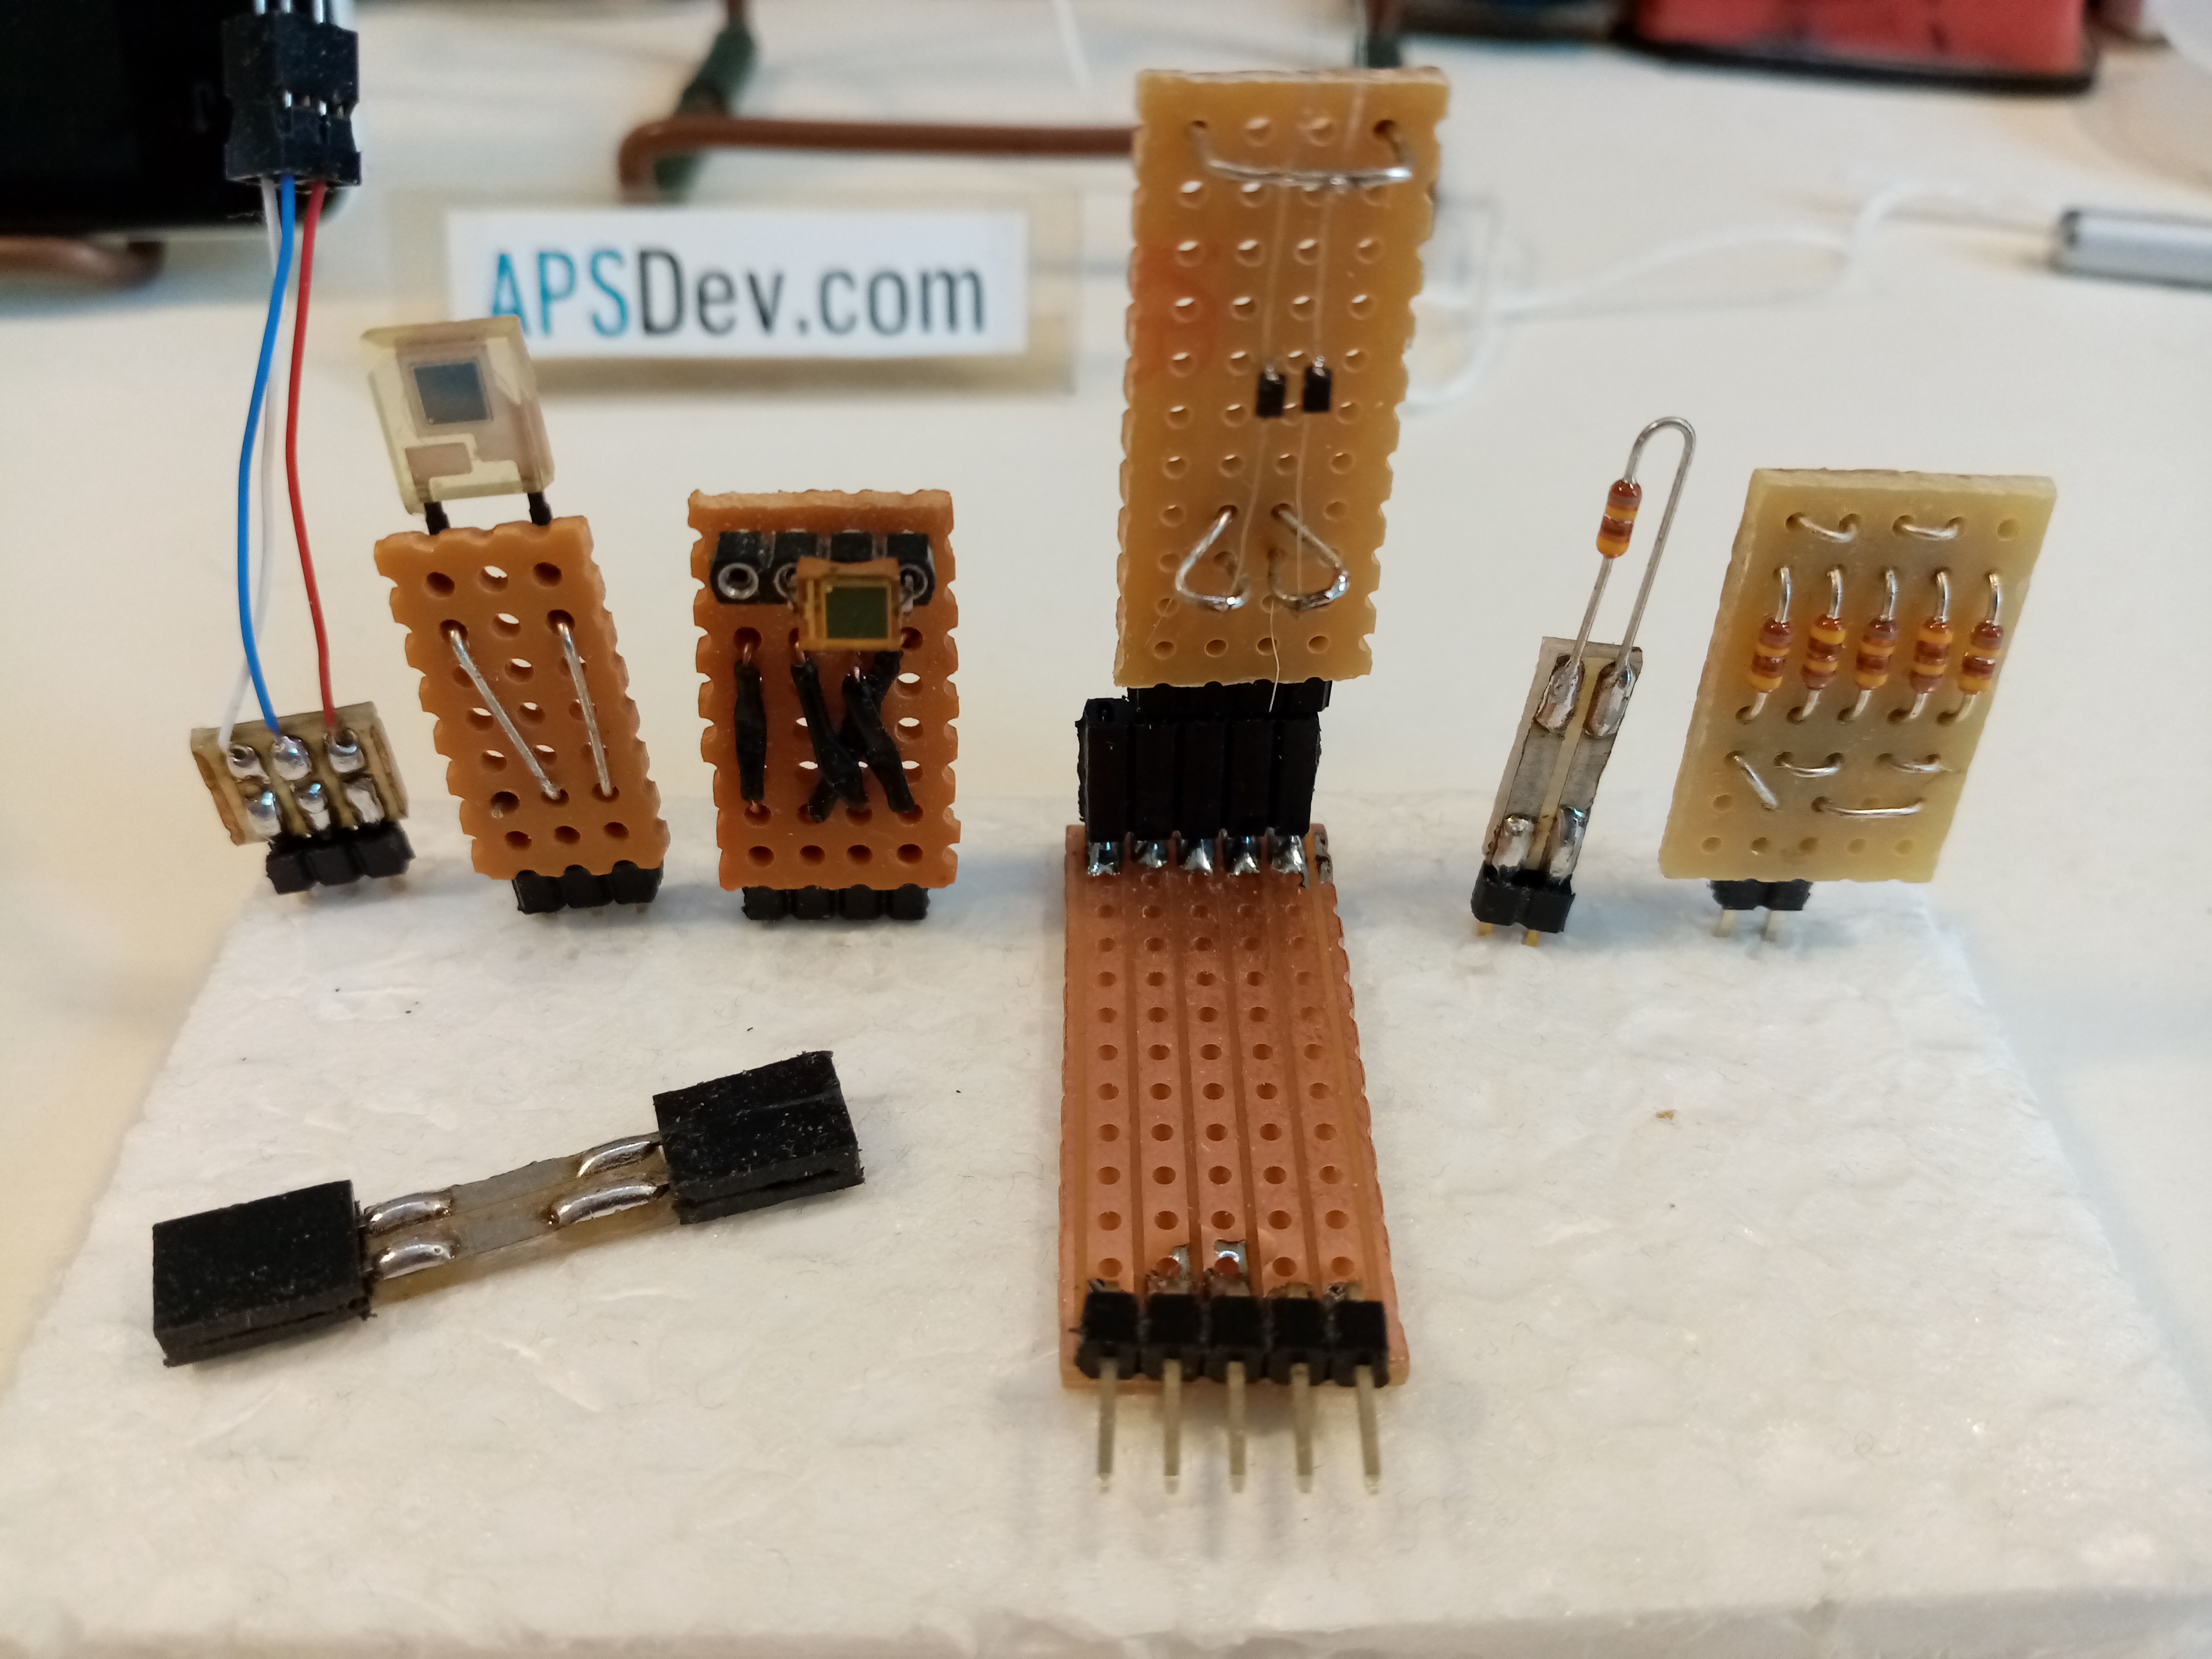
To measure long wave infrared of heat you need special sensors, special materials and lenses.
As regular photodiodes and glass lenses dont work you need exotic semiconductors and silicon, germanium or plastic lenses.
However there is another way, instead of measuring the radiation you use temperature sensor which are suspended on very
thin wires above a surface. Which is basically what makes cheap FLIR lepton sensors possible.
Disadvantage is that they are a bit slower, i tried to make a double bolometer by soldering 2 SMD diodes to
very thin wires .. which is what you can see on the long circuit board. The others are there for size comparison.
|
PIR bolo meter. |
 |
 |
 |
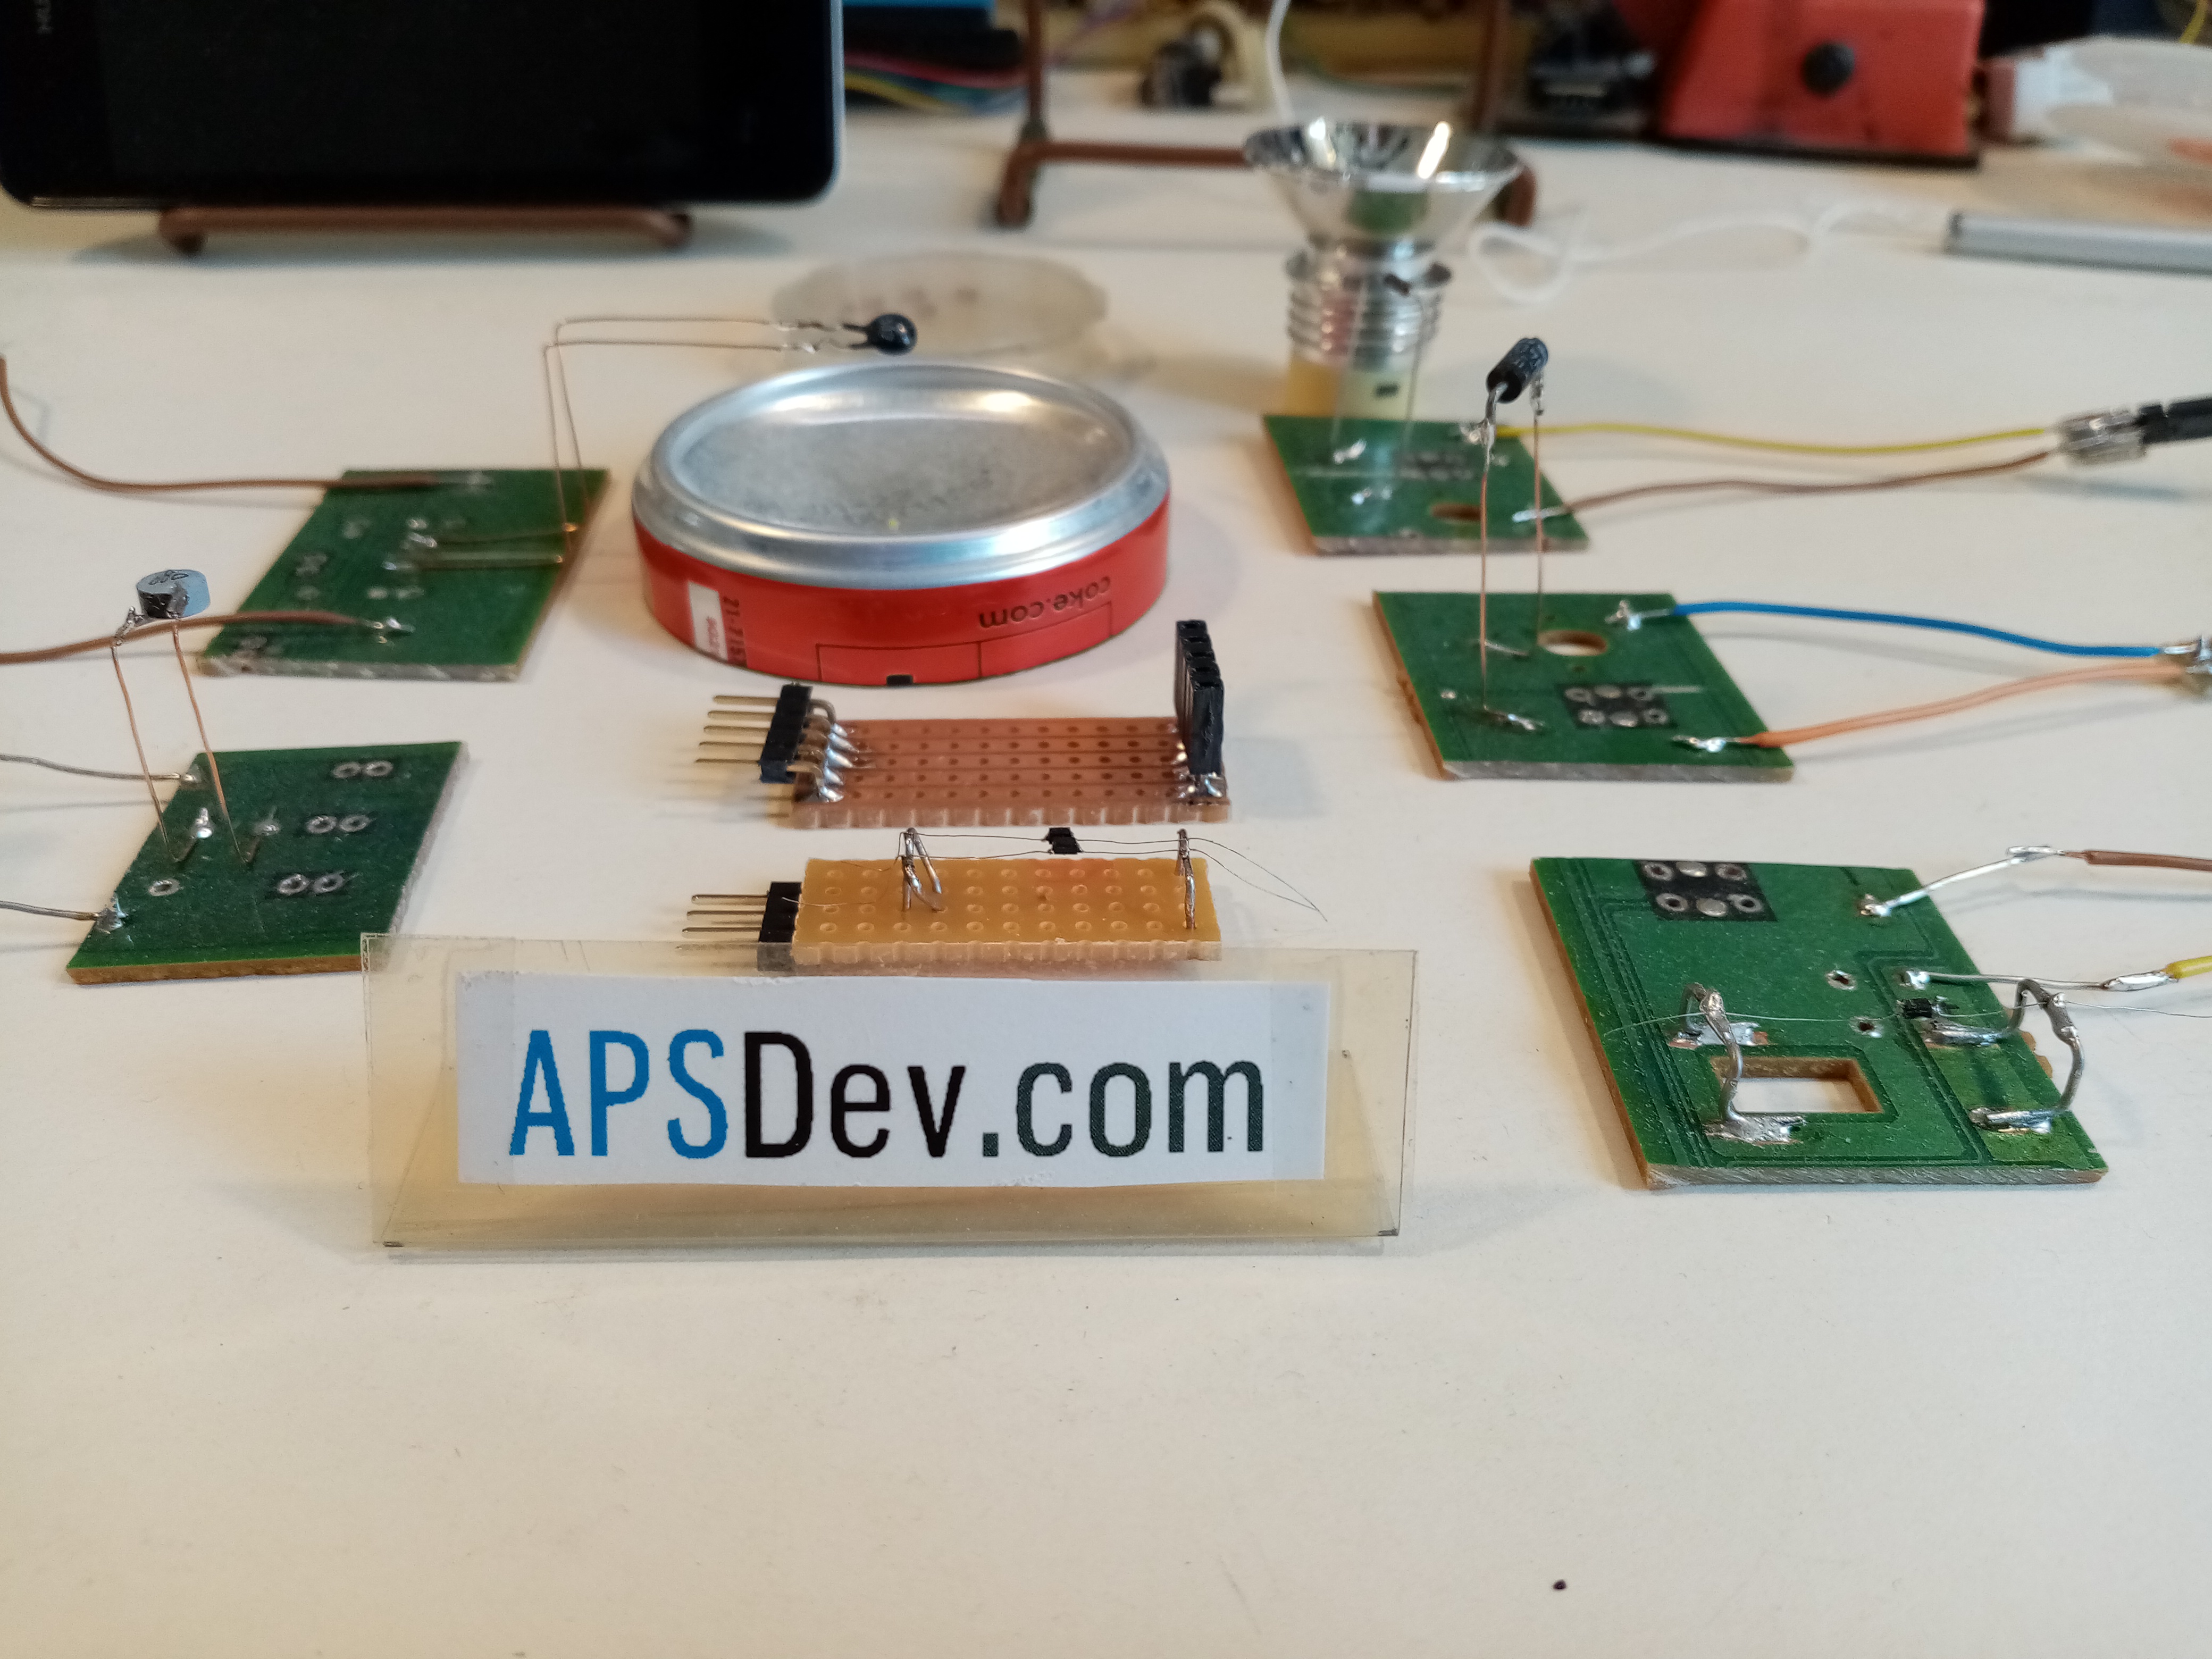
Here are some other experiments with bolometers, some with diodes some with NTC resistors.
The NTC resistors seem to be a bit more sensitive.
I used bottoms of soda cans as mirrors are glass lenses won't work.
|
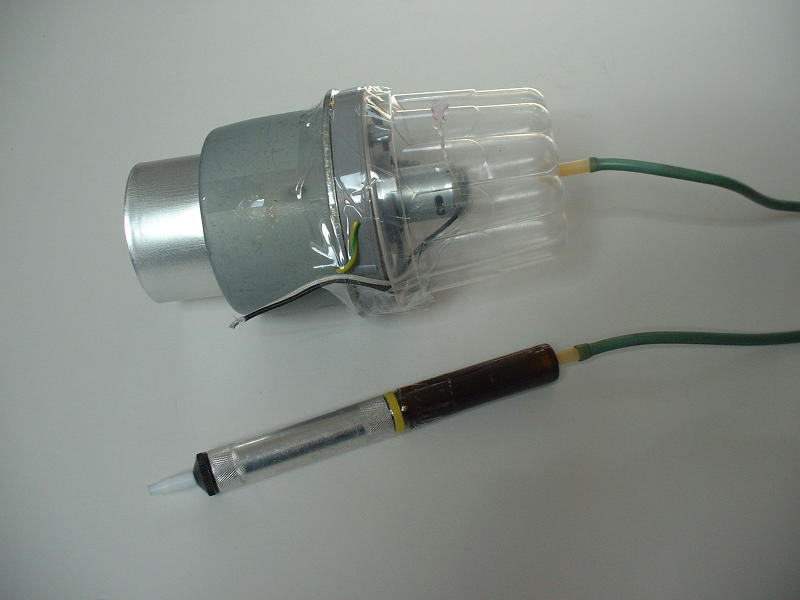
Fluxprobe/HAL sensor. |
 |
These where the results of trying to measure magnetic fields with the oscilloscope.
With ferrite cores you can only measure AC currents, with HAL sensors which you can find in
brushless motors in optical drives you can measure DC currents and fields of magnets. But
useally they are SMD and tricky to solder to PCBs. However in an old 5.25" floppy drive i found
some HAL sensors that have 4 long pins on one side. So you can make a probe where the tip does
the measuring.
|
Video Rig. |
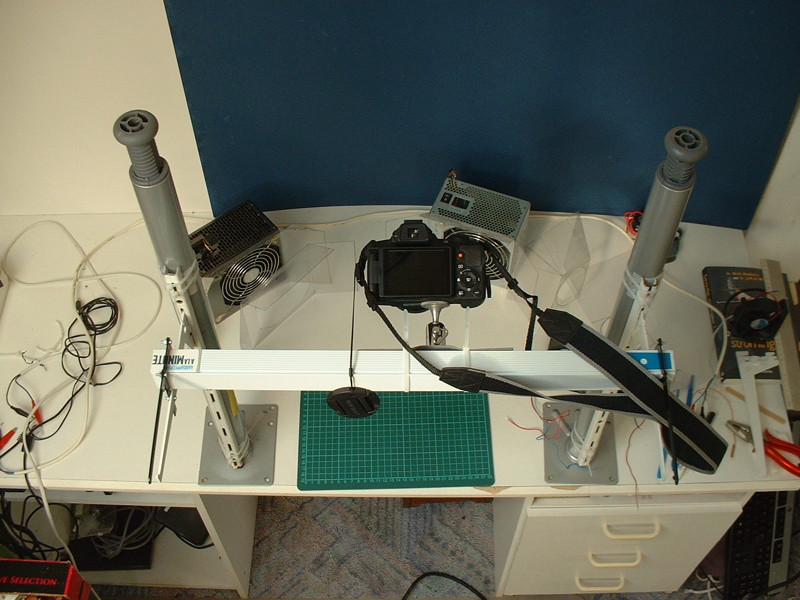 |
 |
 |
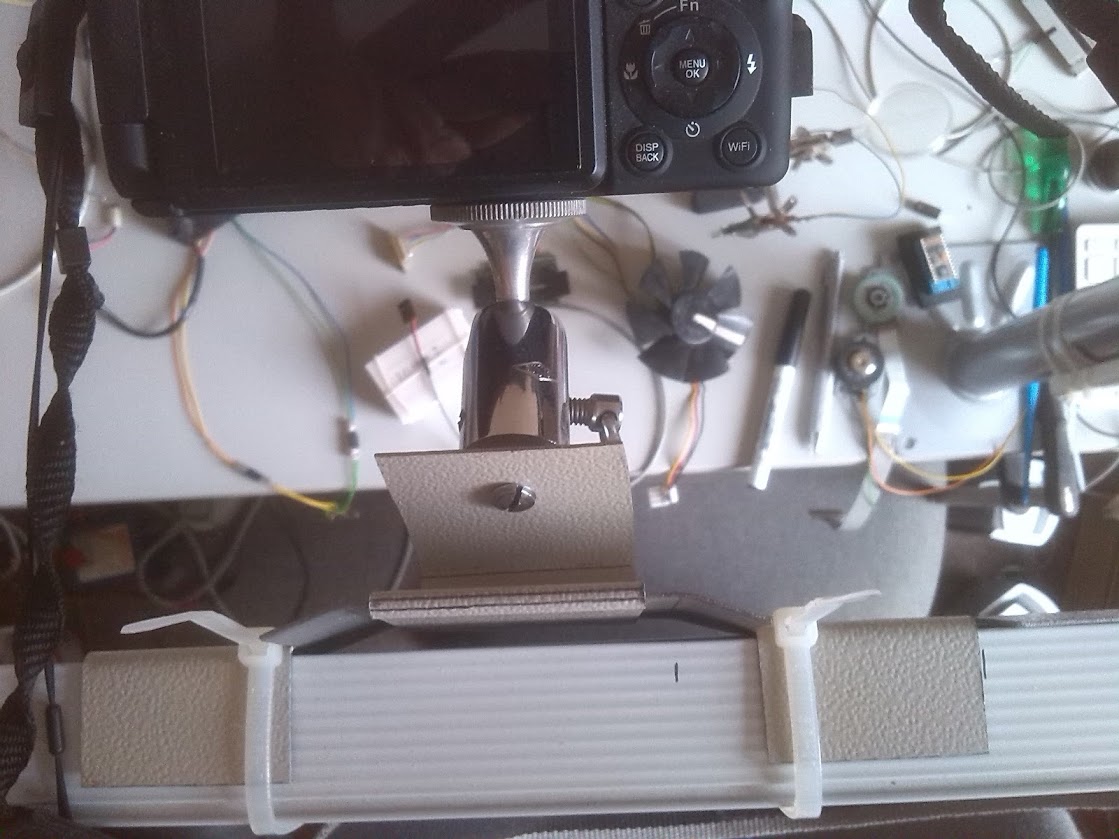
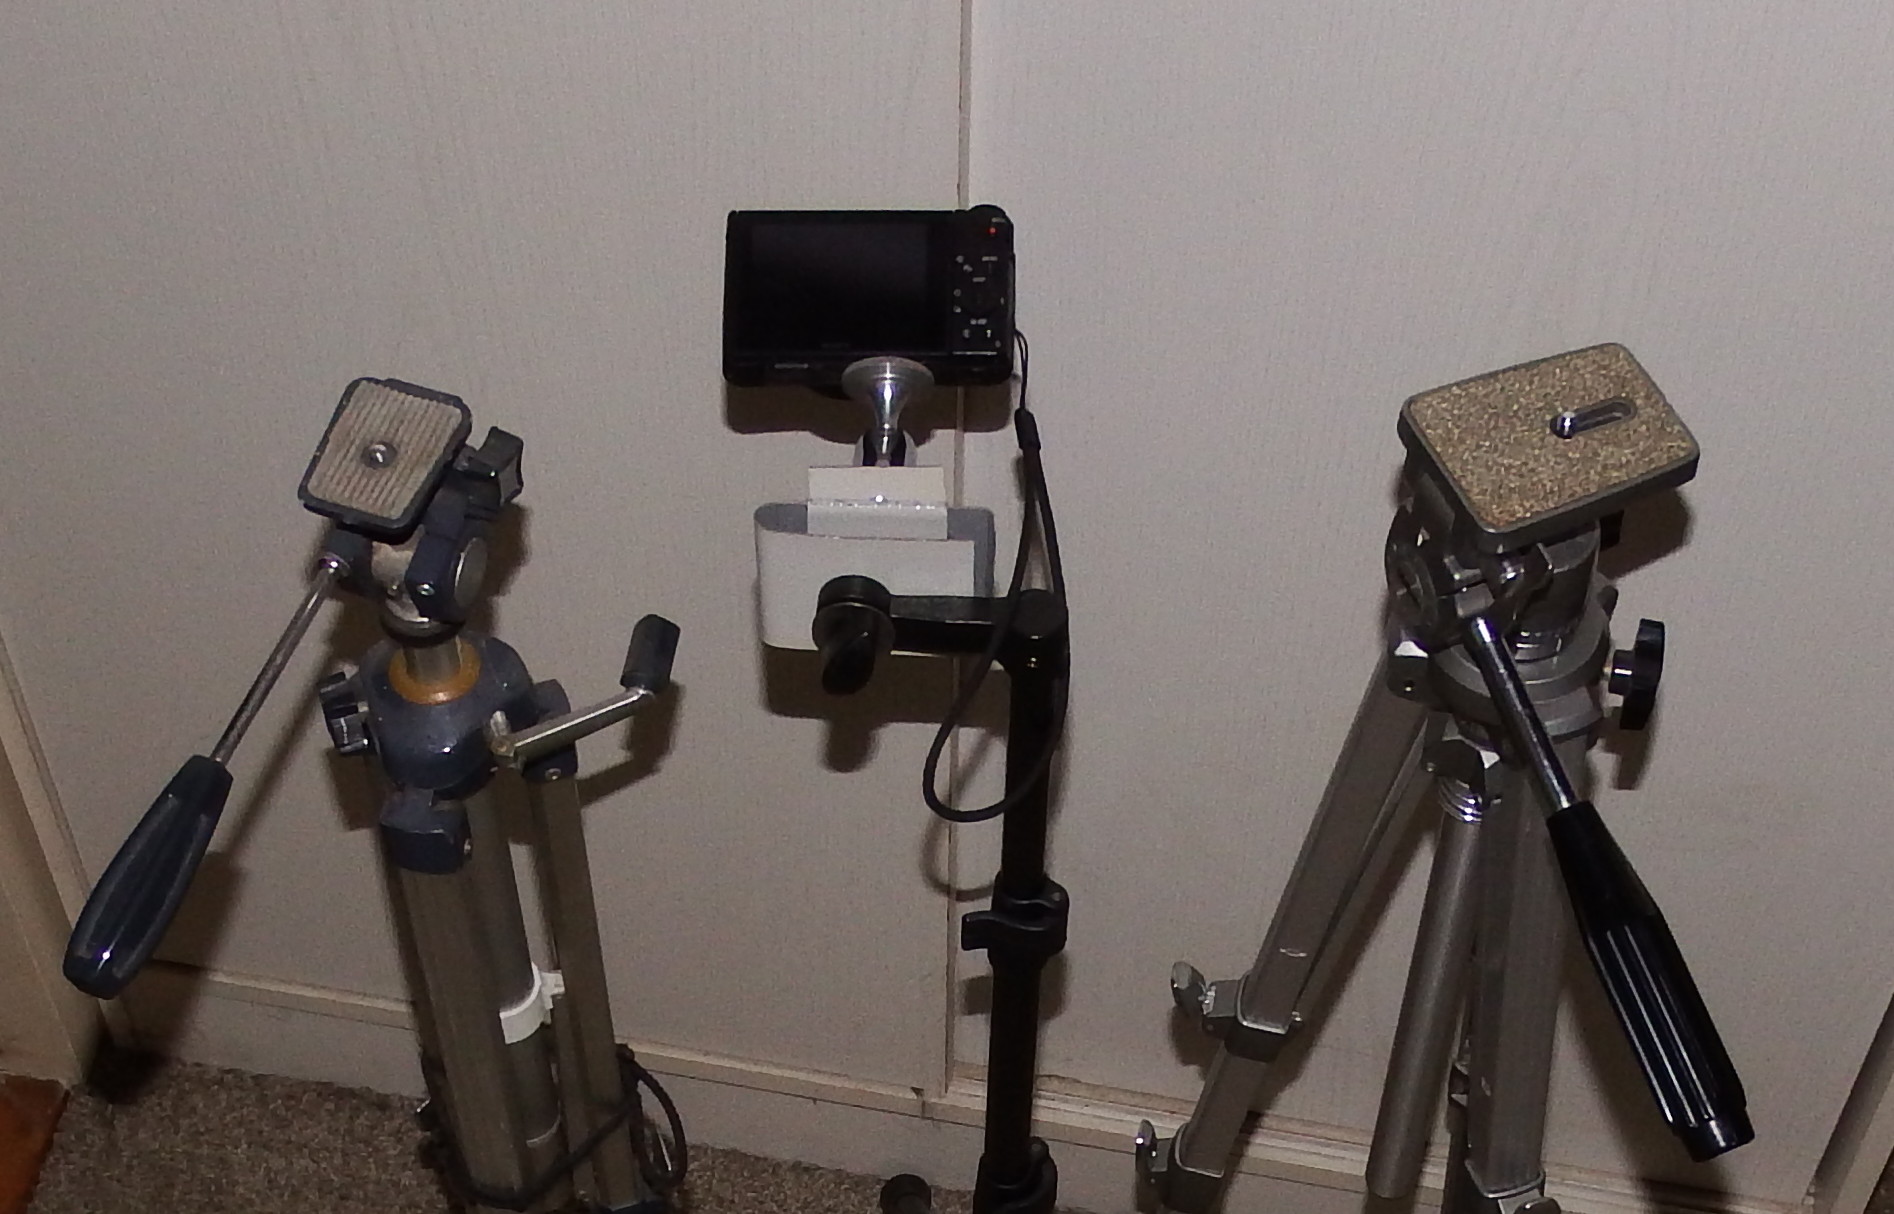
I was trying to record video on a desk, but if you use a tripod then it is always in the way.
So i build this rig, it is basically a couple of table legs with a big base. Some plank holders and
a big aluminium profile with the head of a small tripod mounted on it.
You can use a big reflective windshield protector to light your desk with a high power lamp.
|
 |
Camera quick release mechanism .. makes it easy to take the camera to a PC to charge
and copy footage. And then put it back in the same angle without unscrewing.
|
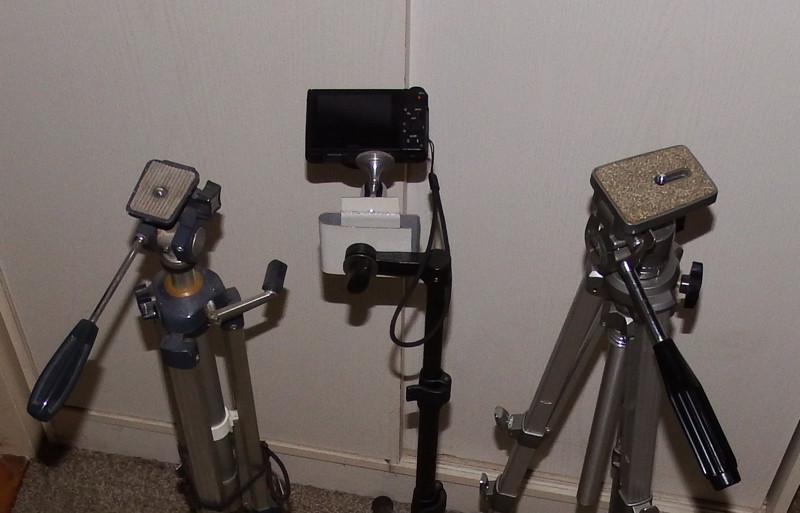 |
Traditional tripods are tricky to use if you want to film something on a table as the
handles are in the way and they are bulky. So i converted this sheet music holder into a tripod
with quick release. So its easy to take the camera of to charge it or to copy the footage onto a PC
and then put it back in the same angle on the tripod. It was a cheap sheet music holder of which the
top part was too weak, but the bottom part is sturdy and take very little space.
|
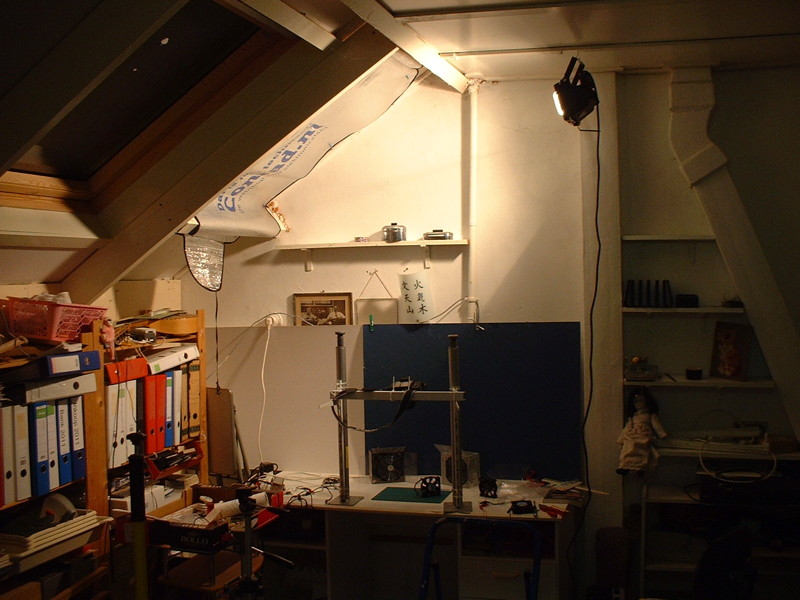
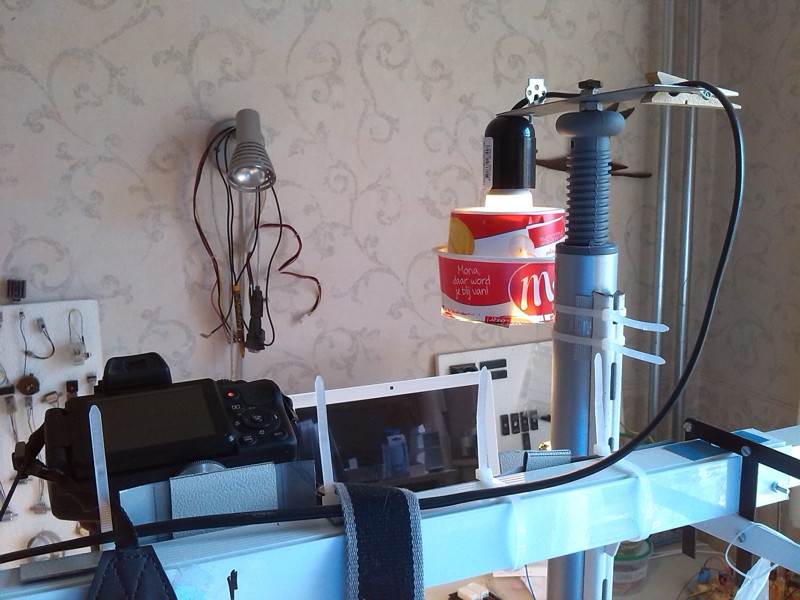 |
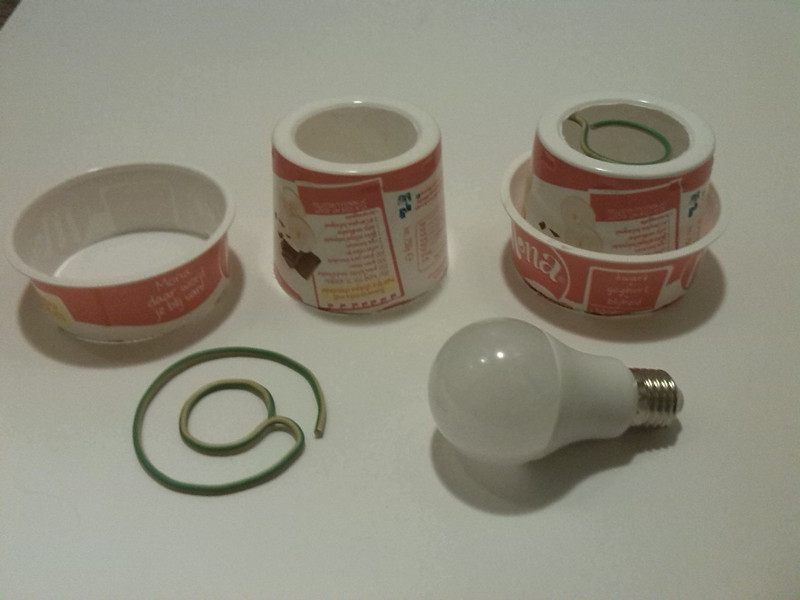 |
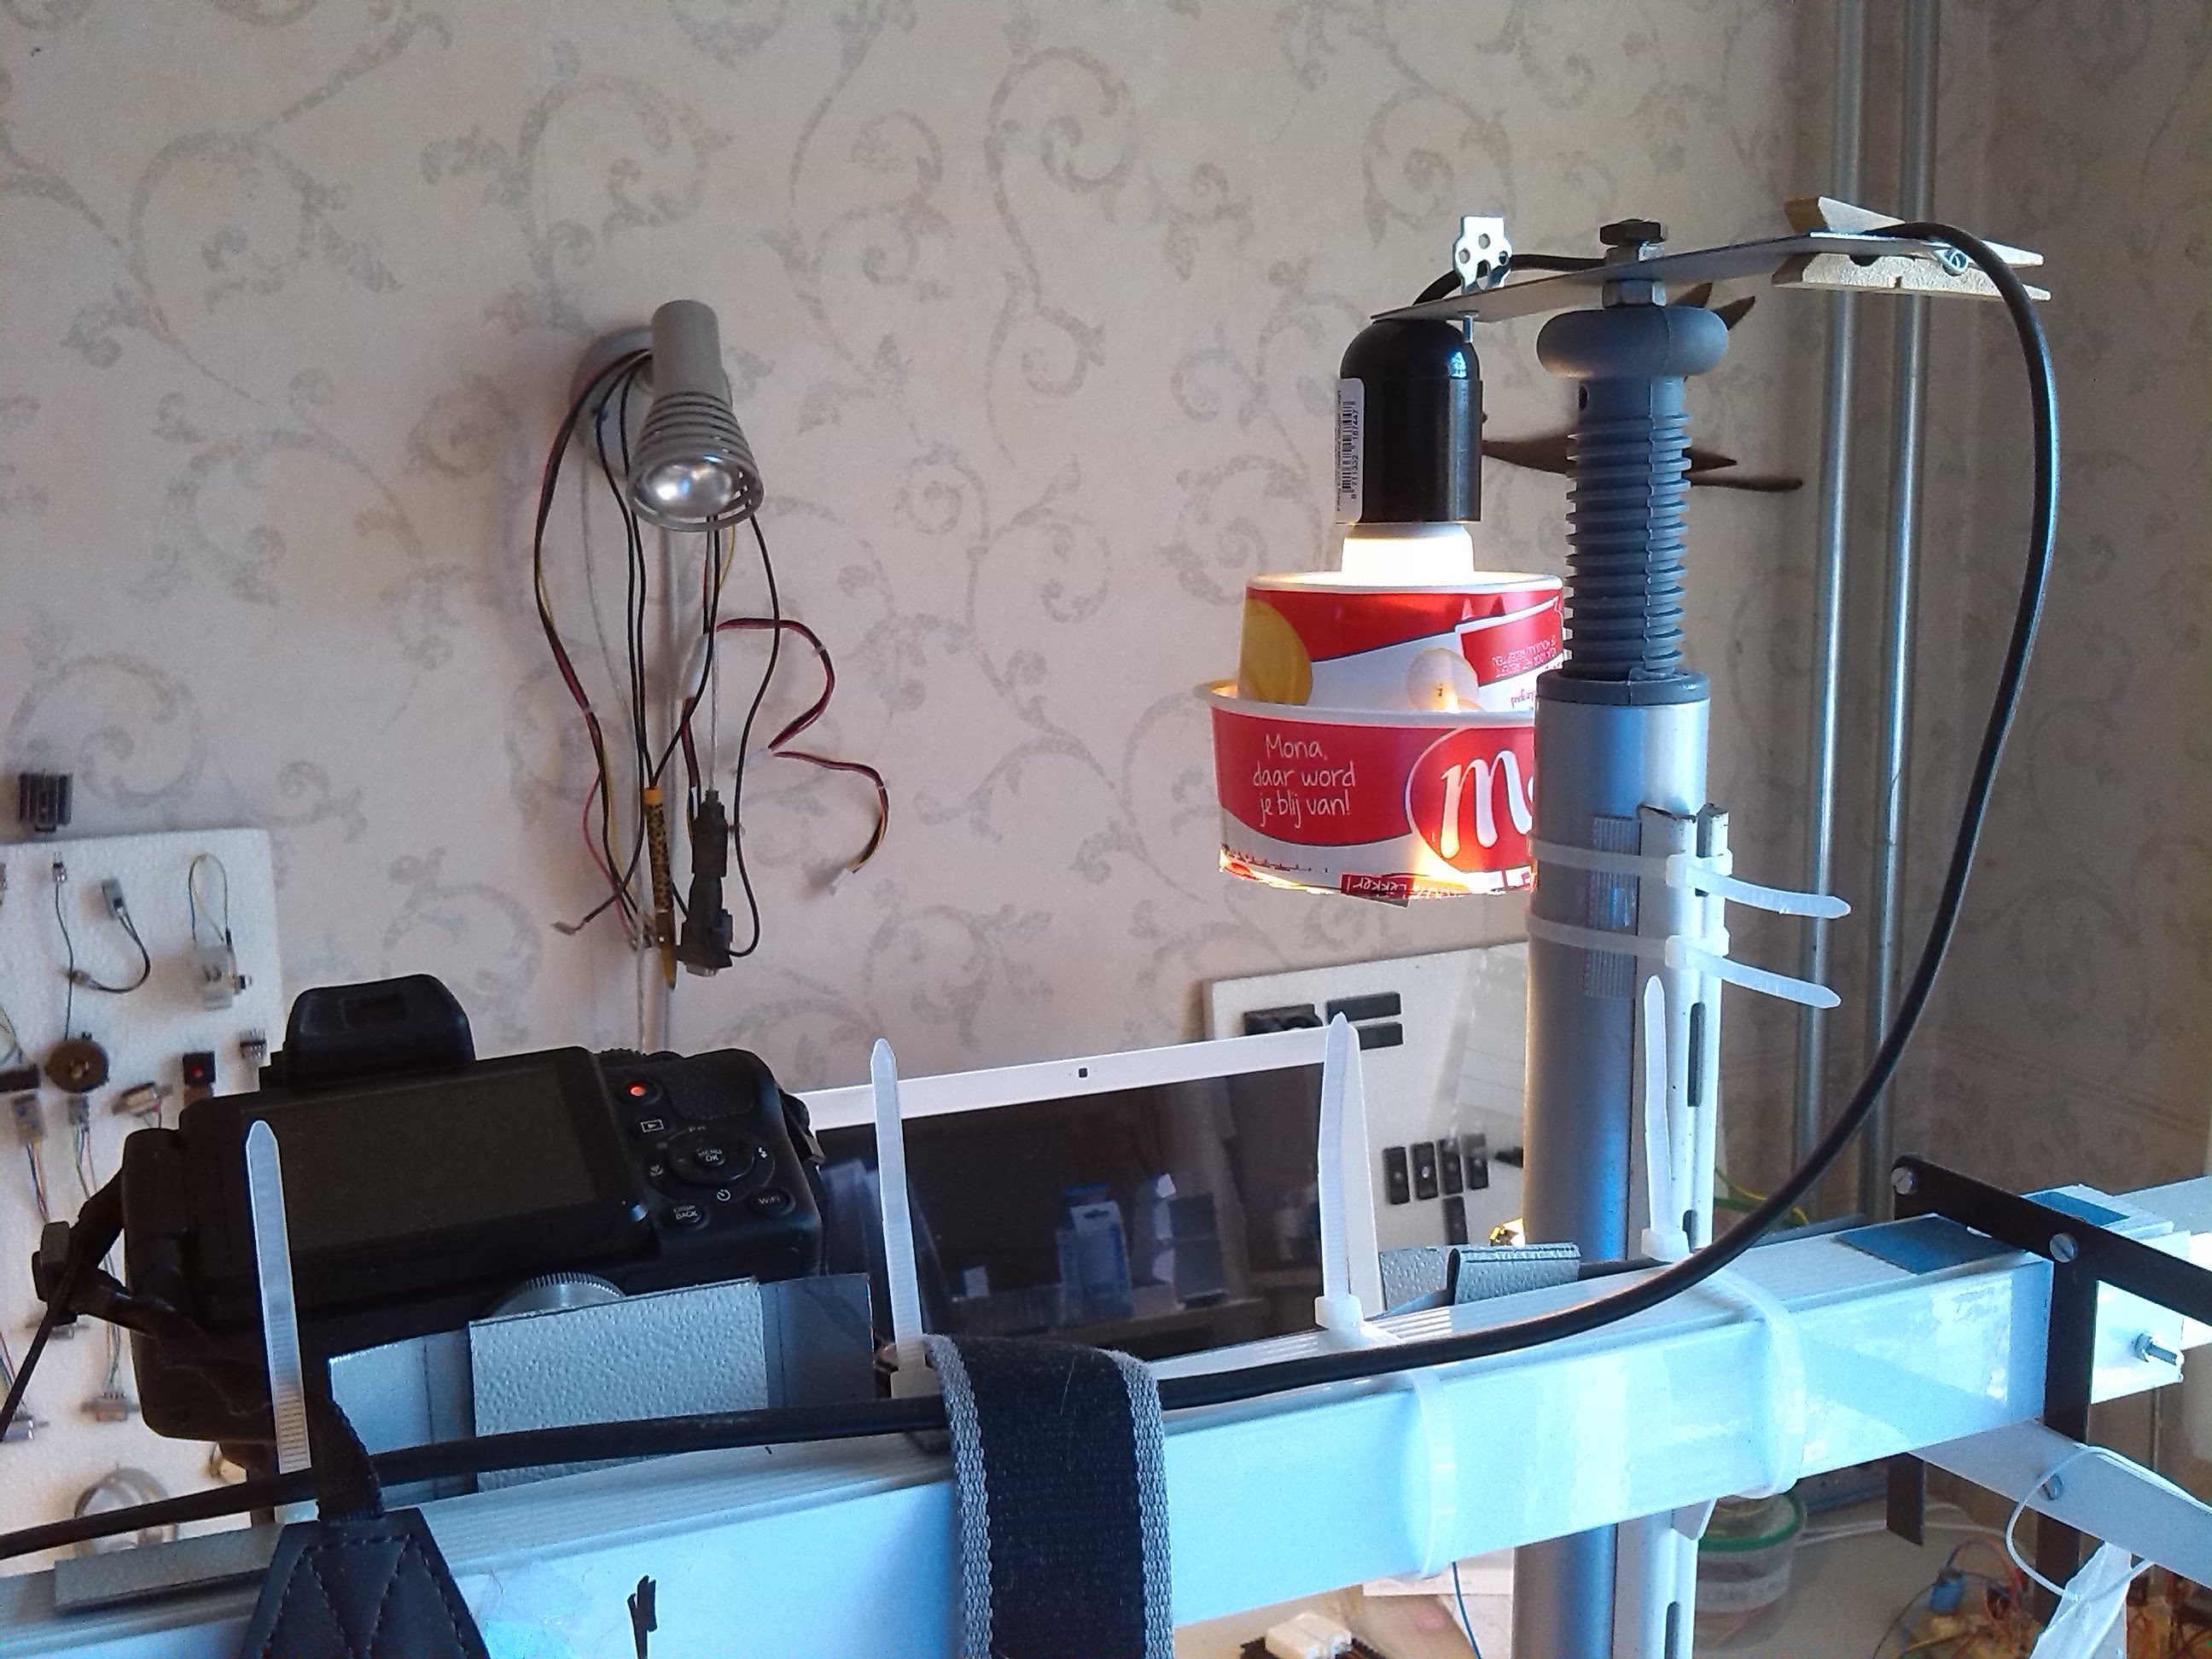
I added a couple of 9 Watt high efficiency (A+) very white LED lamps, i made the shades by
cutting up some desert cups and lining them with aluminized mashed potato powder bags. I used some installation wire
to suspend them from the light bulbs.
|
Lego dolly |
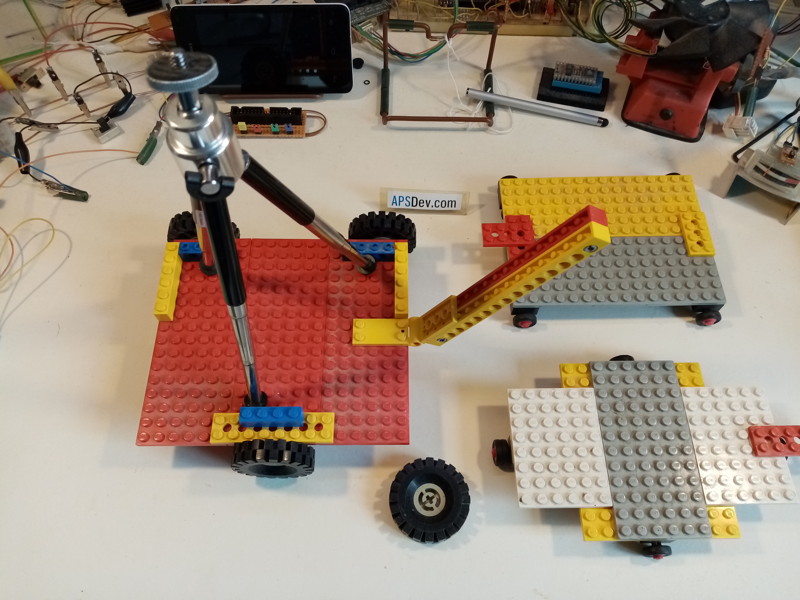 |
To make action shots on the desk i made these little dolly's a can put a tiny tripod on.
I made it with 3 wheels as it was a little more stable, and couldnt find the fourth wheel at first.
|
Phone holder |
 |
When filming on my desk i cant watch on the camera, but i can use a smartphone connected over
wifi to camera as viewfinder and as remote. So i made these holders to put phones on to use as viewfinder
or as clock.
|
Wire things |
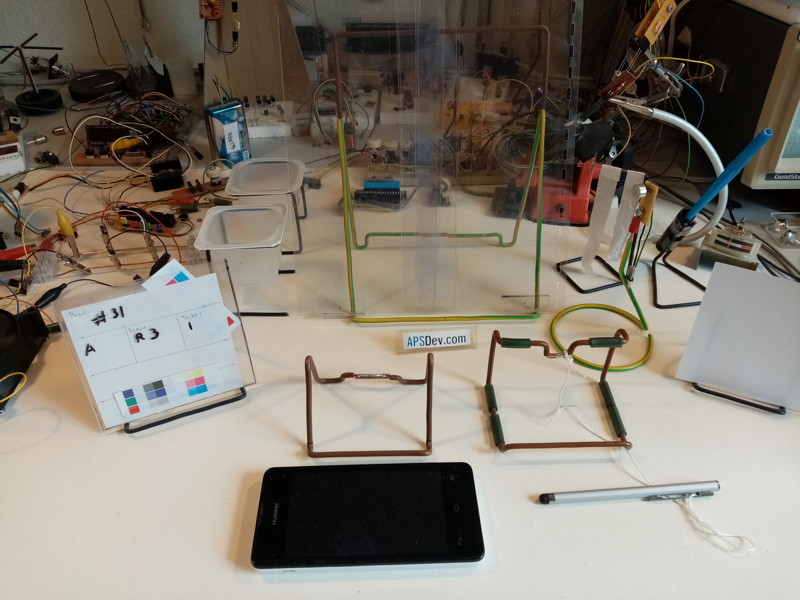 |
You can make a lot of usefull things with installation wire, not only phone holders but
copy holders. Microphone holders, wind detector, pen holder, holders for cups with ice and hot water for IR experiments.
(Video)
|
Comparing clocks |
 |
 |
In the X-files Mulder compared 2 wrist watches the left laying on a stretch of street,
what would happen if you compare to accurate clocks ?
(Video)
|
--
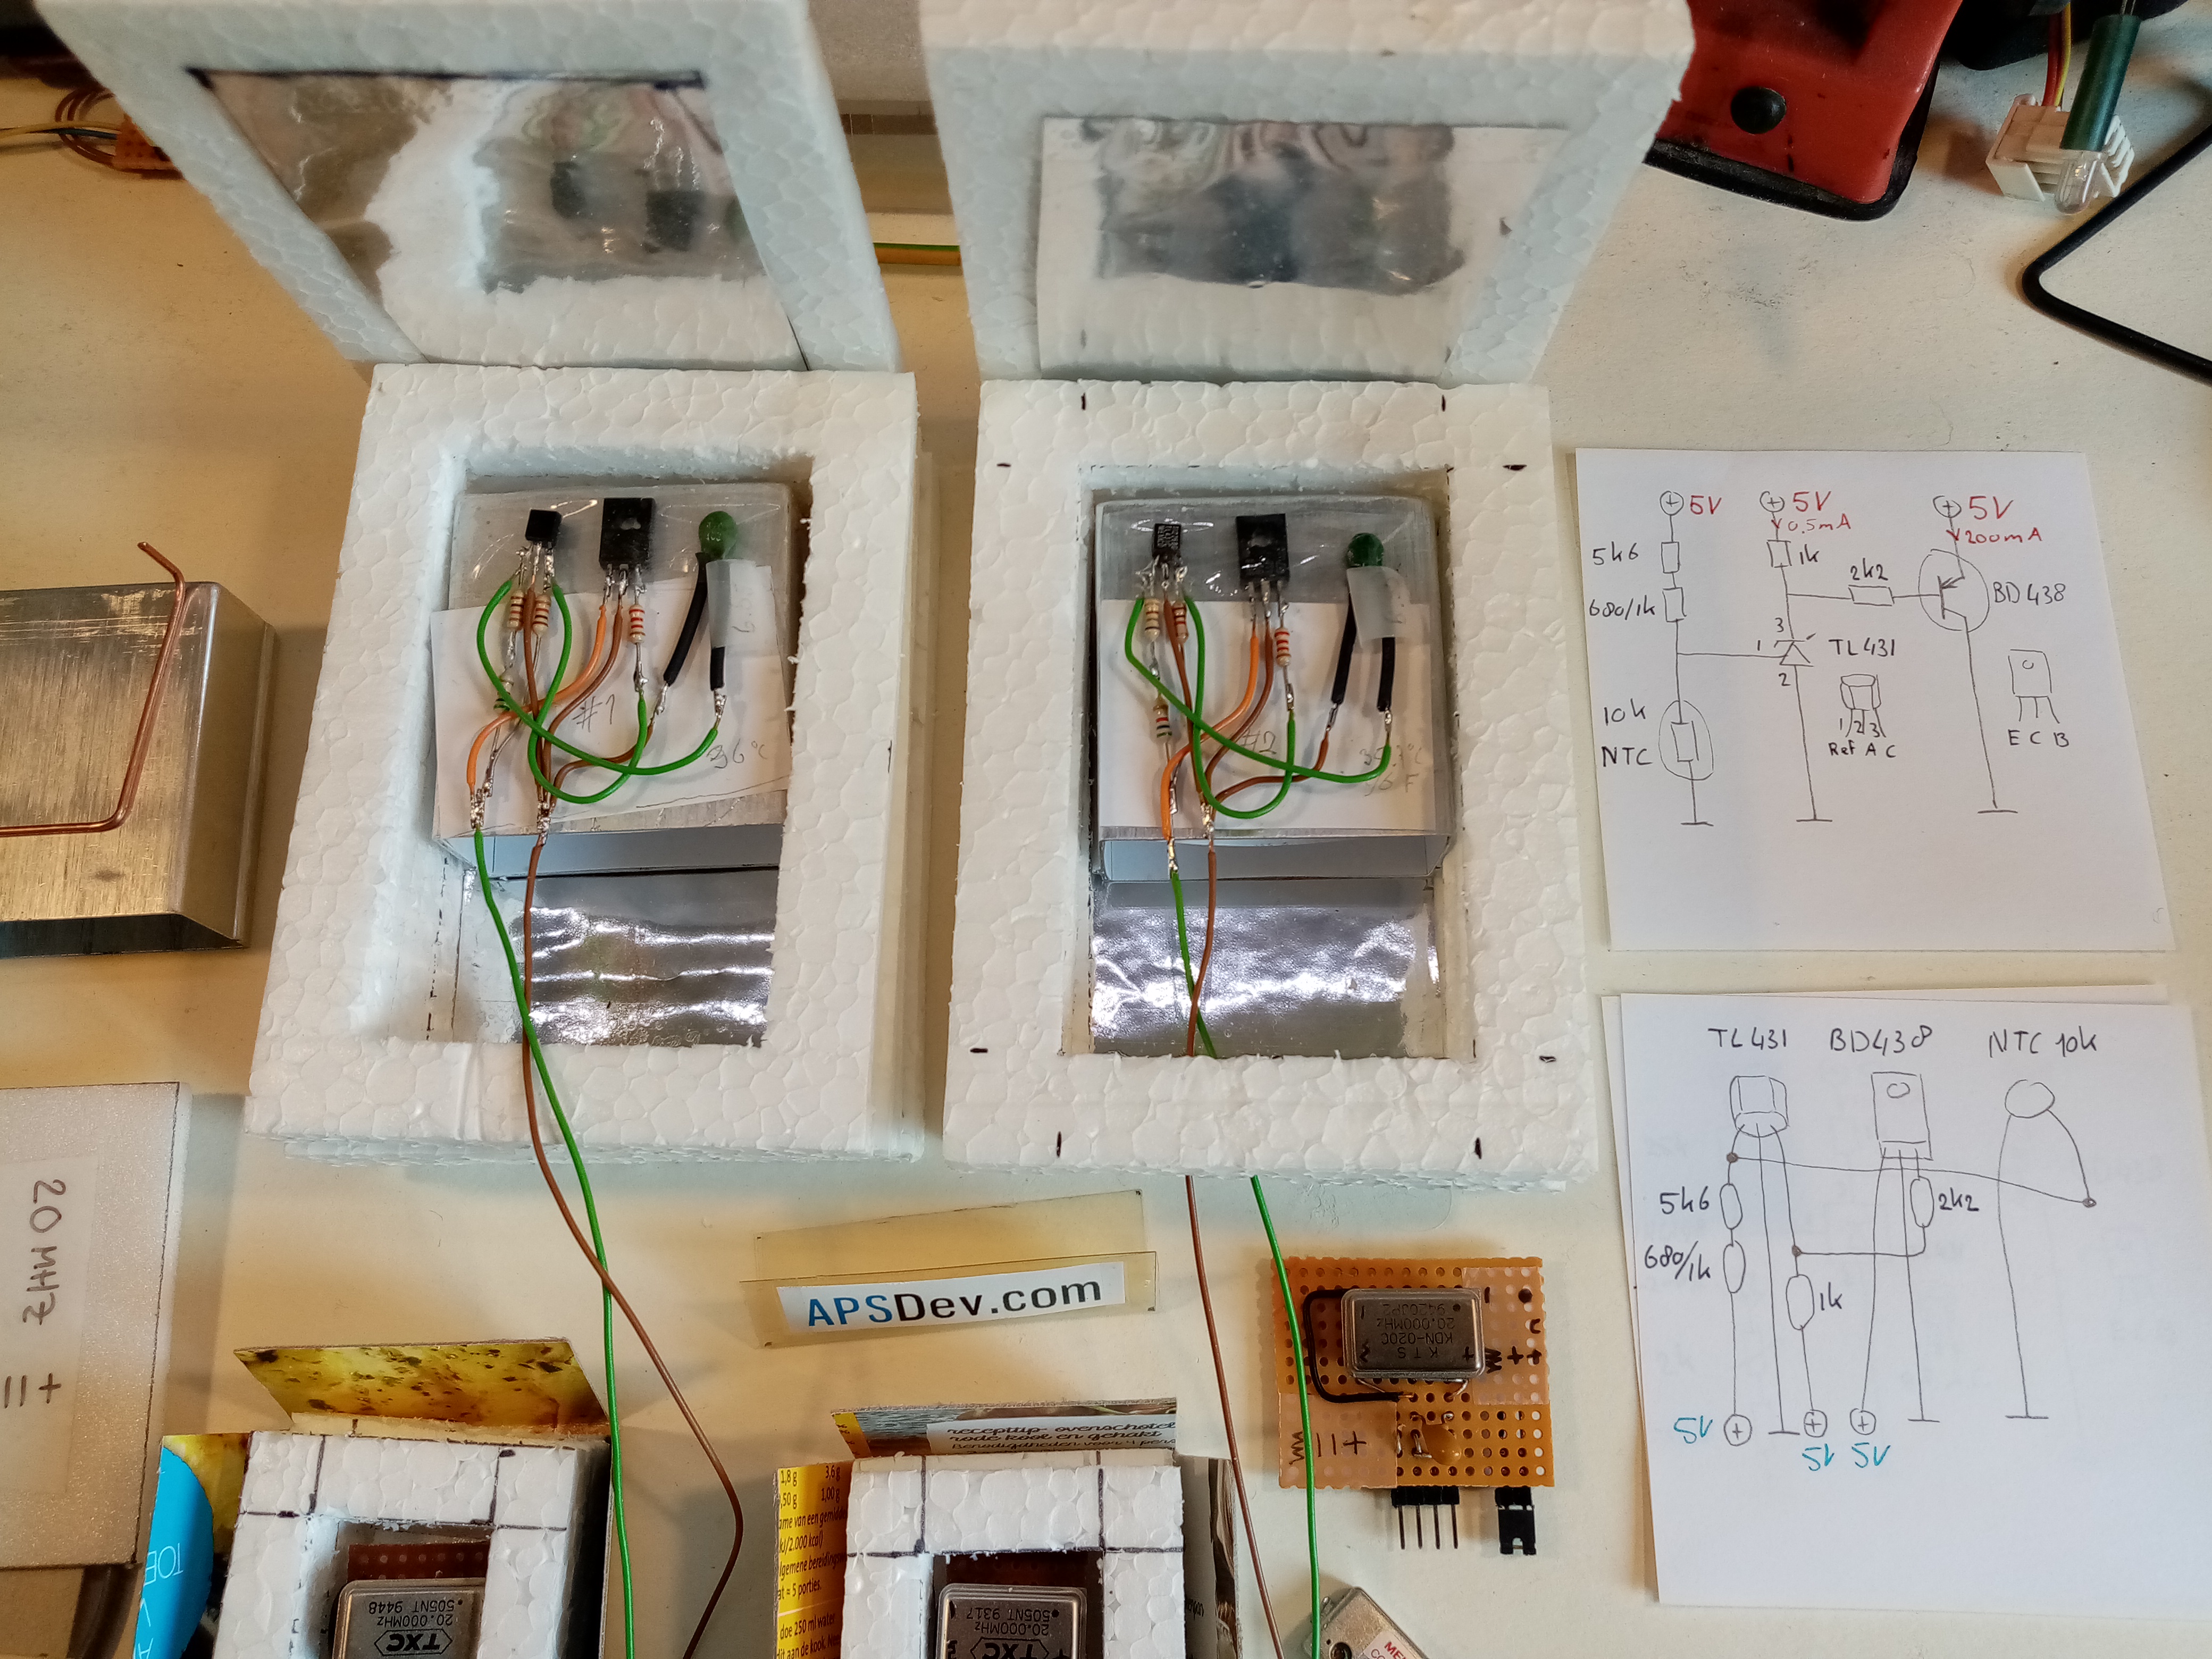
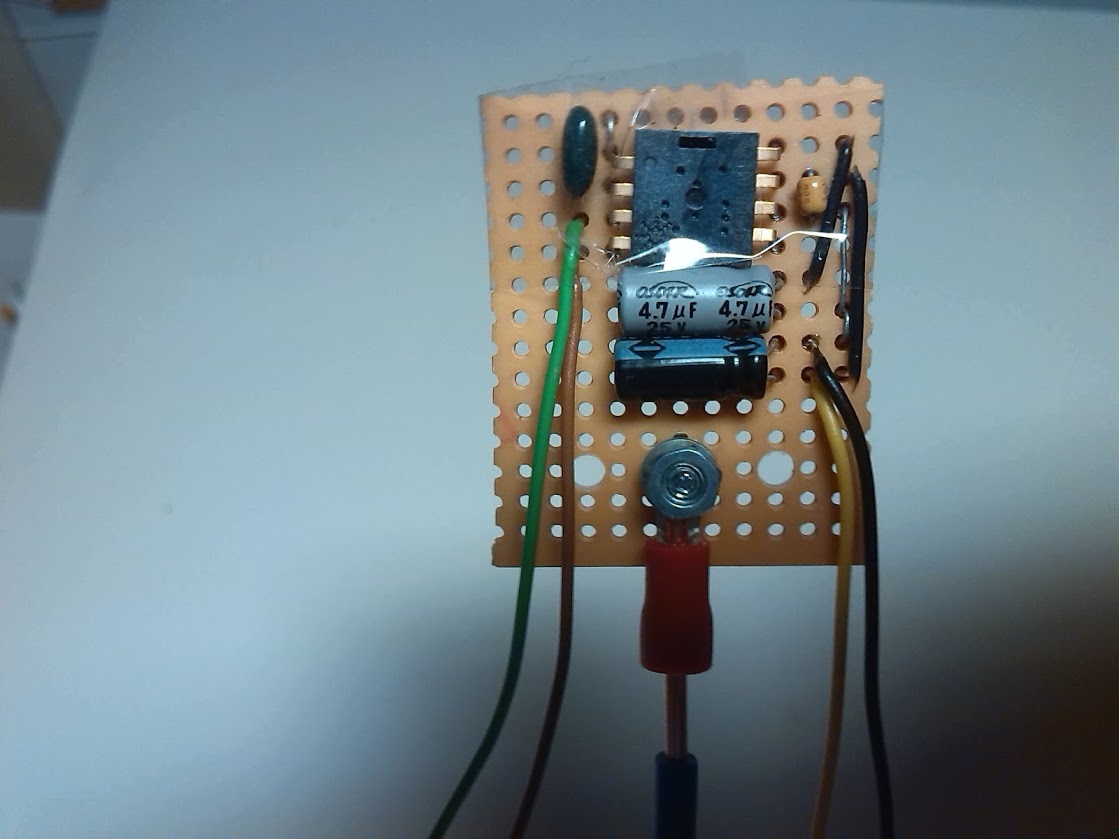
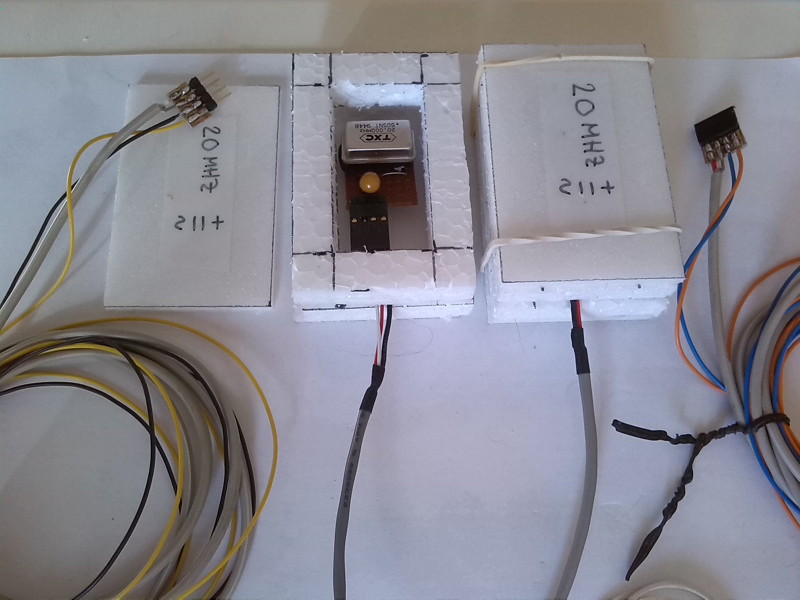
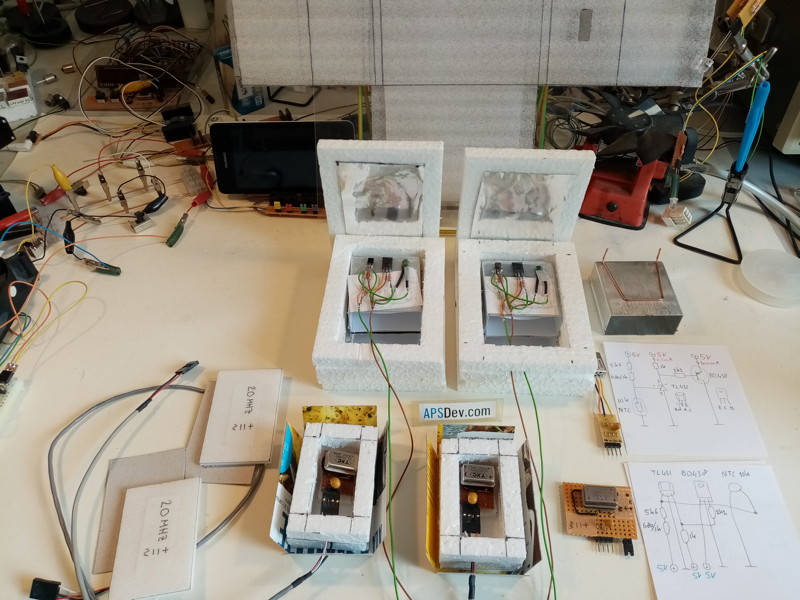
Crystal oven using TL431 |
 |
 |
 |
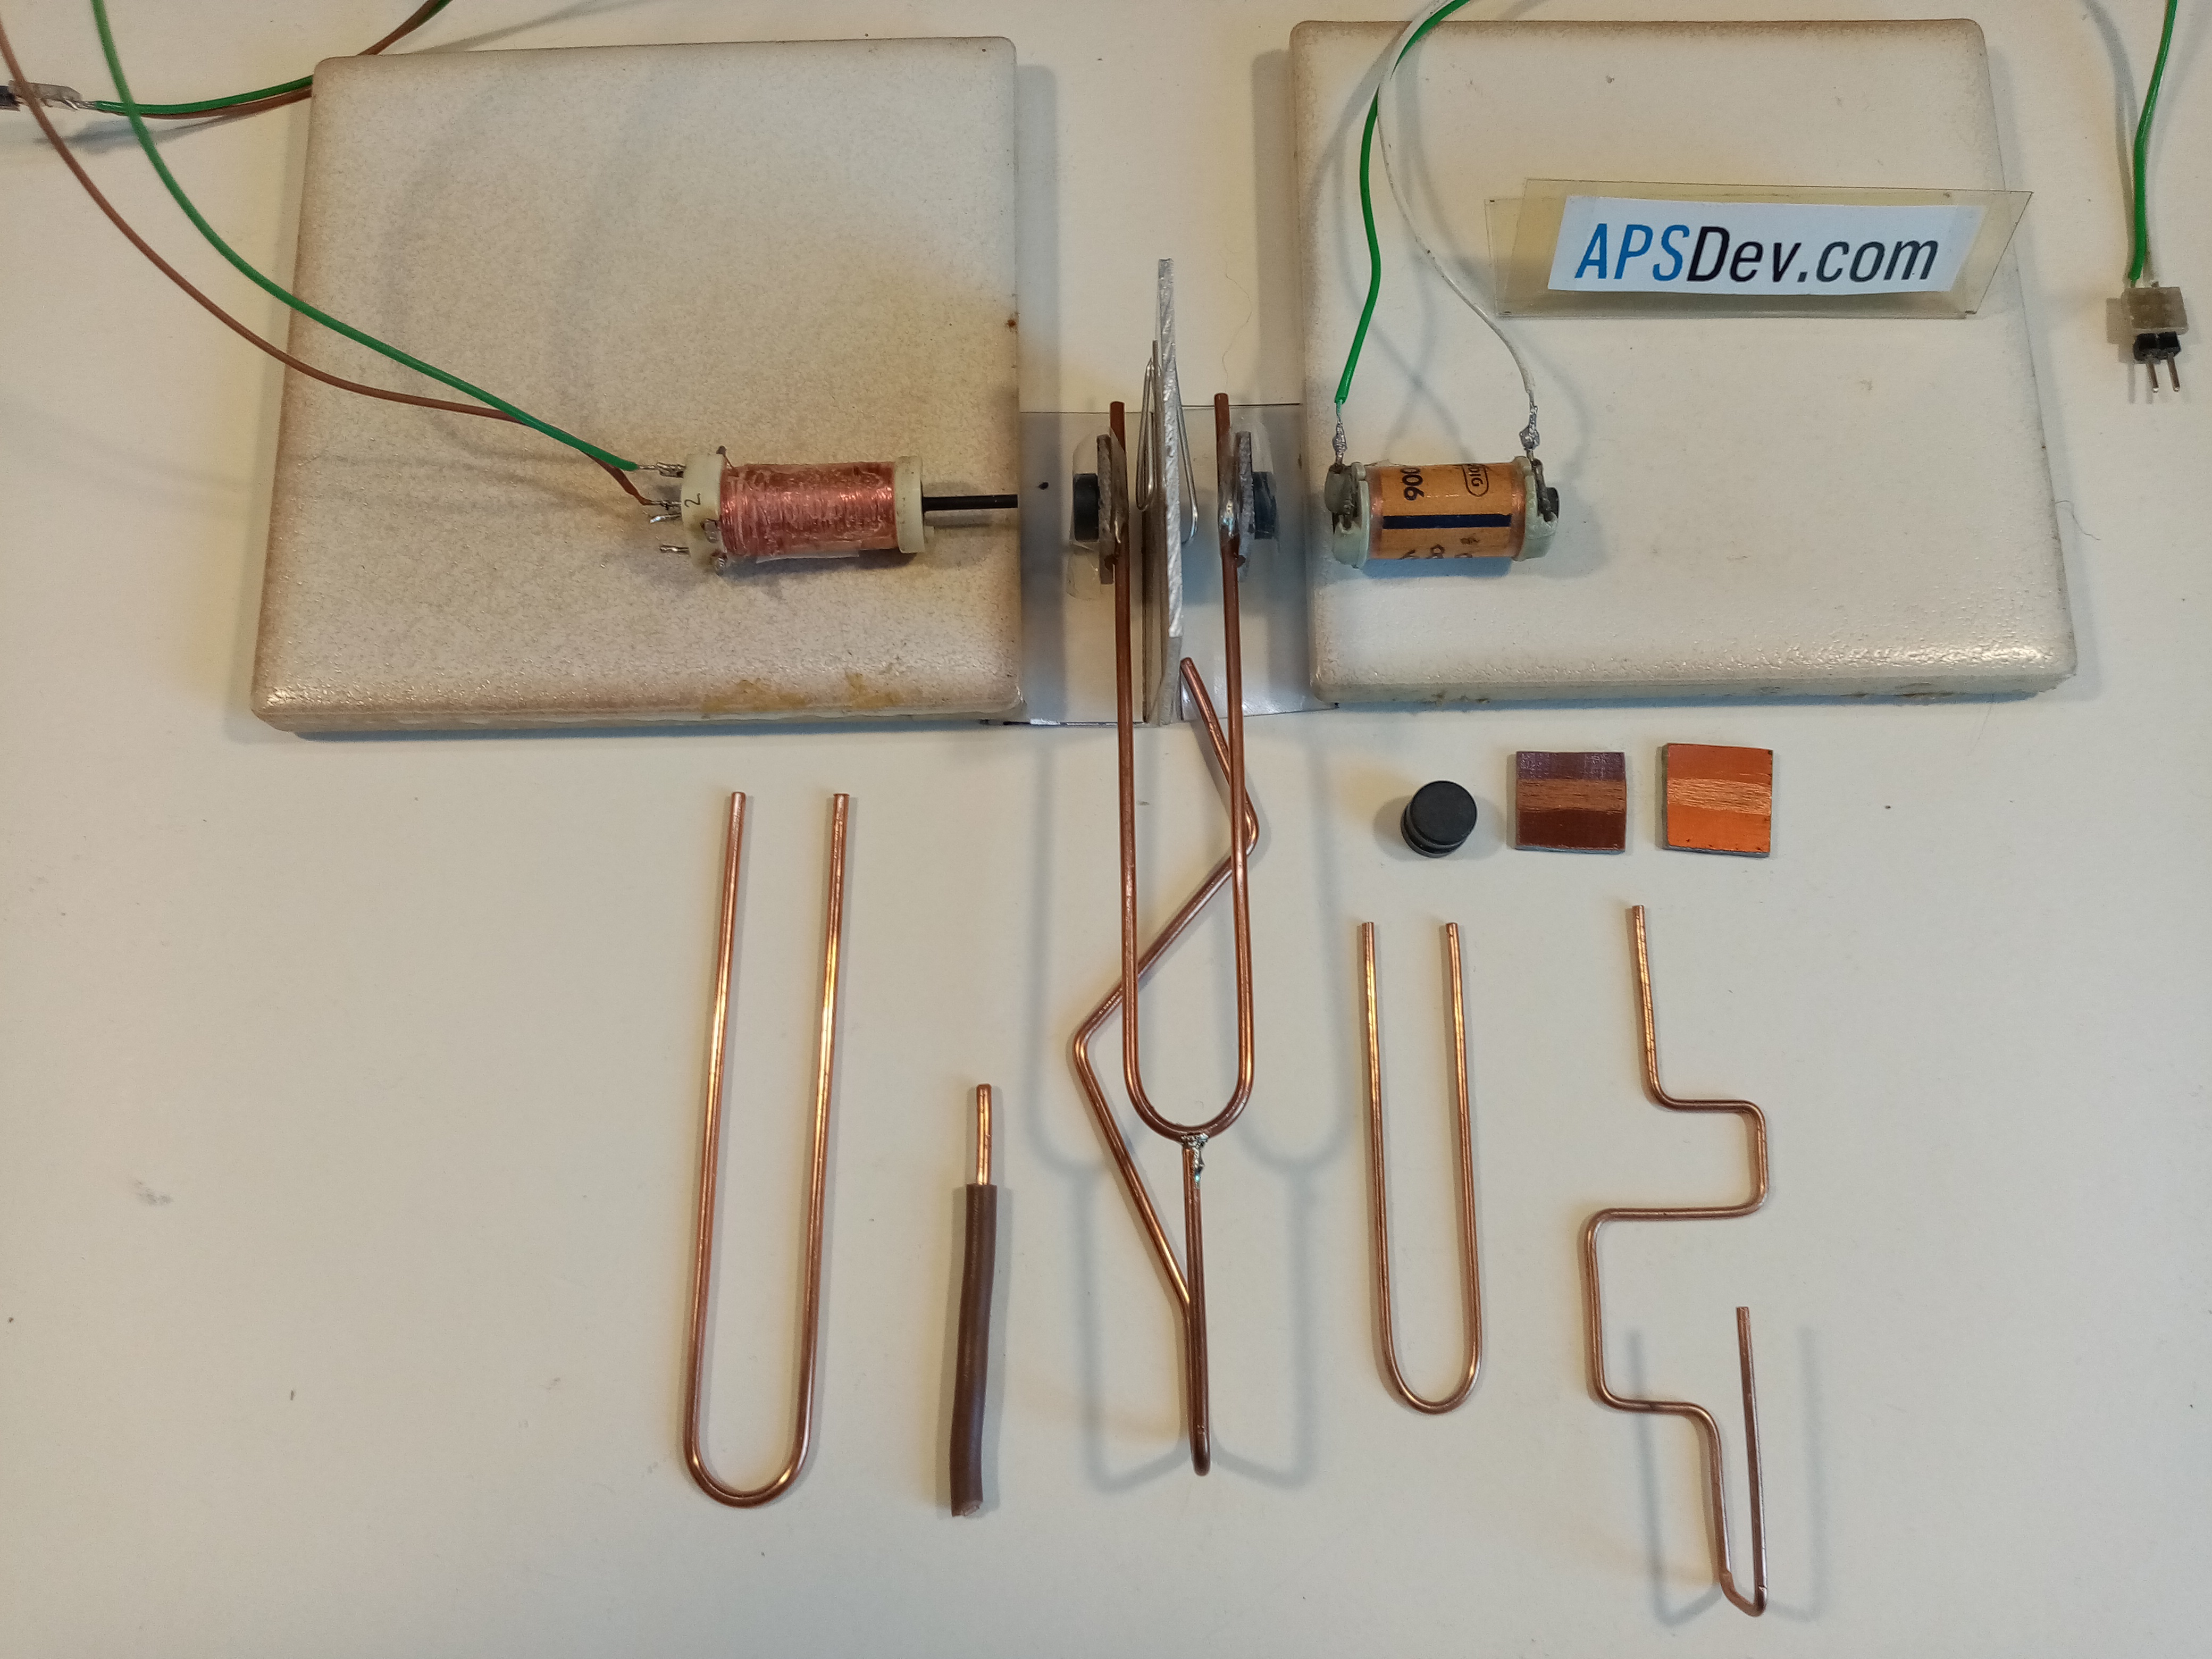
To make the clock experiment more accurate i build a couple of crystal ovens using TL431's
which keep the crystals at 37 degrees celsius.
The base of the ovens are aluminium cans that contained electronics modules in old TVs.
|
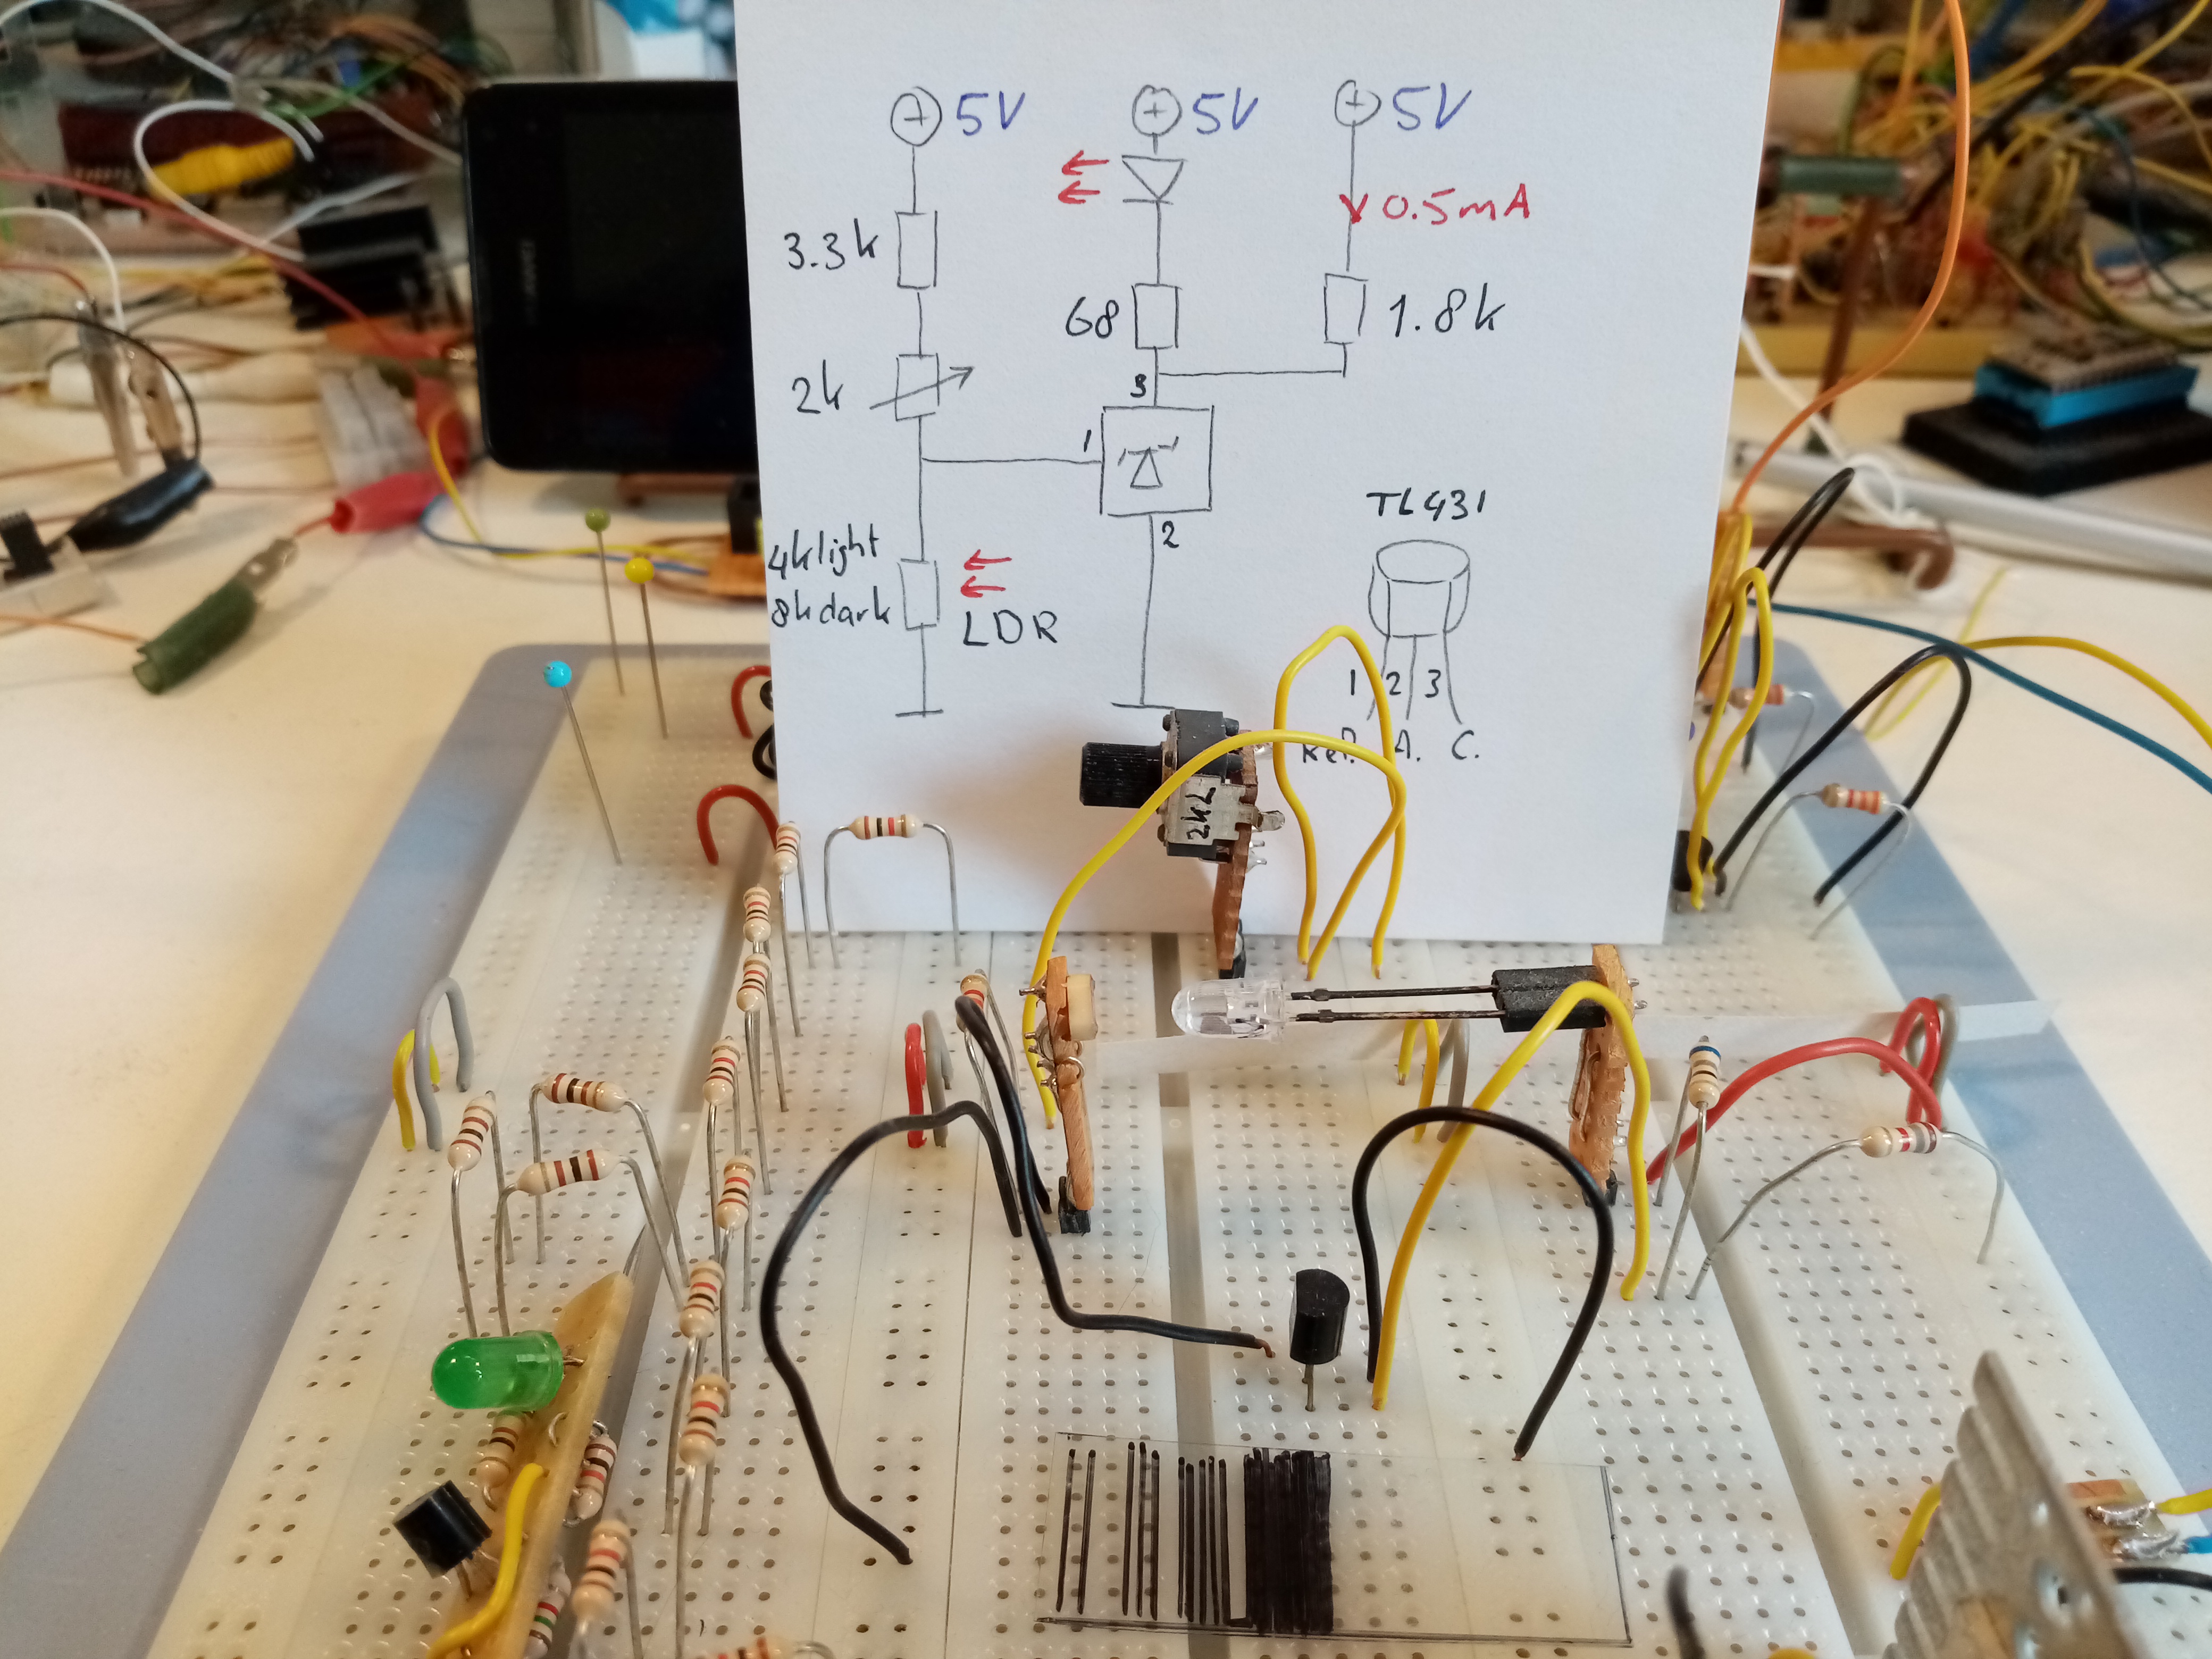
Simulating TL431 crystal oven with LED and LDR |
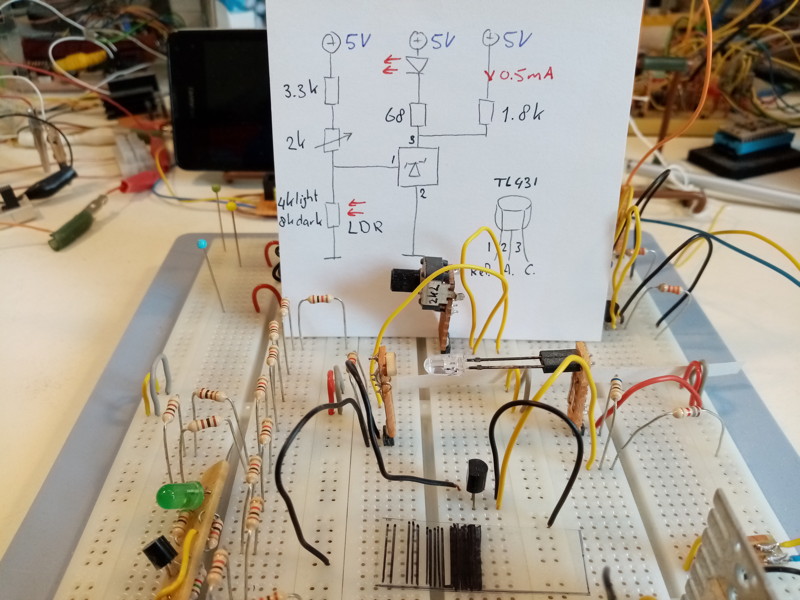 |
To demonstrate how the crystal over works i replace the heater with an LED and the
temperature sensor with an LDR.
|
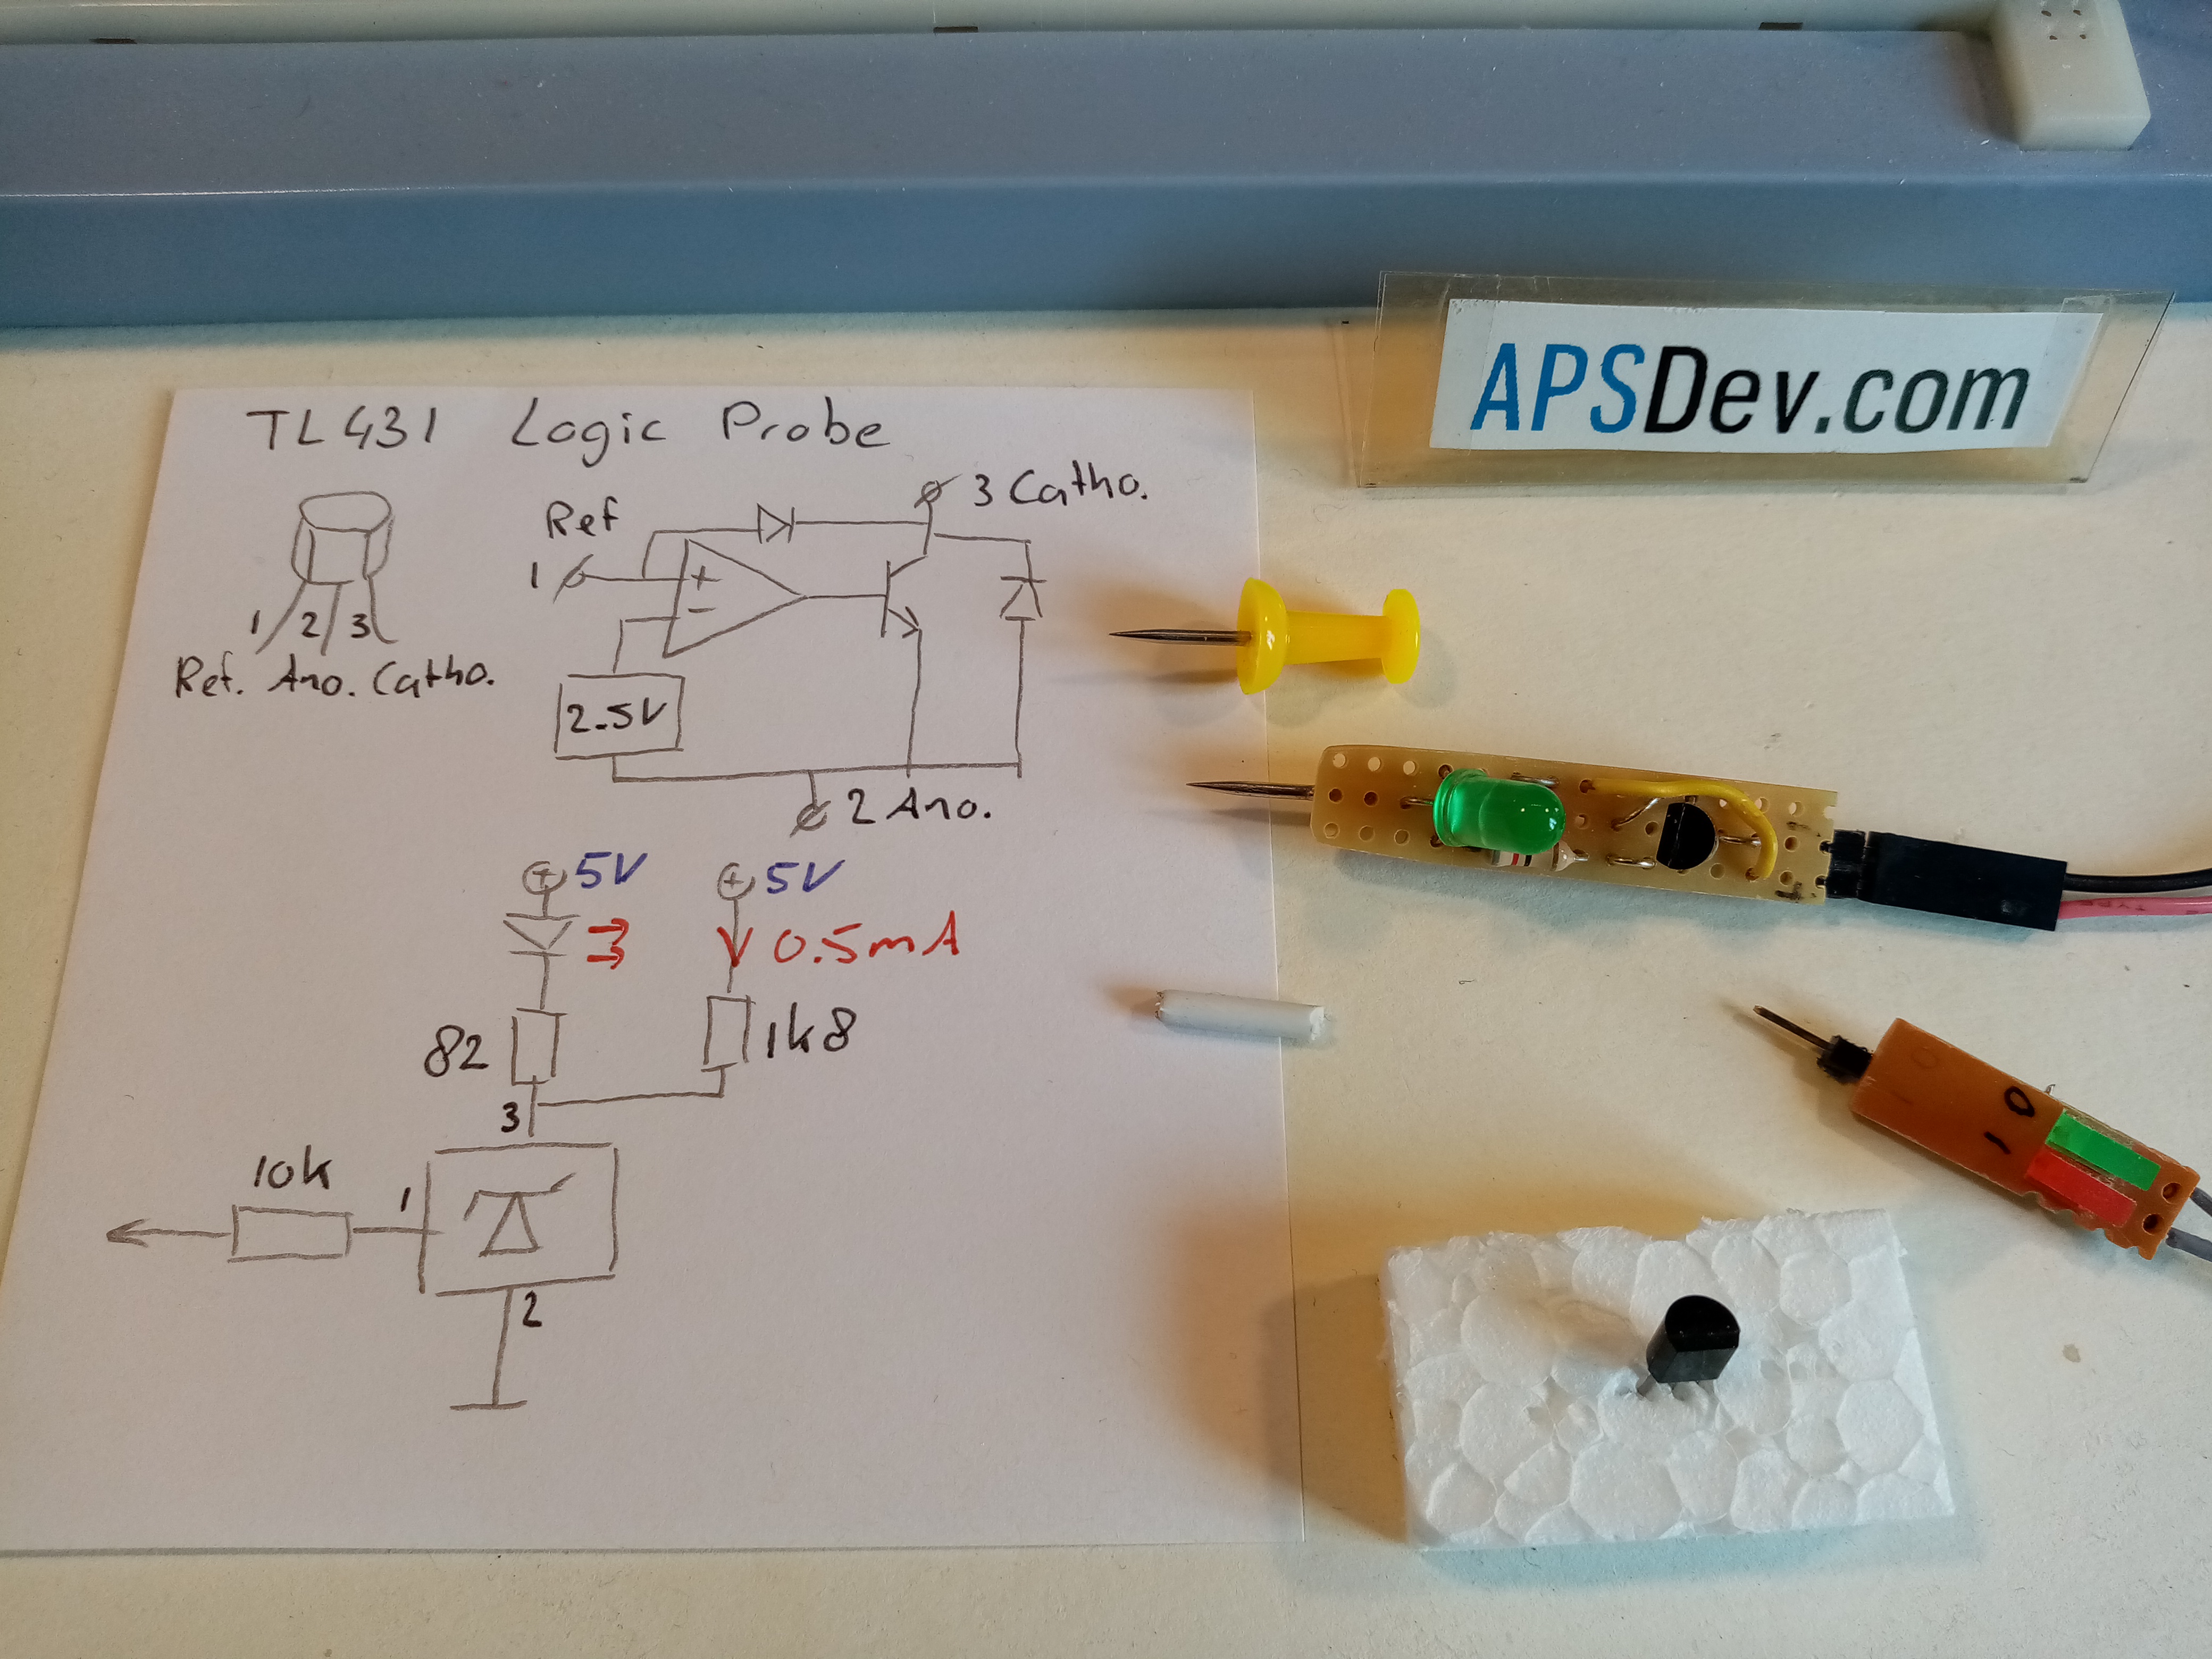
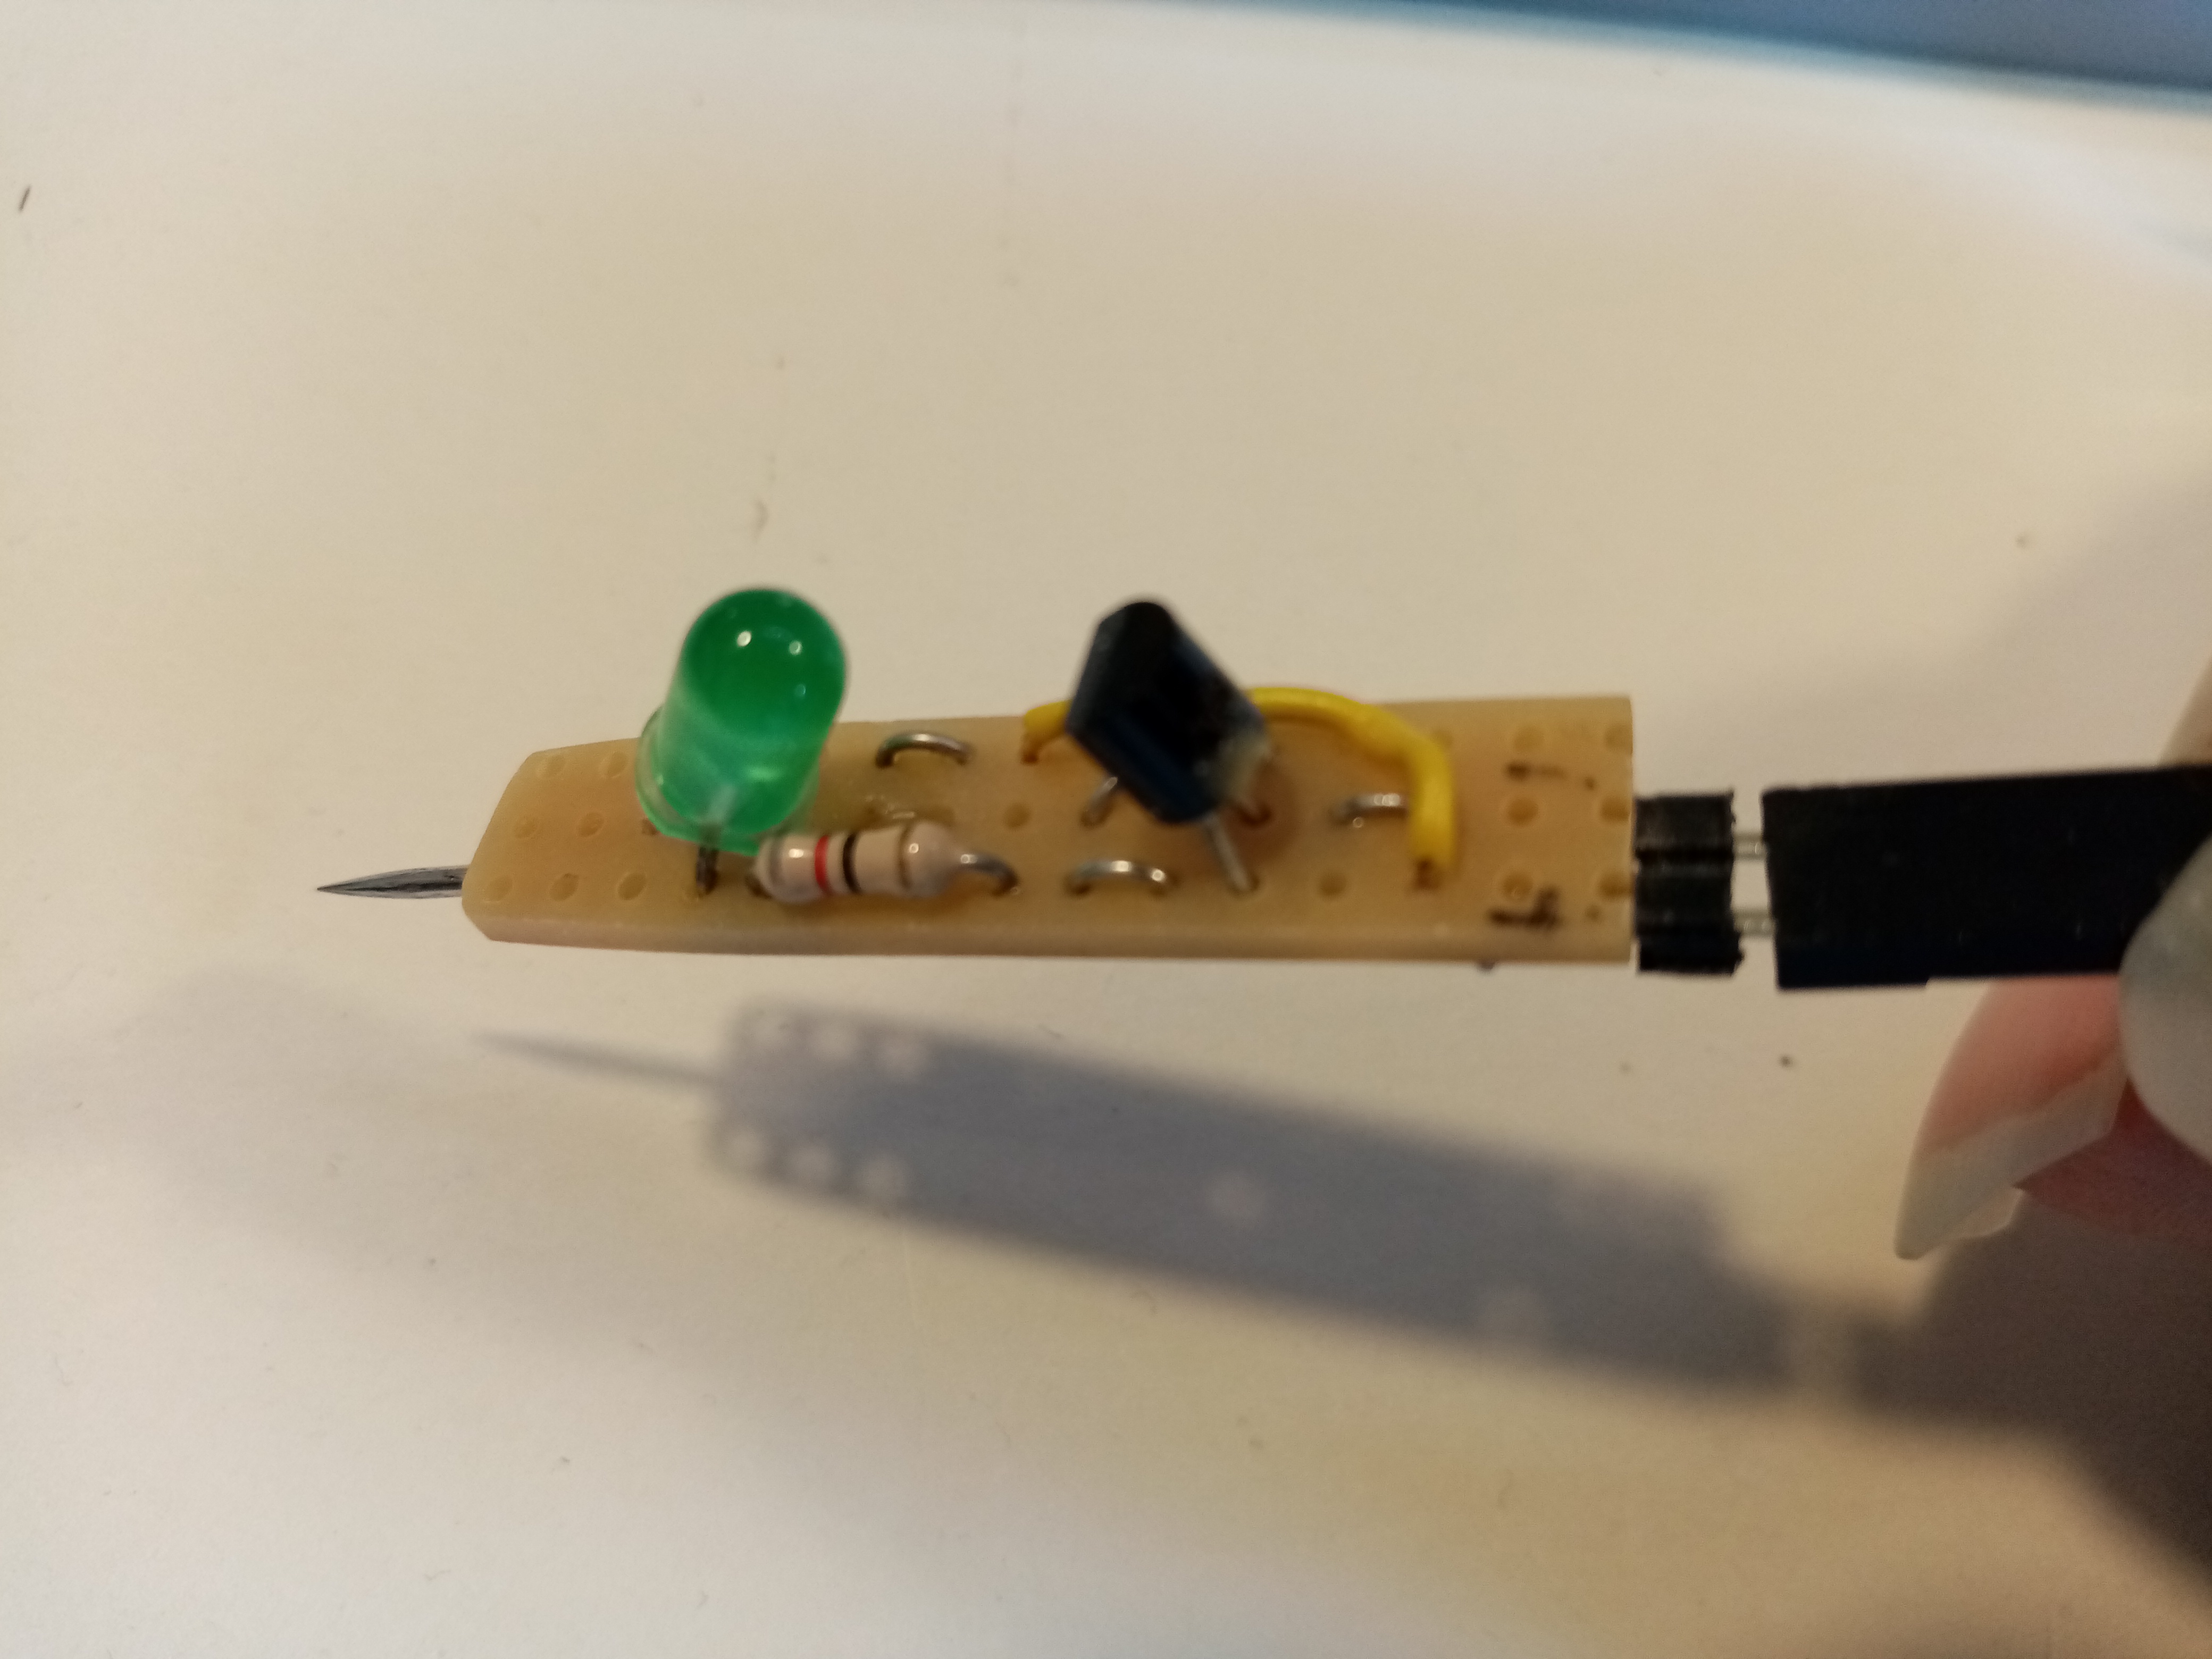
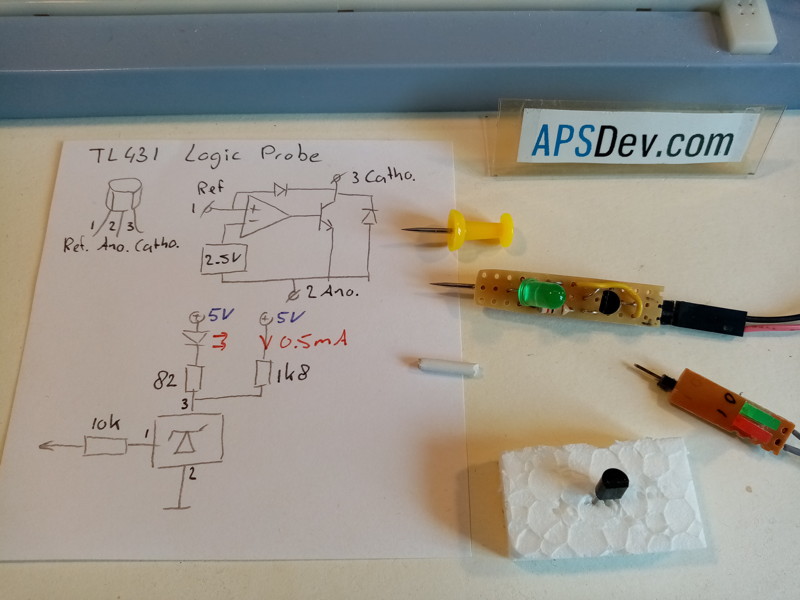
TL431 digital probe |
 |
 |
 |
In another experiment to demonstrate the TL431 i build a digital probe with a very high impedance.
The LED comes on at 2.5 Volts .. very usefull to test on breadboards.
|
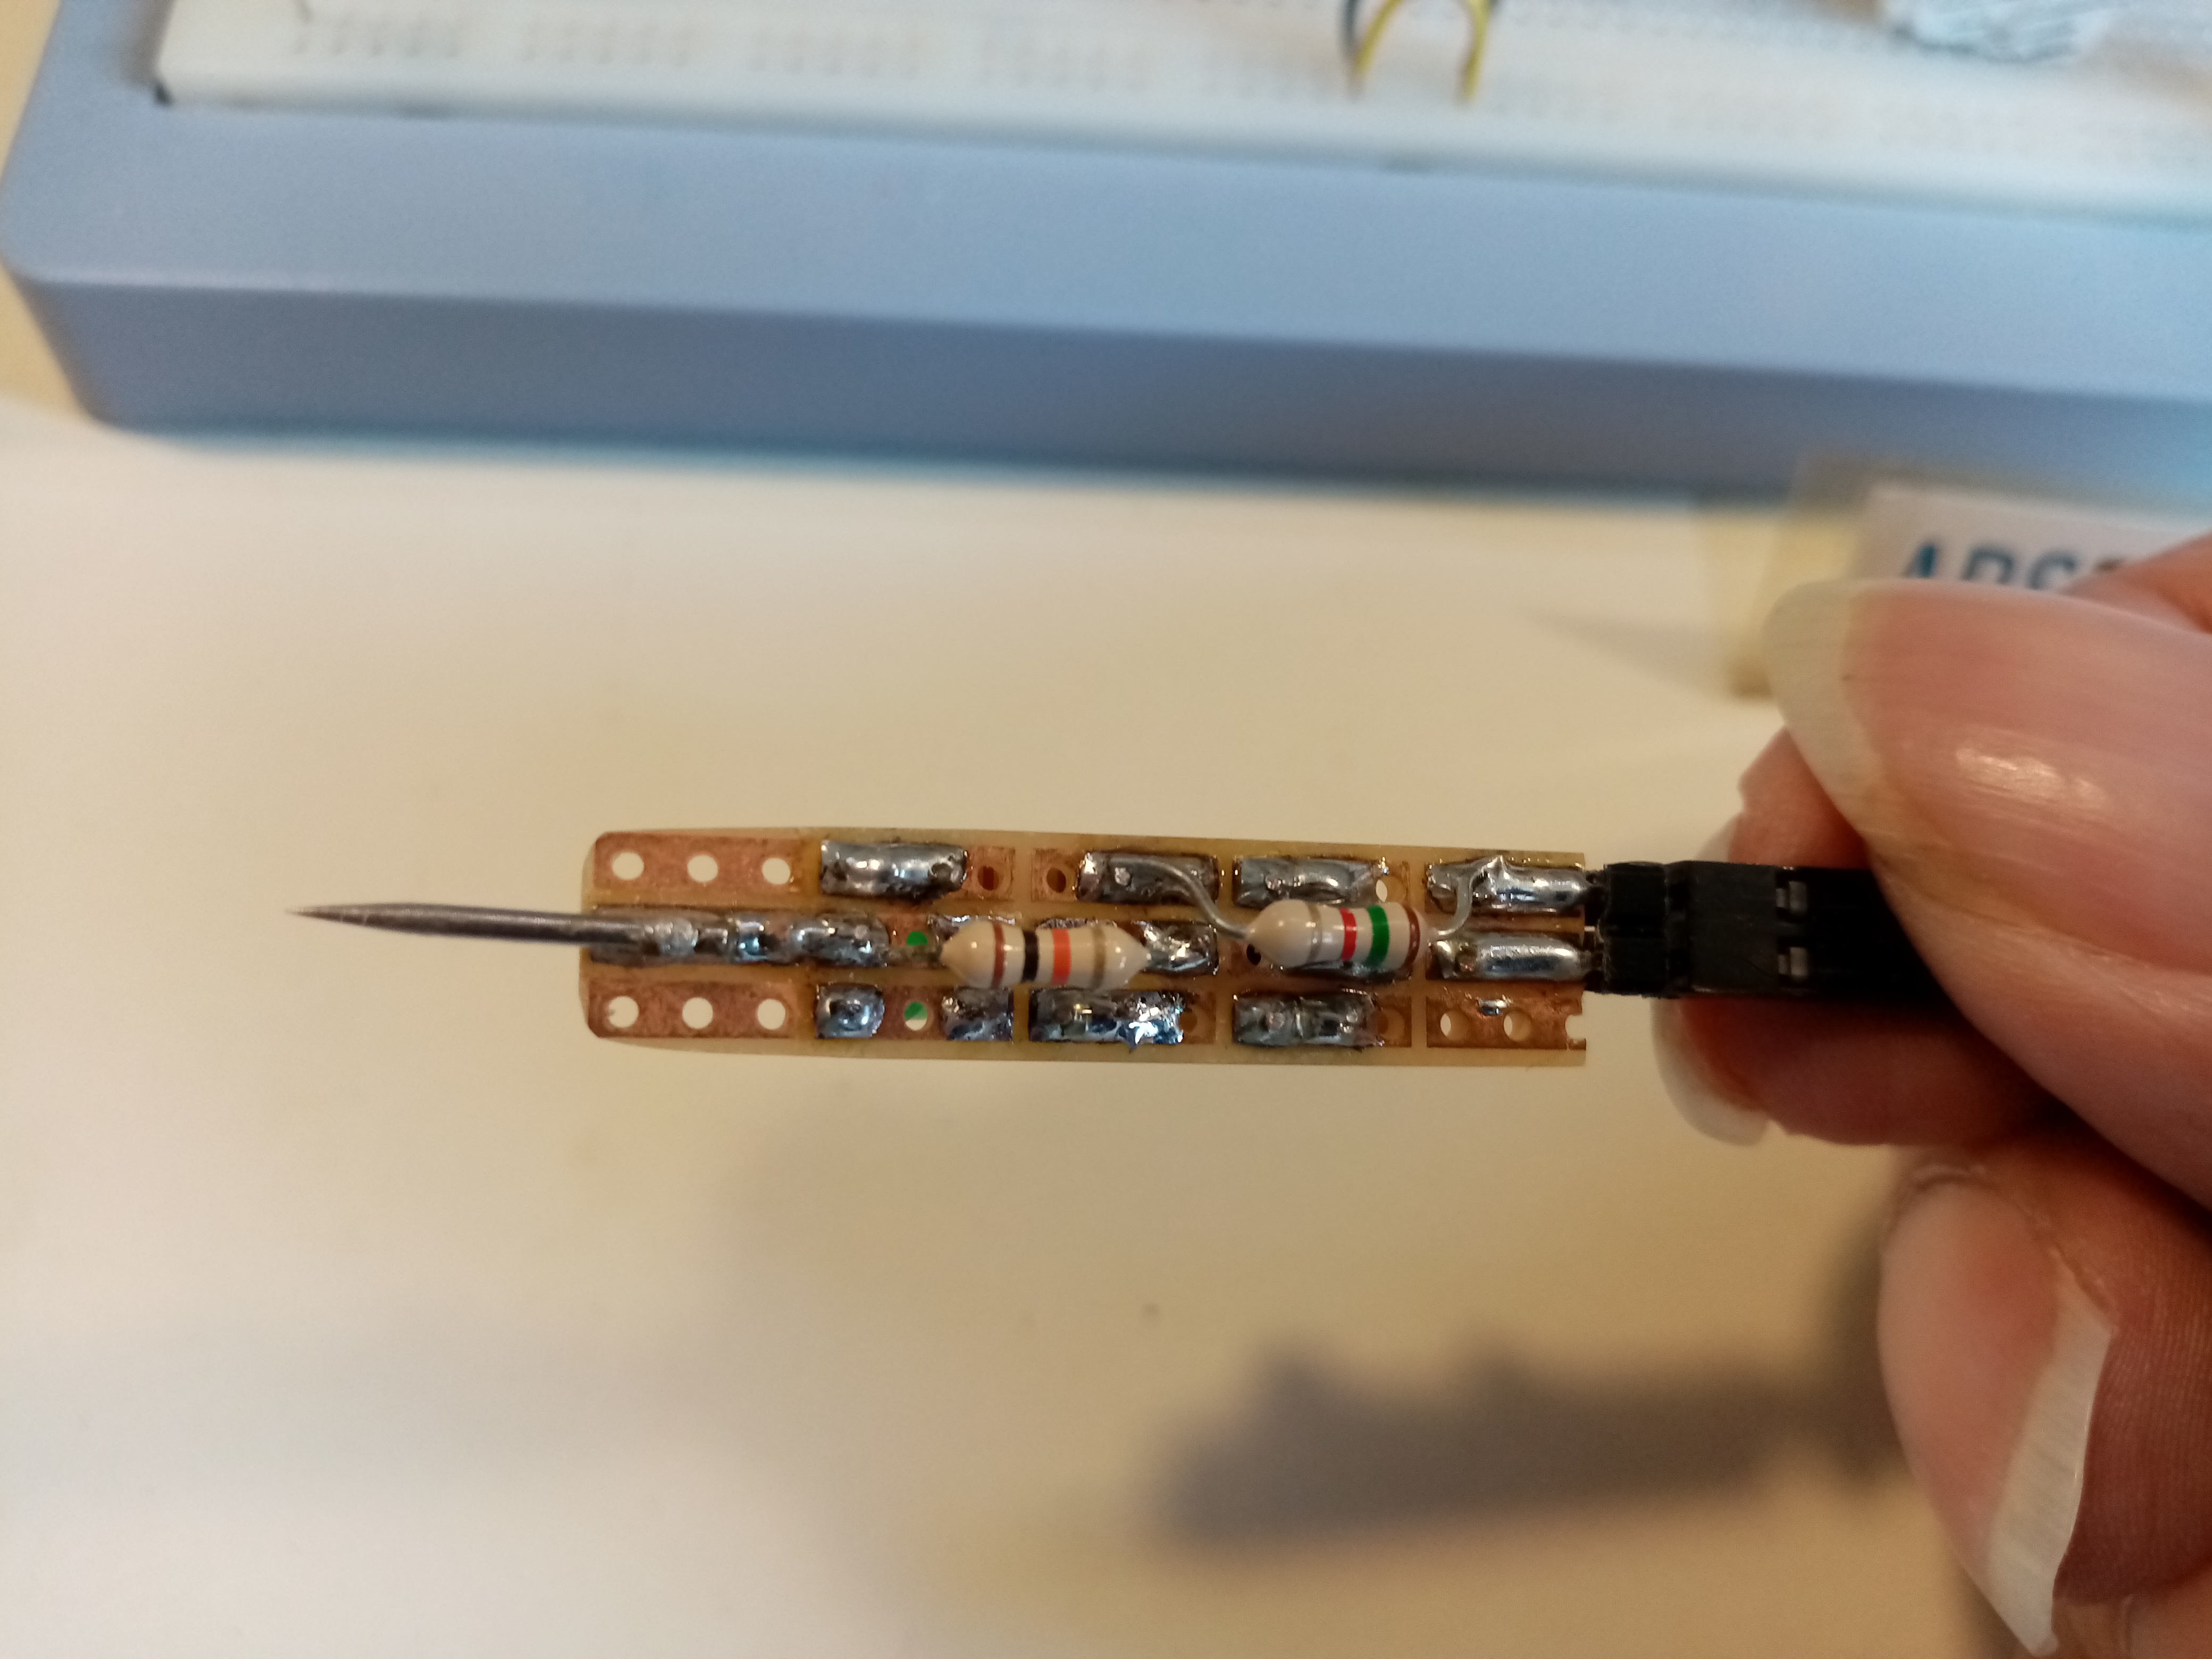
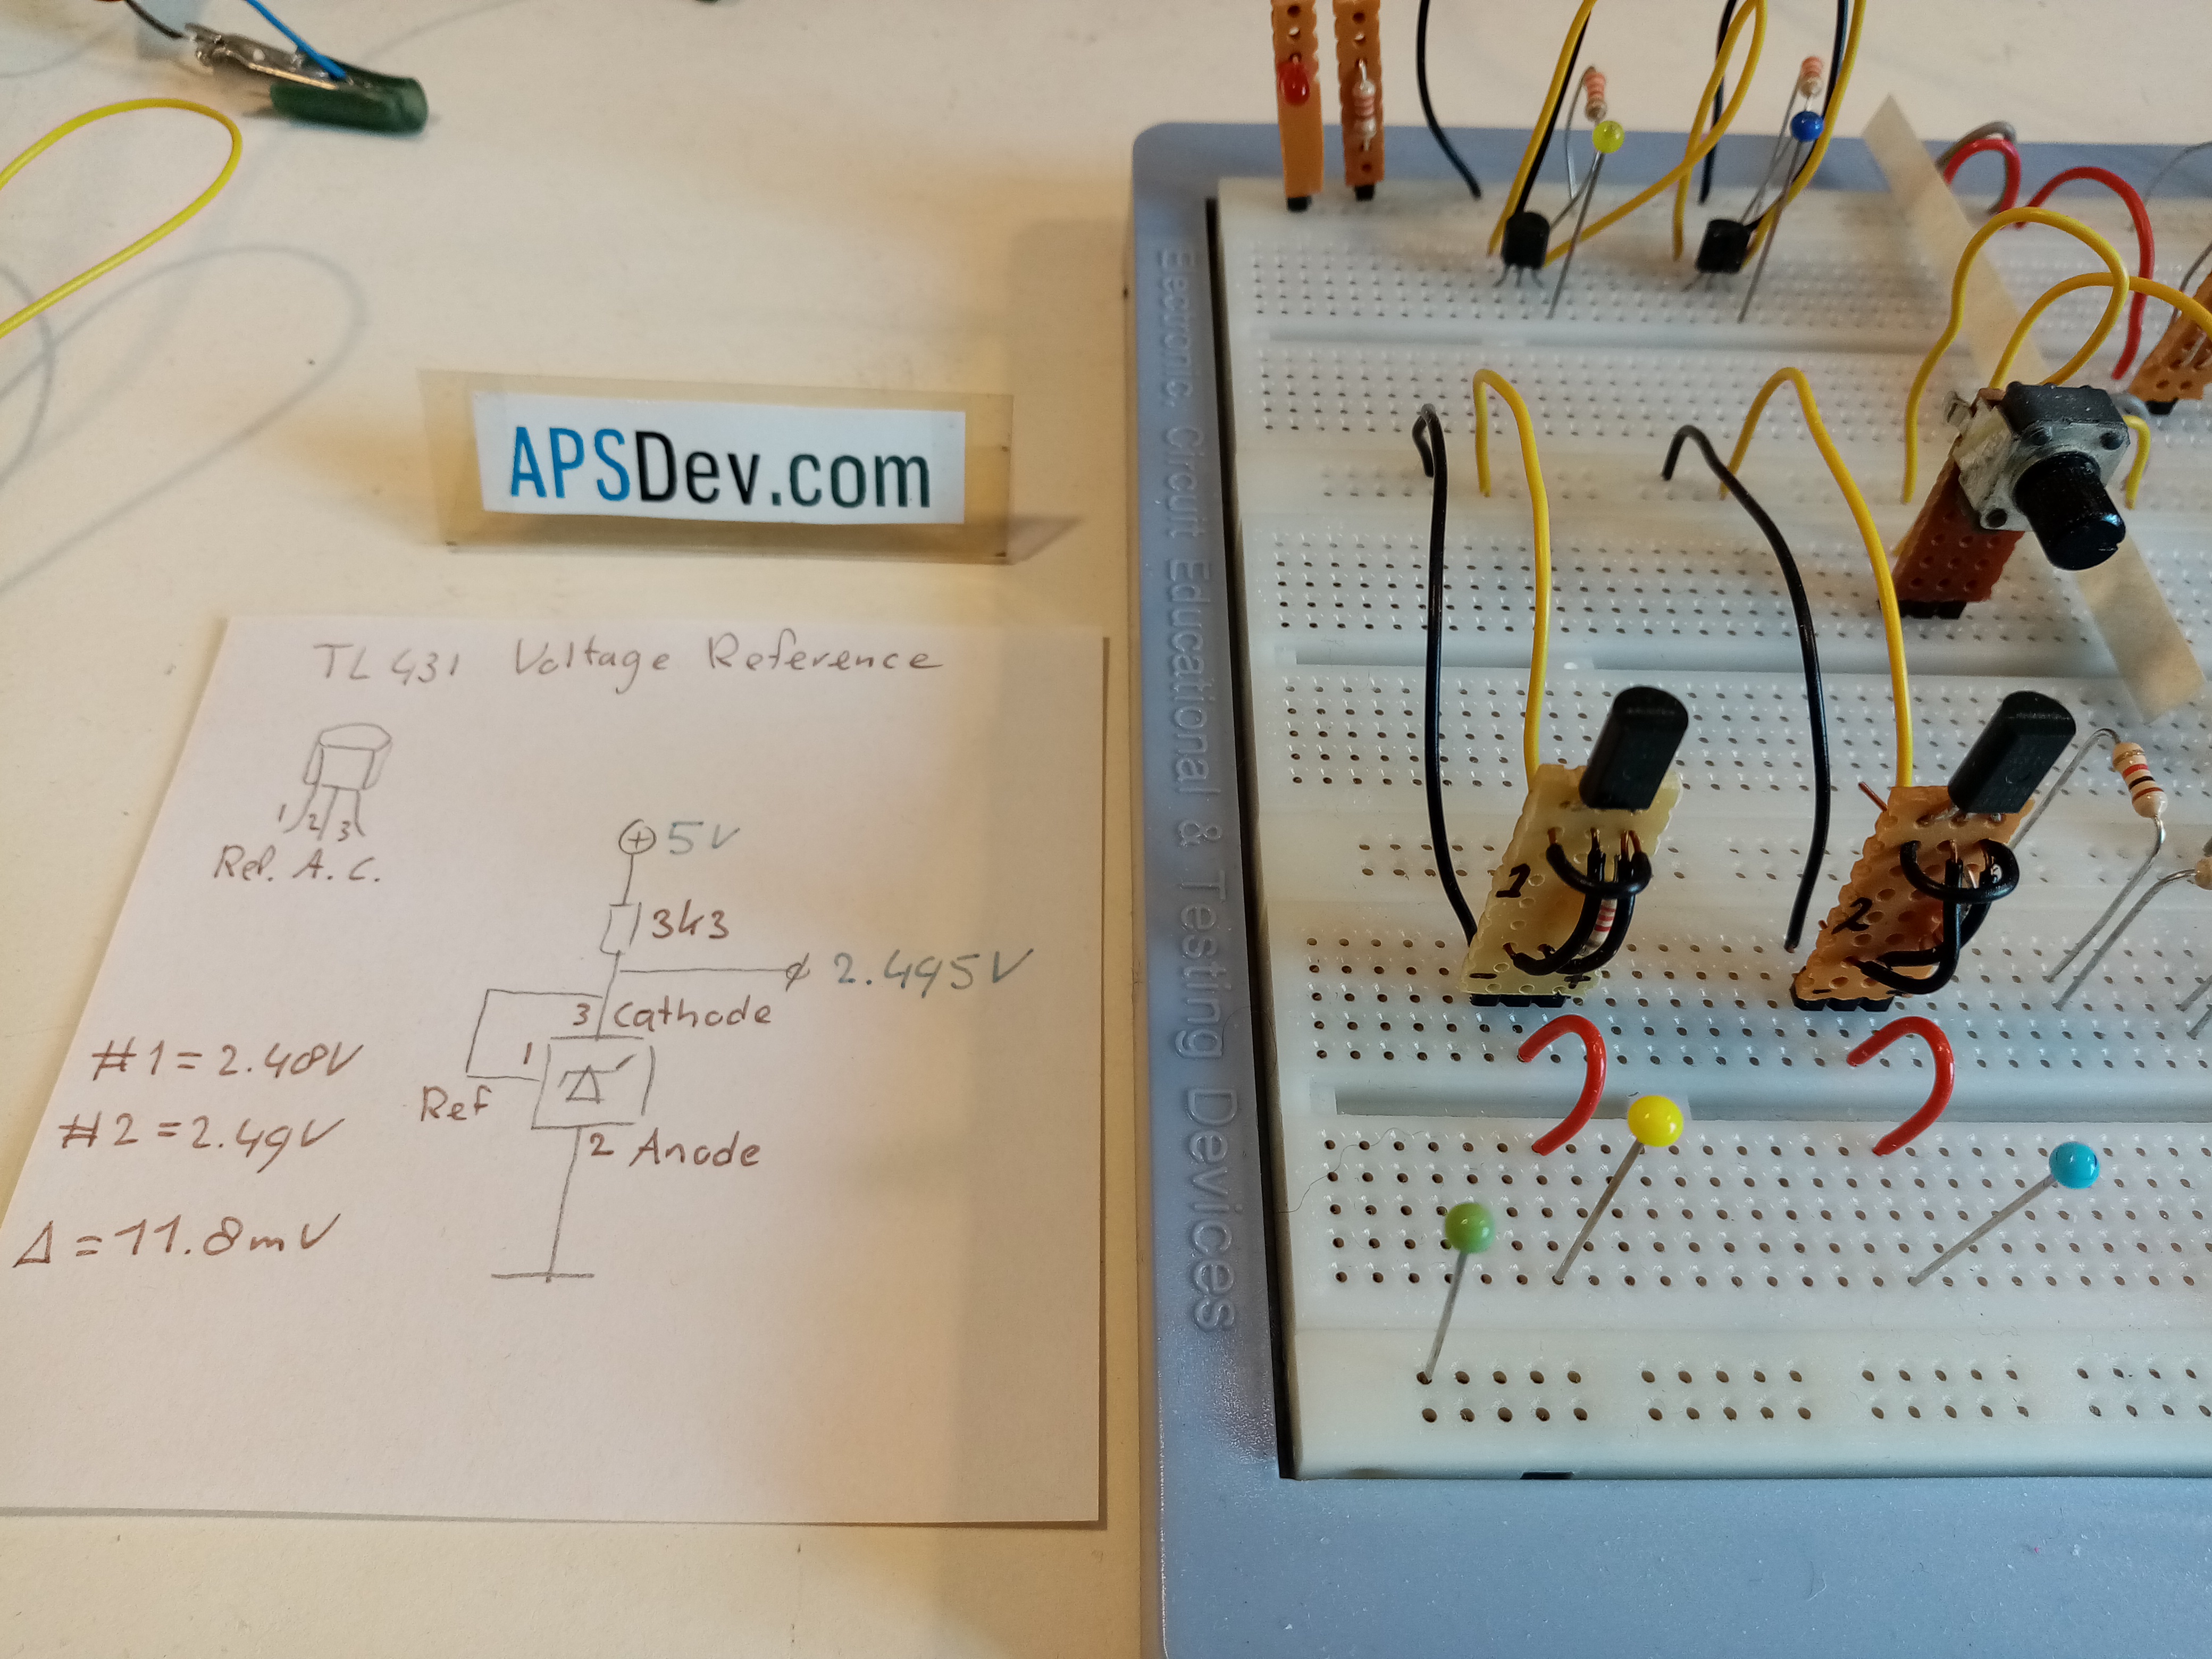
TL431 reference |
 |
To test in the field if my voltmeters are still accurate i made some voltage references with TL431's.
To see how accurate they really i setup a bunch on a breadboard.
They are also usefull if you need 2.5 volts in an experiment on a breadboard say as a zero voltage on opamps.
|
--
Can you use a quartz crystal oscillator to weigh things. |
 |
With a quartz crystal you can make a very accurate very high frequent clocksignal, as the frequency
is very high you should be able to detect very small changes to it if you campare the signal with a
crystal of the same frequency.
(Video)
|
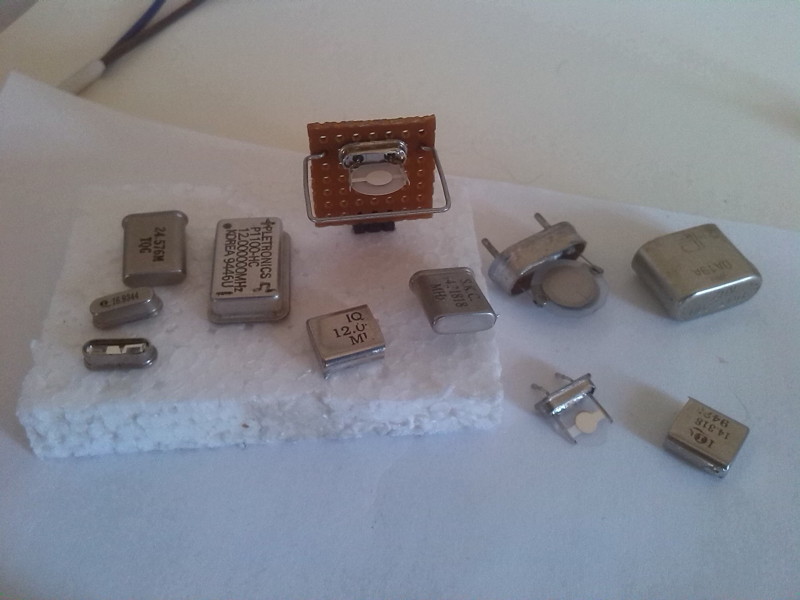
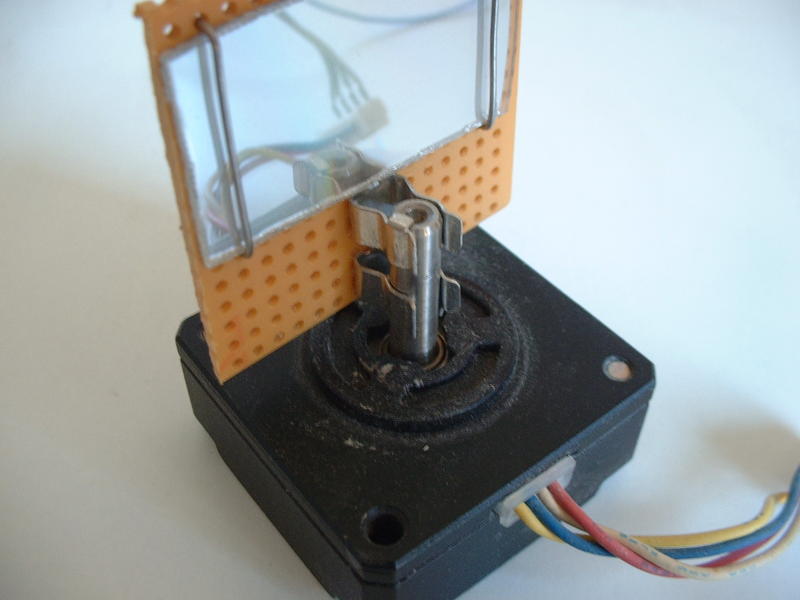
Tuning fork. |
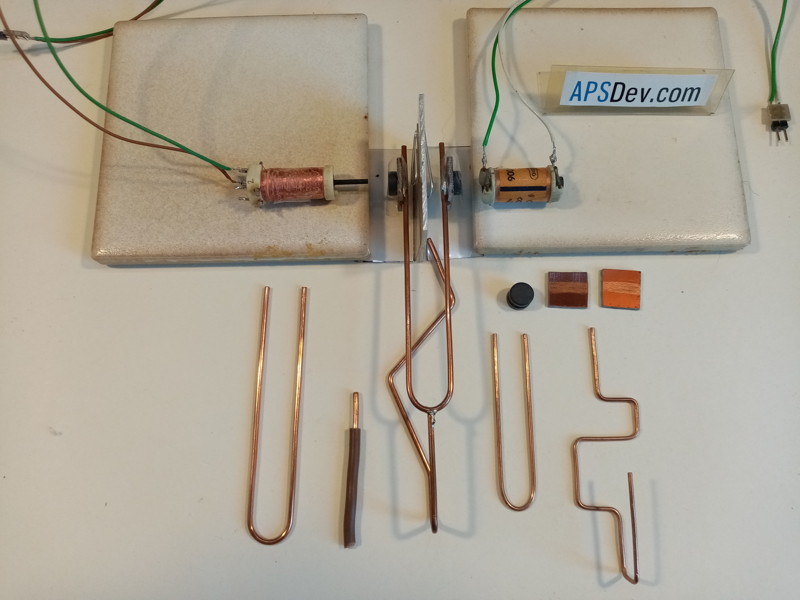 |
In electronics circuits you often use quartz crystals to make stable frequencies, which are often disks.
Which doesnt work for very low frequencies like in wrist watches, the crystals in wristwatches are shaped like tiny
tuning forks. In the first electric watches they used actual tiny electric tuning forks.
This is sort of an attempt to build a working electric tuning fork.
|
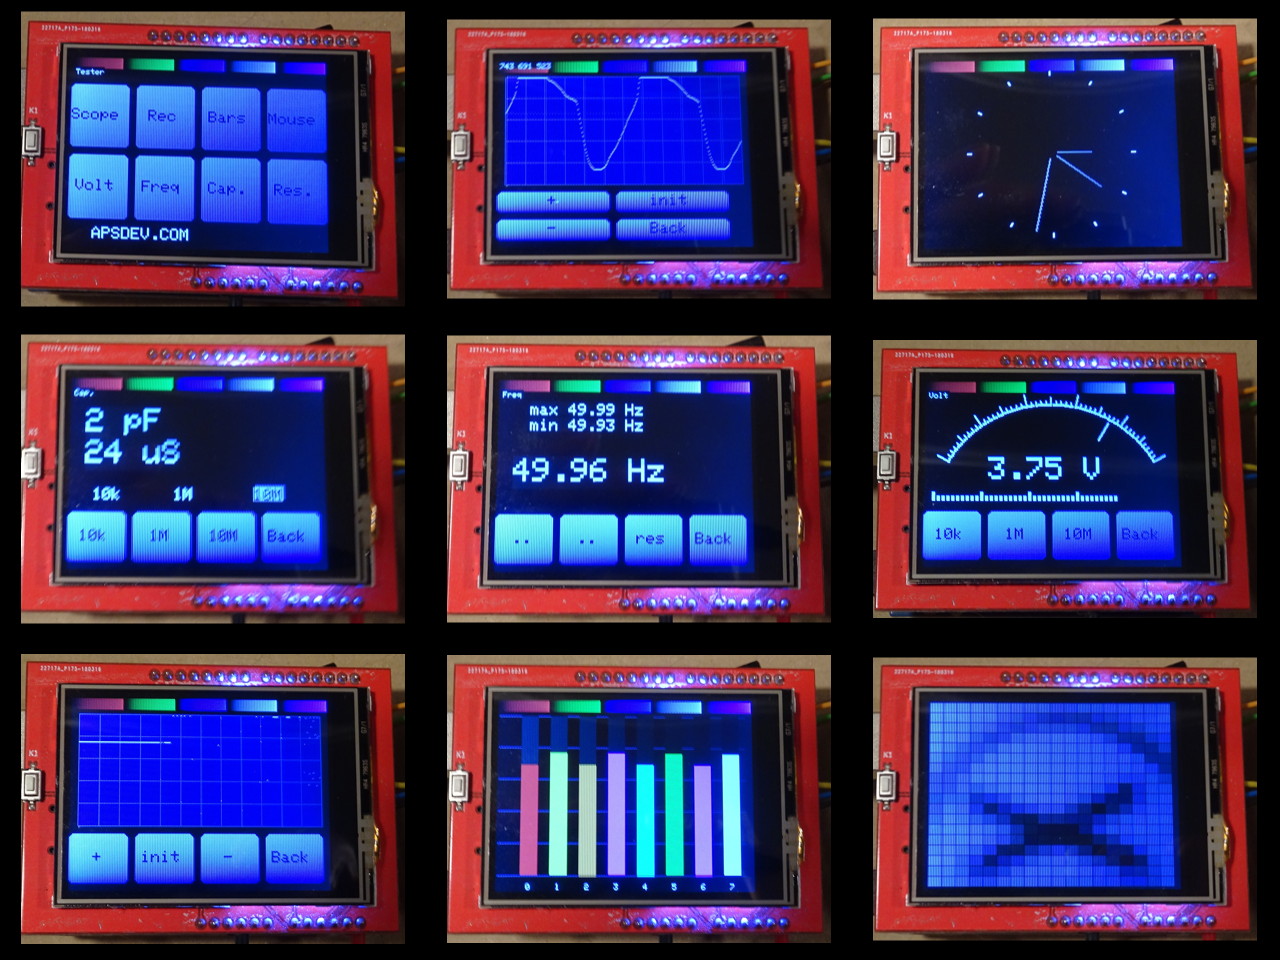
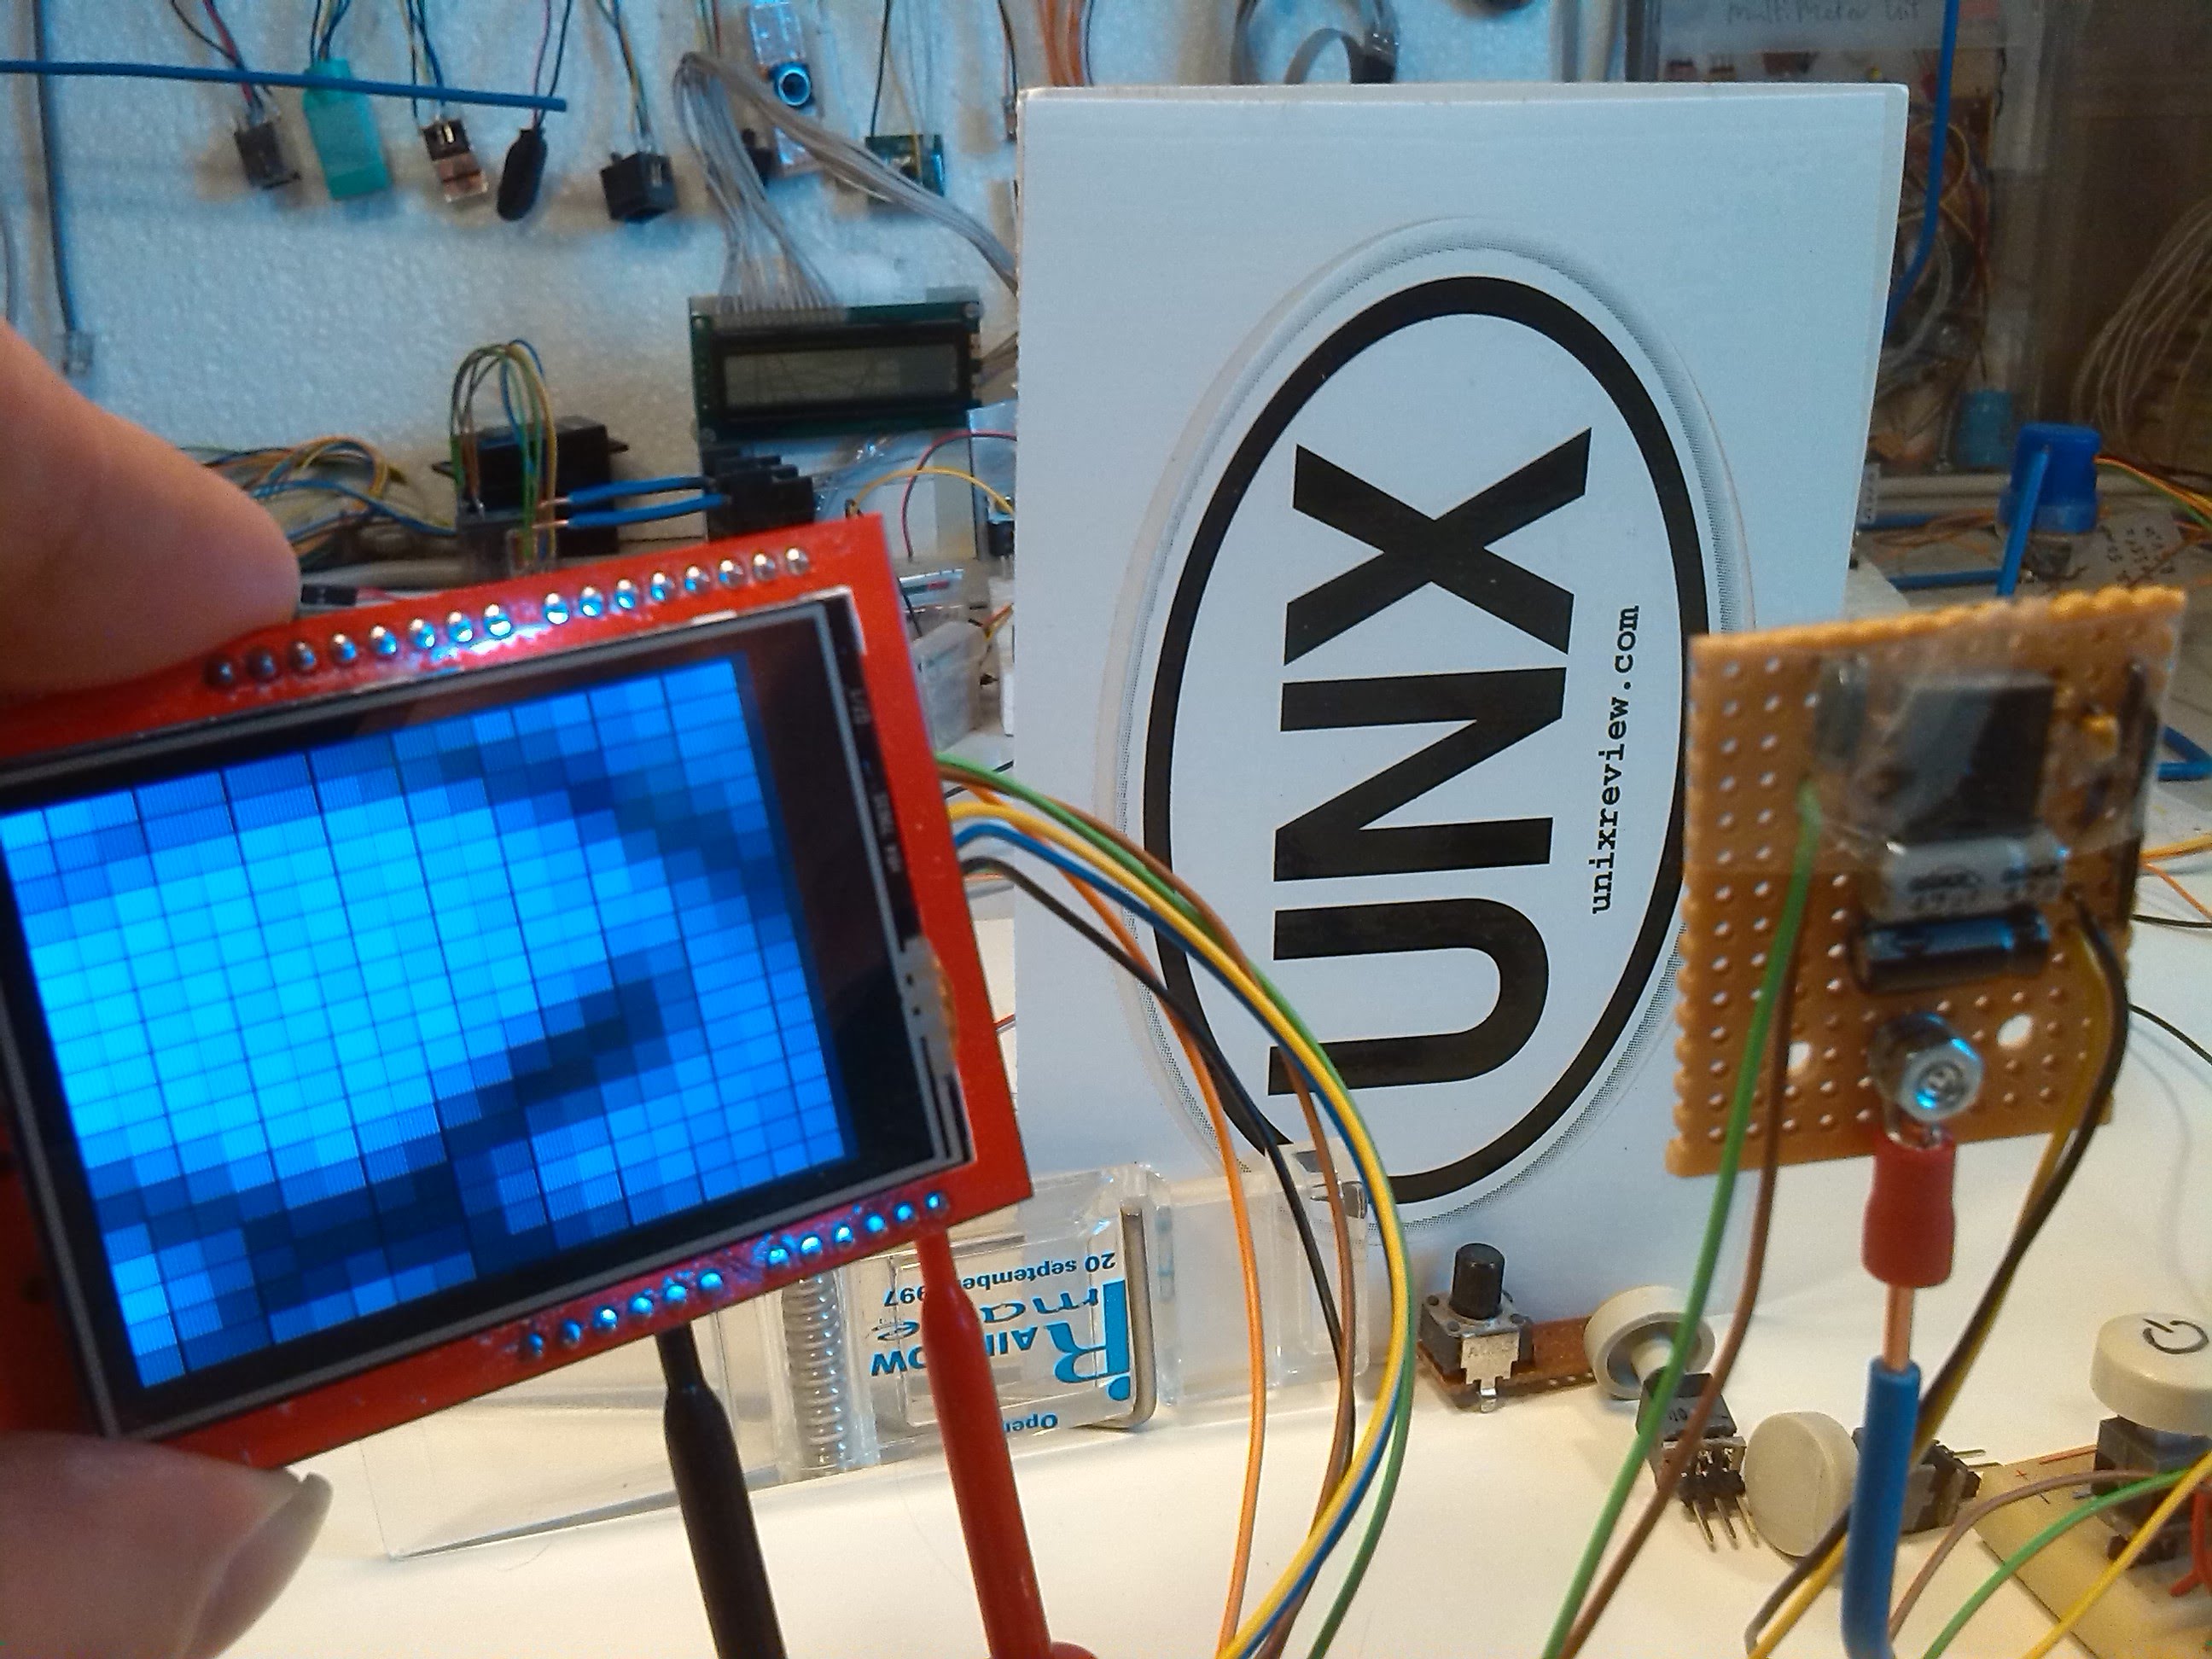
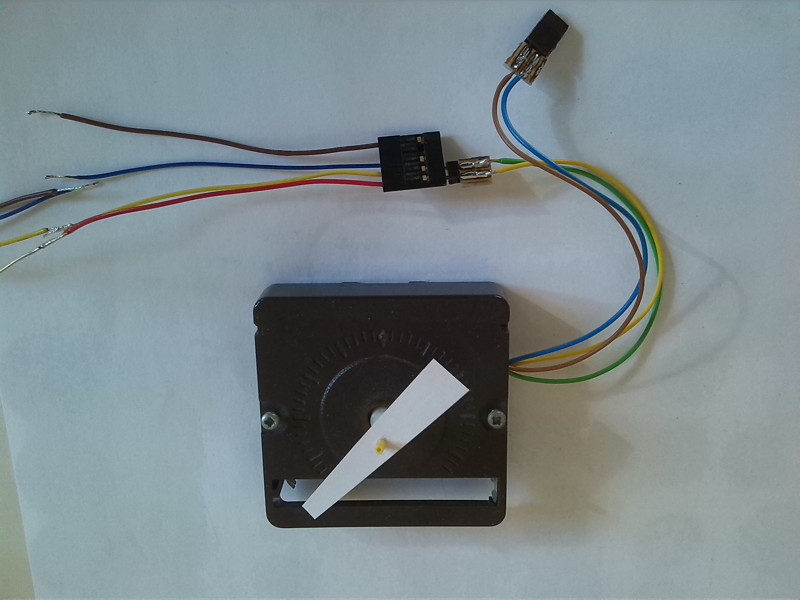
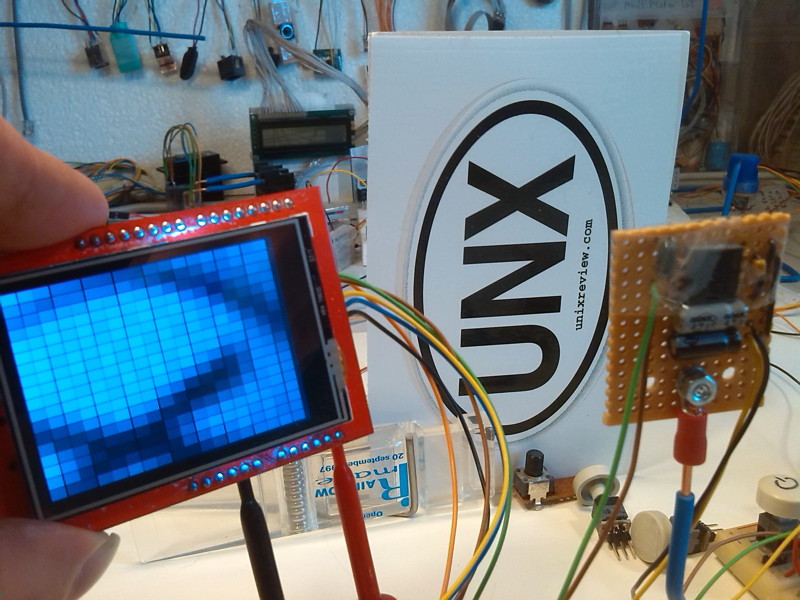
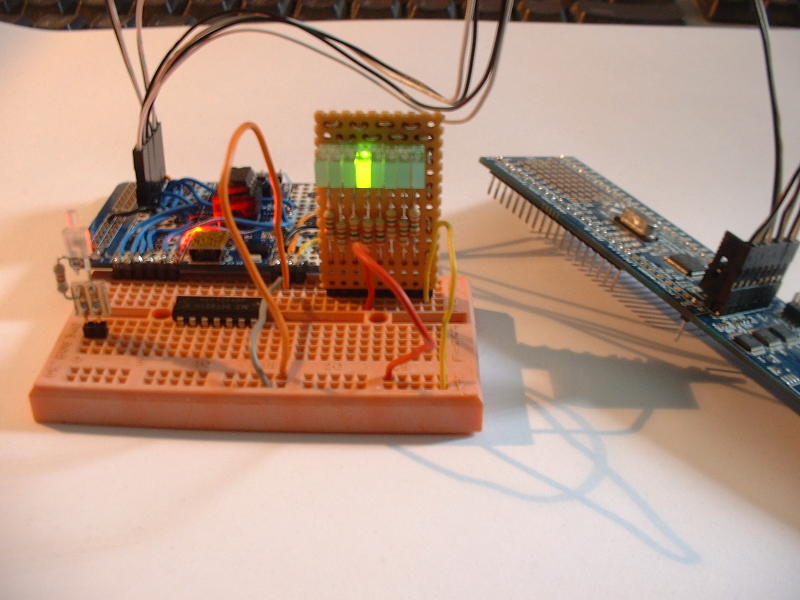
Arduino TFT Shield |
 |
For only 10 Euro you can get a an Arduino TFT LCD shield with touchscreen and microSD
which makes it a lot more interesting as you add new ways for input and output.
So this was an experiment what you could put in the 32kb flash.
Result was a scope and recorder, voltmeter, capacity meter, frequency meter, clock, bar meter, mouse camera etc.
(Video)
|
Can you make a clock movement run backwards ? |
 |
(Video)
|
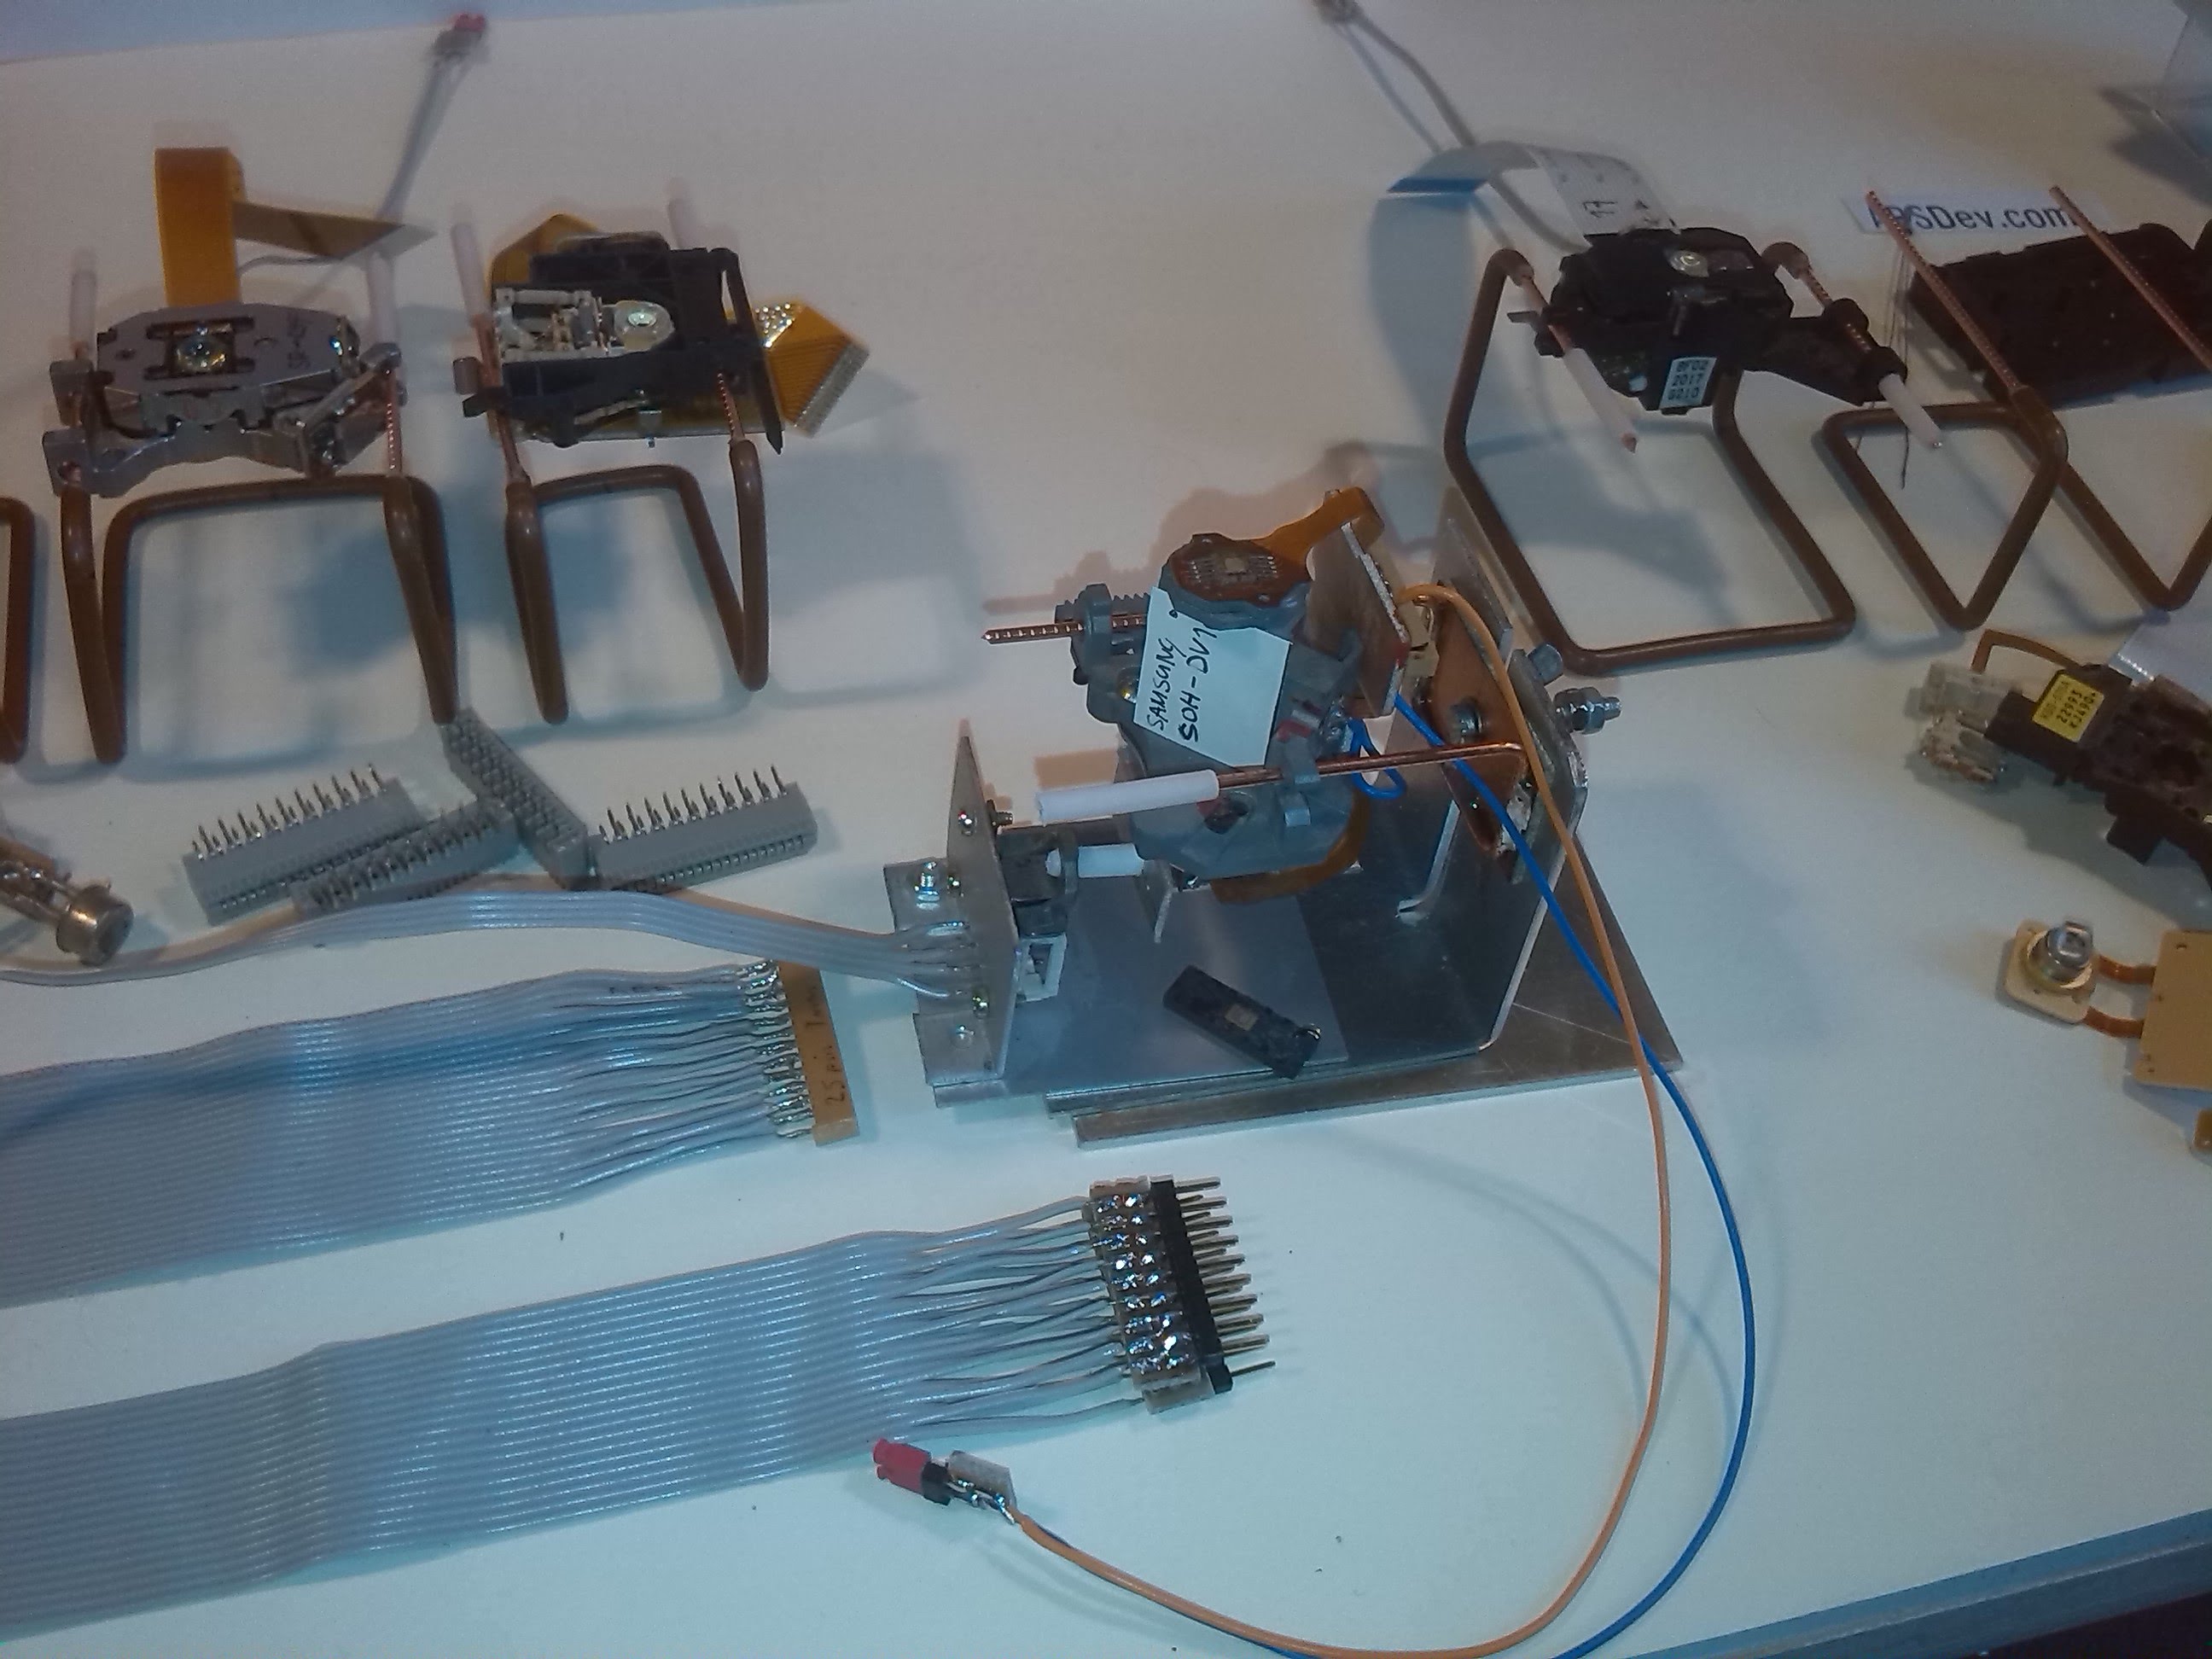
cd/dvd rom heads. |
 |
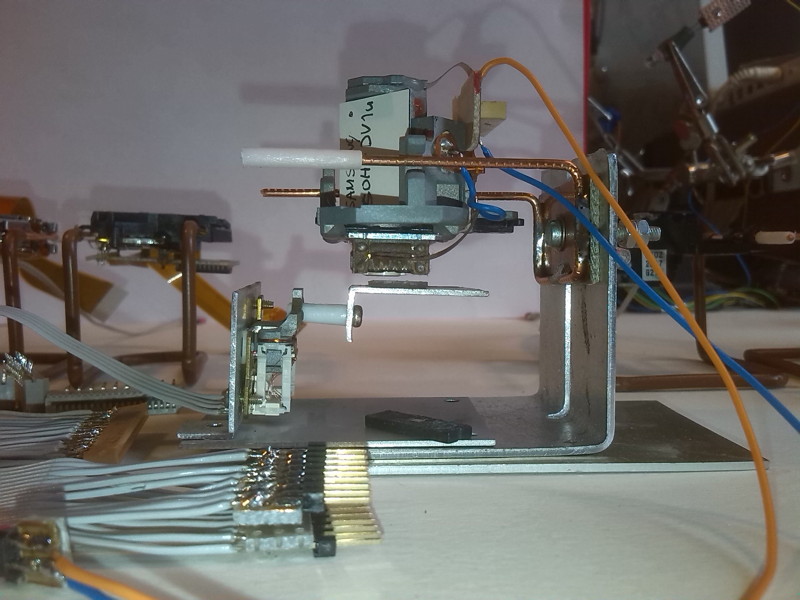 |
 |
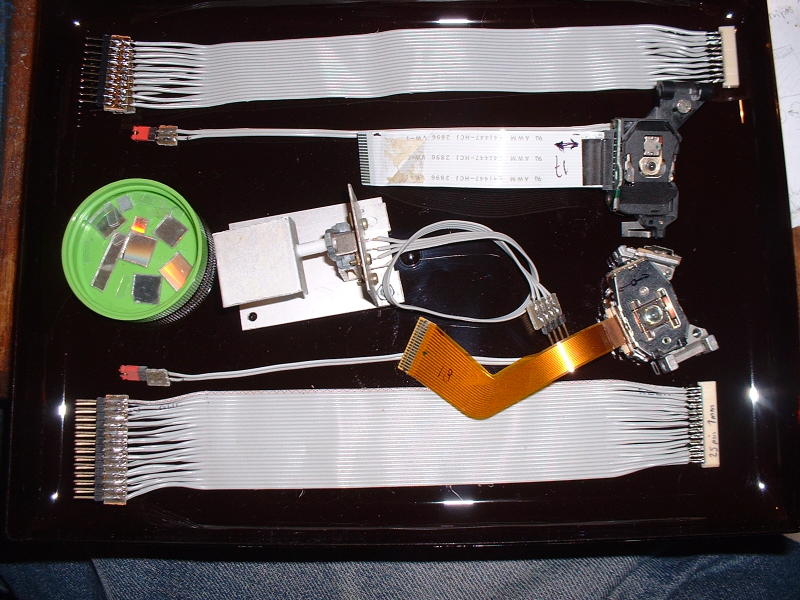
Way back in school i did some reports about how CDplayers work, and years later i opened up
some broken CDrom drives and wondered if i could use the heads to make something like a scanning microscope.
So i figured out the connections and made some adapter cables, and soldered some protection cables
to the laser connections. I made a little object table with the lens actuator from another CDrom head.
Also with these cables and the earlier CDrom motor cable it might be possible to control a complete
CDrom drive.
|
(Video)
|
Fan with switchable direction. |
 |
So the CPU heatsinks in my PCs get covered with a layer of dust after a while,
so the CPU runs hotter and the PC gets slower. So i wondered if i can reverse
direction of the fan to blow away the dust. See video for a longer how to.
(Video)
|
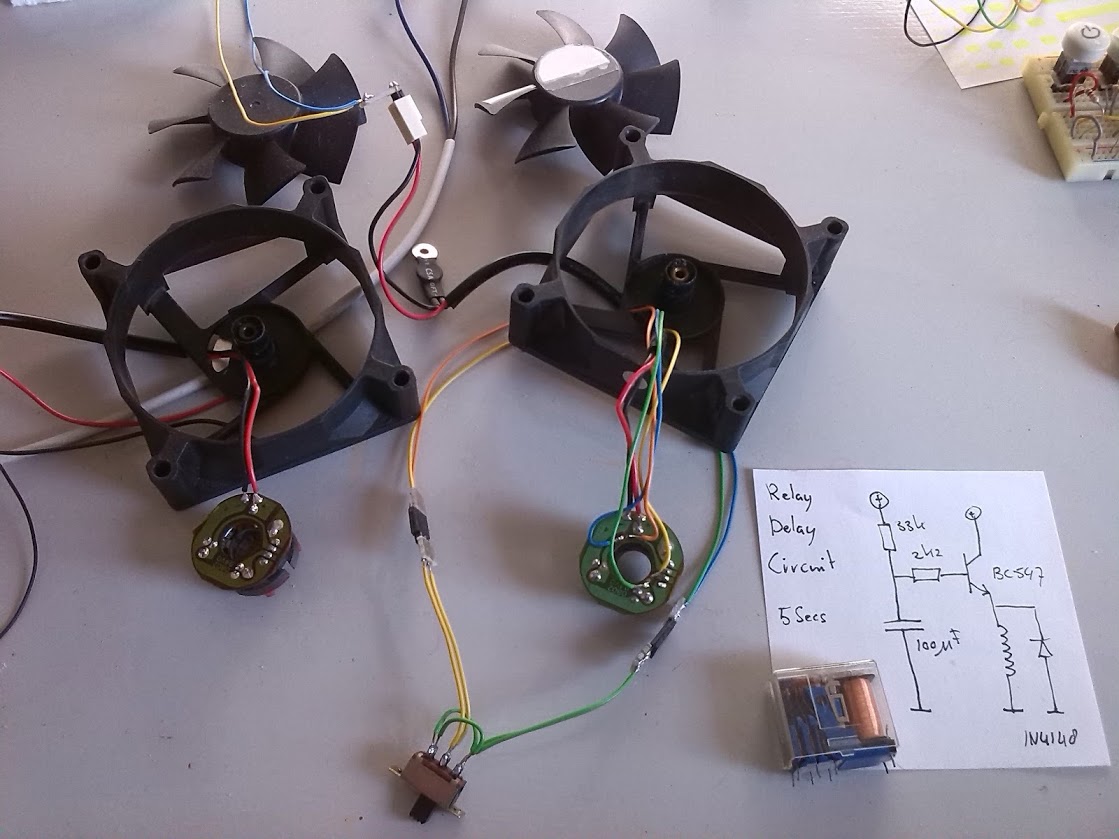
Fan with automatic direction. |
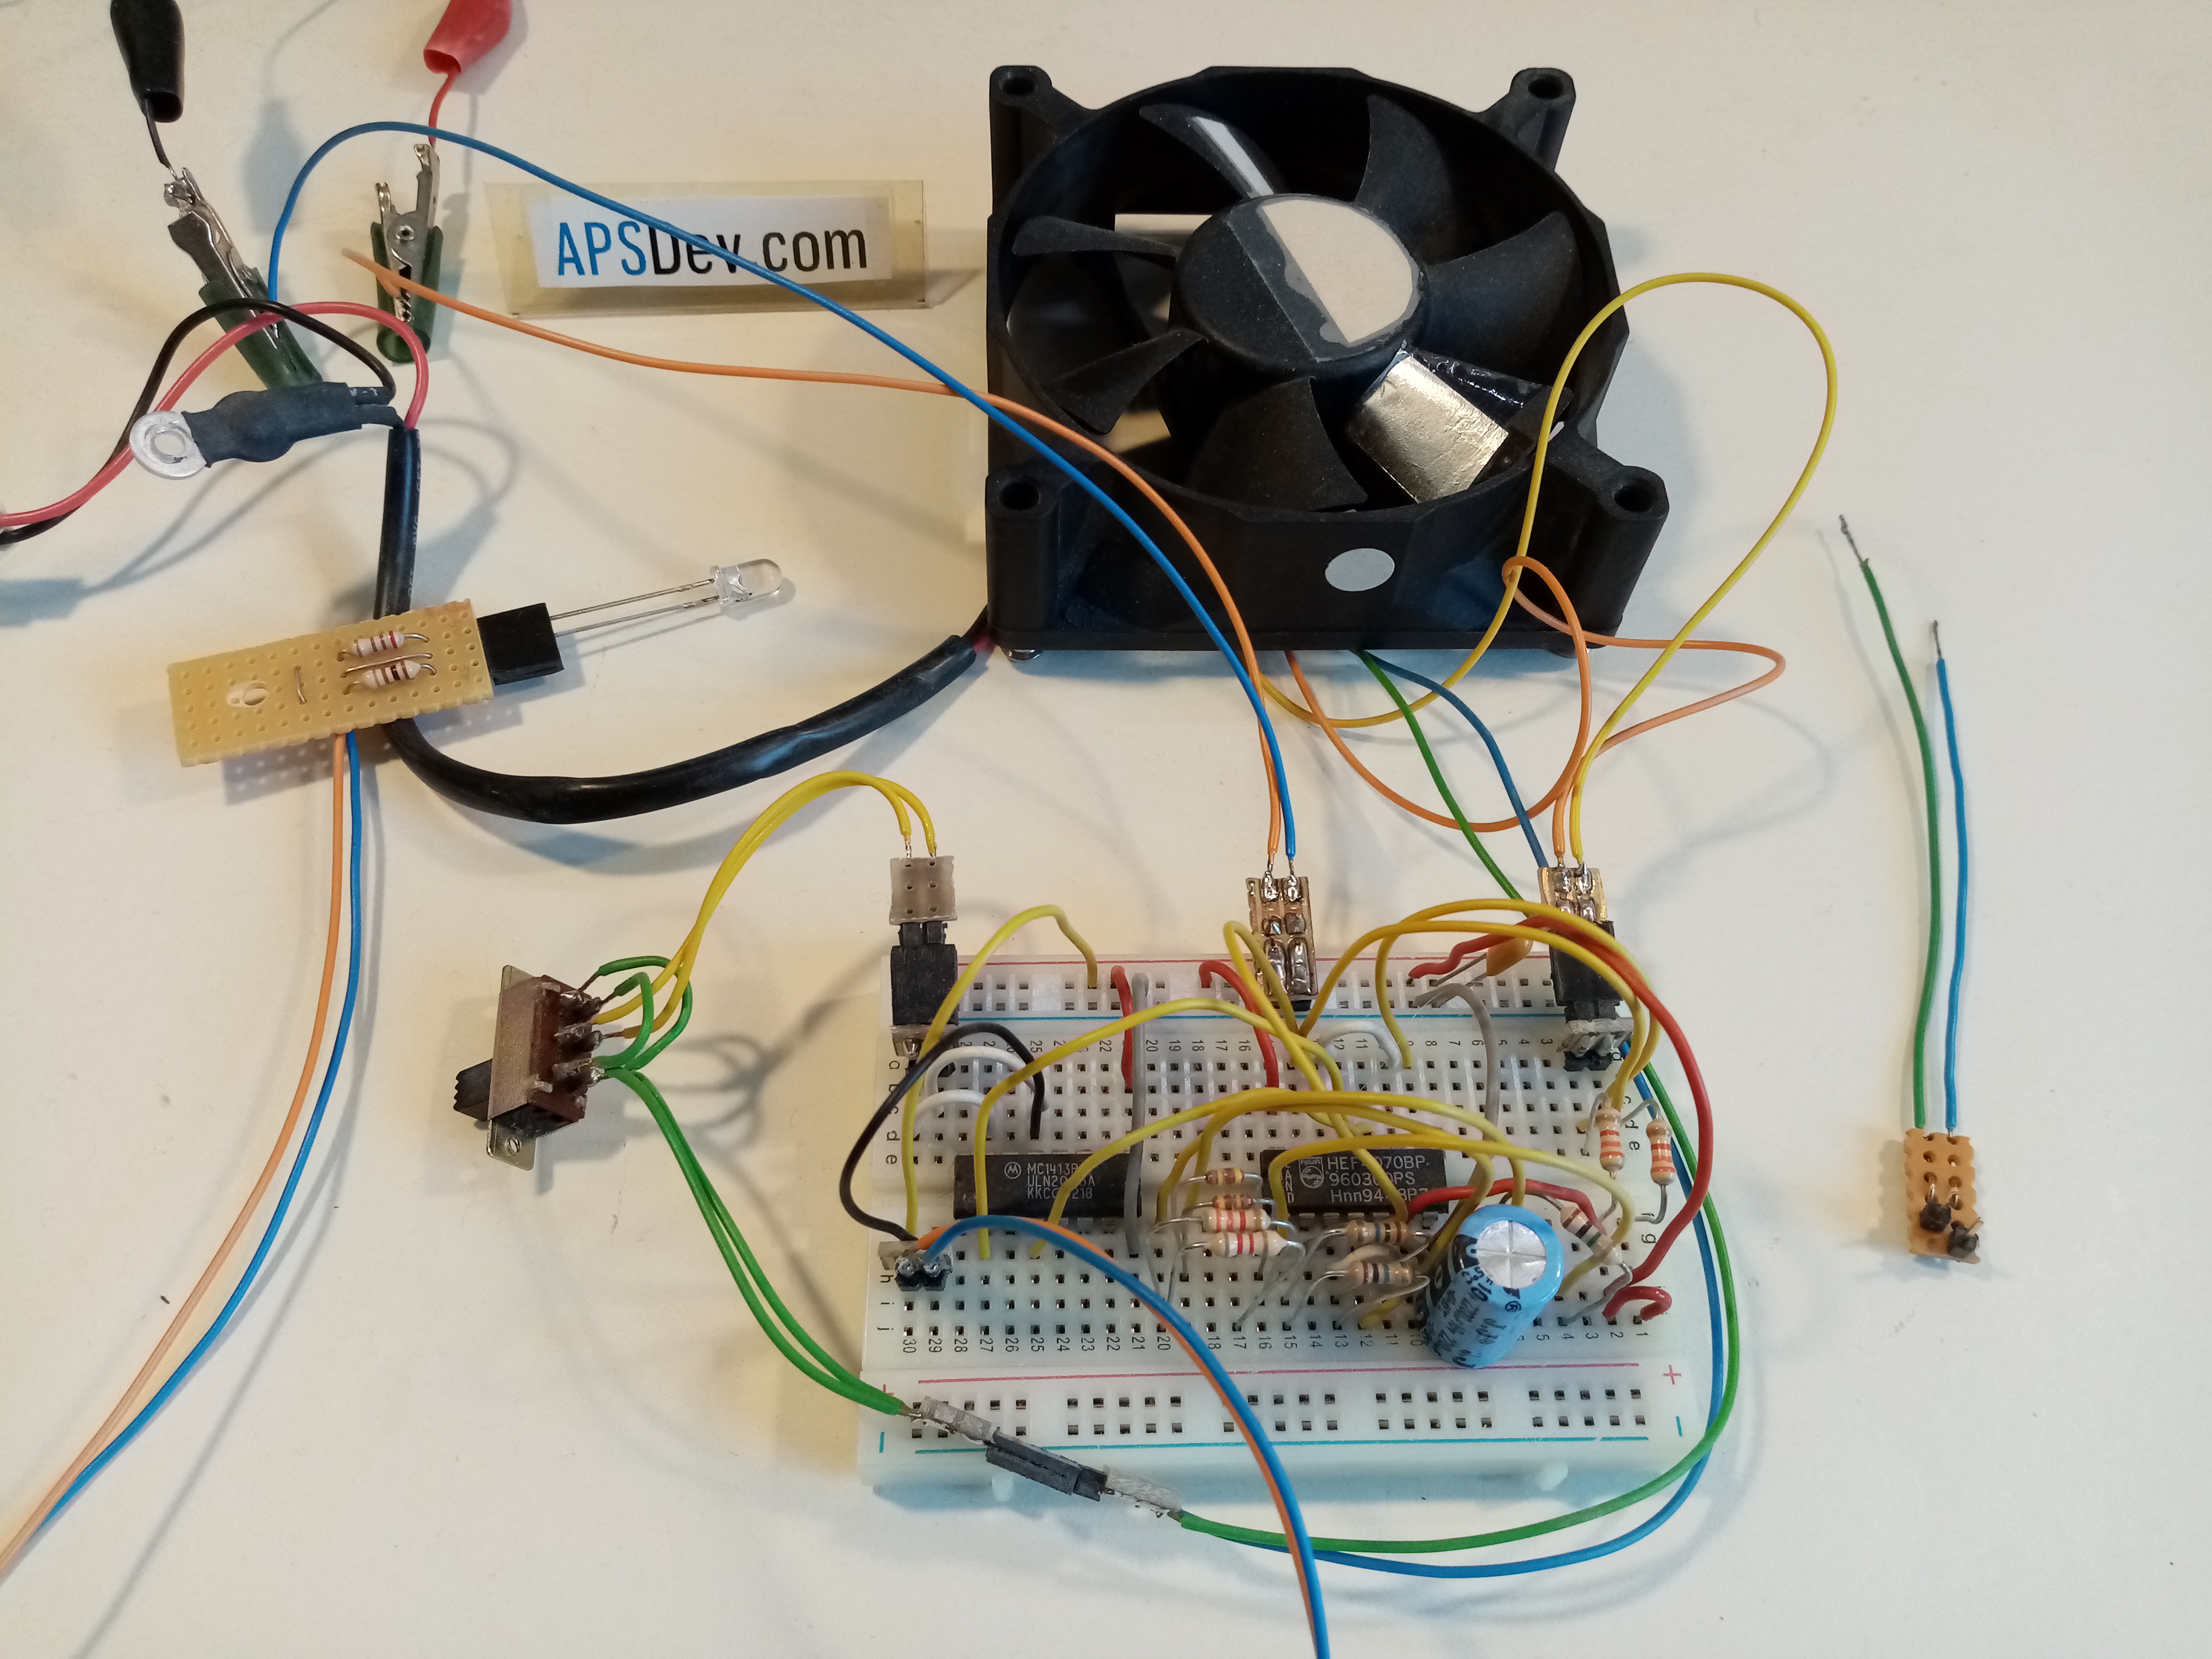 |
This is an advanched version of the bidrectional fan, with the use of 4 gates and 2 transistors
you can change direction of a fan after a certain period of time for a short period.
|
CPU controlled Fan. |
 |
An even more advanched version that uses a microcontroller for direction and speed.
|
Foil Fan. |
 |
Some time ago there was this news about soundless piezo fans, but they are expensive
and dont replace much air. And i was wondering if you could make them with different plastic foil
of different thicknesses a magnet and a coil.
|
Peristaltic Fan. |
 |
In theory you can make a fan by having 3 speakers each with a signal on them with a 120 degree
shift in signal. However making it is tricky as speakers can only move a small bit. If you try moving
the cone to far the coil hits the end and gets flattened and they deteriate. Which i discovered by
connecting fans to a model train transformer. Also you can use only very low frequencies or you will
hear the noise of the speakers.
|
PCB etching. |
 |
So i dont have a real setup to etch PCB's anymore, but i read you can etch PCBs with household things like vinegar salt and peroxide.
Now i dont have peroxide so i made this setup with a heater to test it with only vinegar and salt.
|
--
TV/FM tuner. |
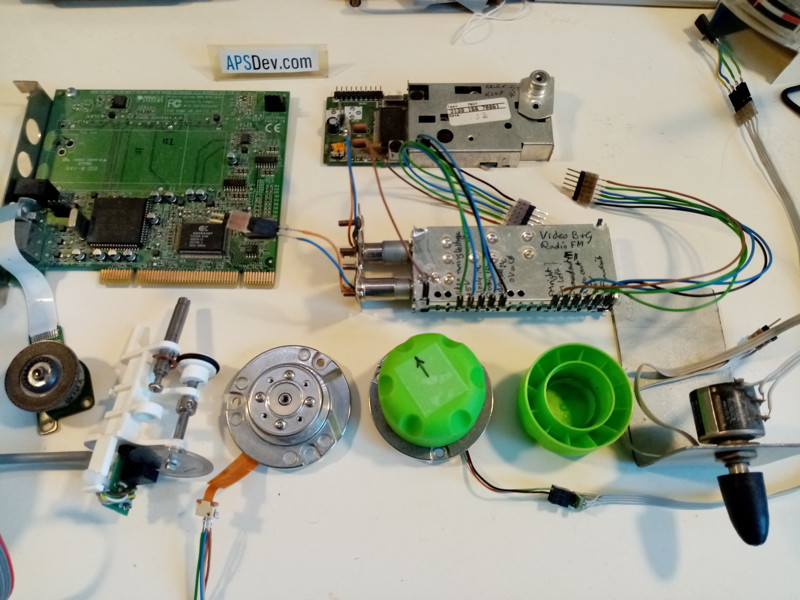 |
So there used to be these PC PCI cards that where a TV and an FM radio tuner.
So studied the datasheets of the tuner and i figure you can use them to make a very wideband
FM/AM radio .. and perhaps receive things like aircraft.
Also trying to make a better tuning knob using digital encoders or a harddisk motor.
|
Spectroscope. |
 |
Trying to build a spectroscope using the CCD sensor from an old fax machine
|
Metal detector. |
 |
So old metal detectors often used some identical coils as a sort of oscillator to detect metal.
But these days with microcontrollers it would be interesting to use a coil with thick wire to send a pulse
down .. and use several small coils with a lot of windings to analyze returning signals.
|
Pendulum. |
 |
 |
Experiment to measure gravity to measure the time that a pendulum makes to make a number of swings.
The most accurate gravity sensors drop a weight a lot of times and use very accurate clocks to measure fall time
and take the average of a lot of falls.
|
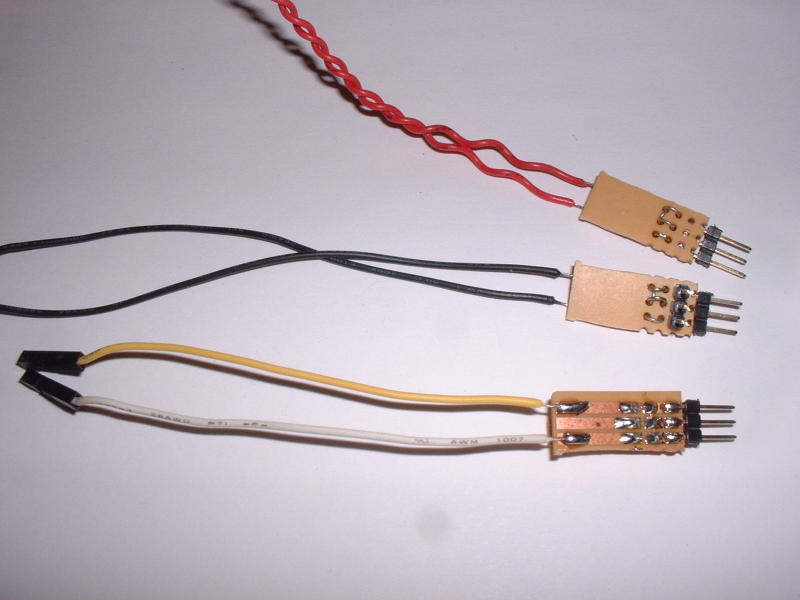
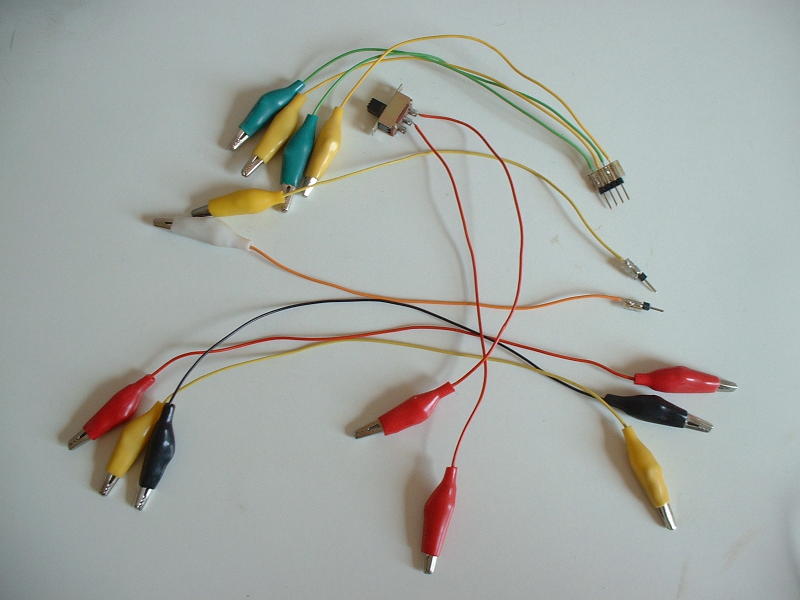
Connector rig. |
 |
I made a lot of small connectors using header pins, this is the rig i use to solder them.
Including a little device to hold wires so i can tin them
|
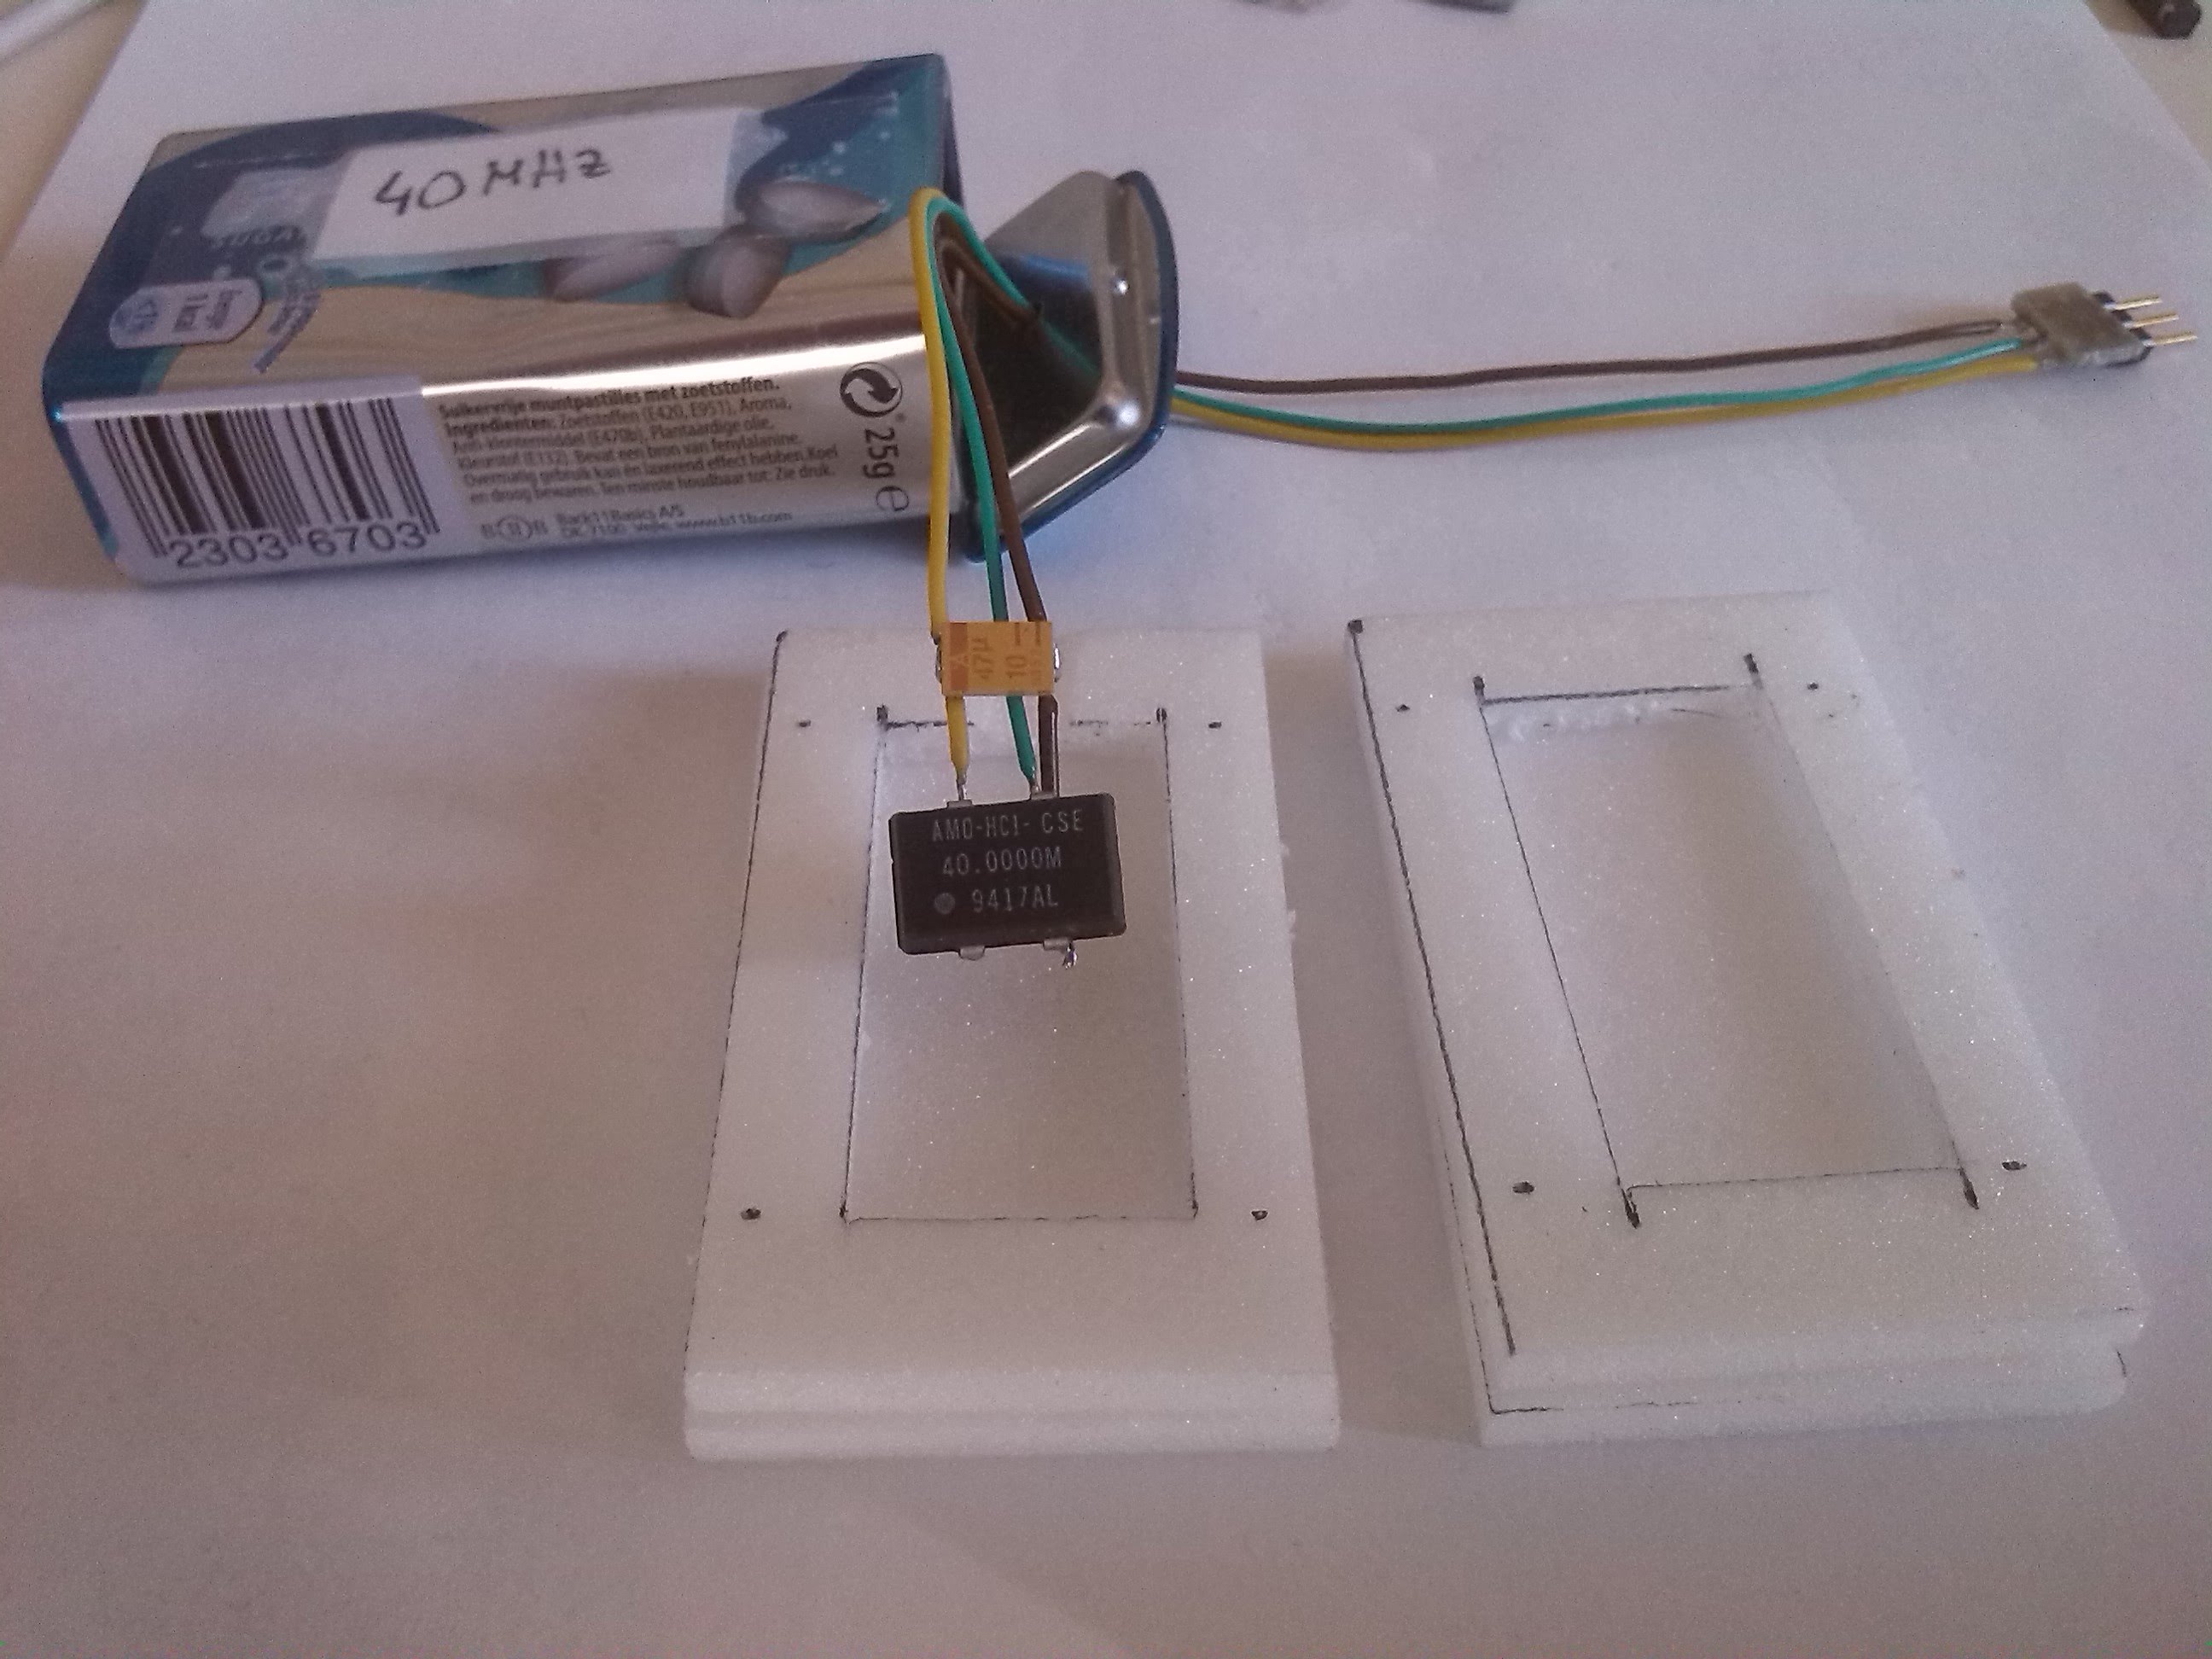
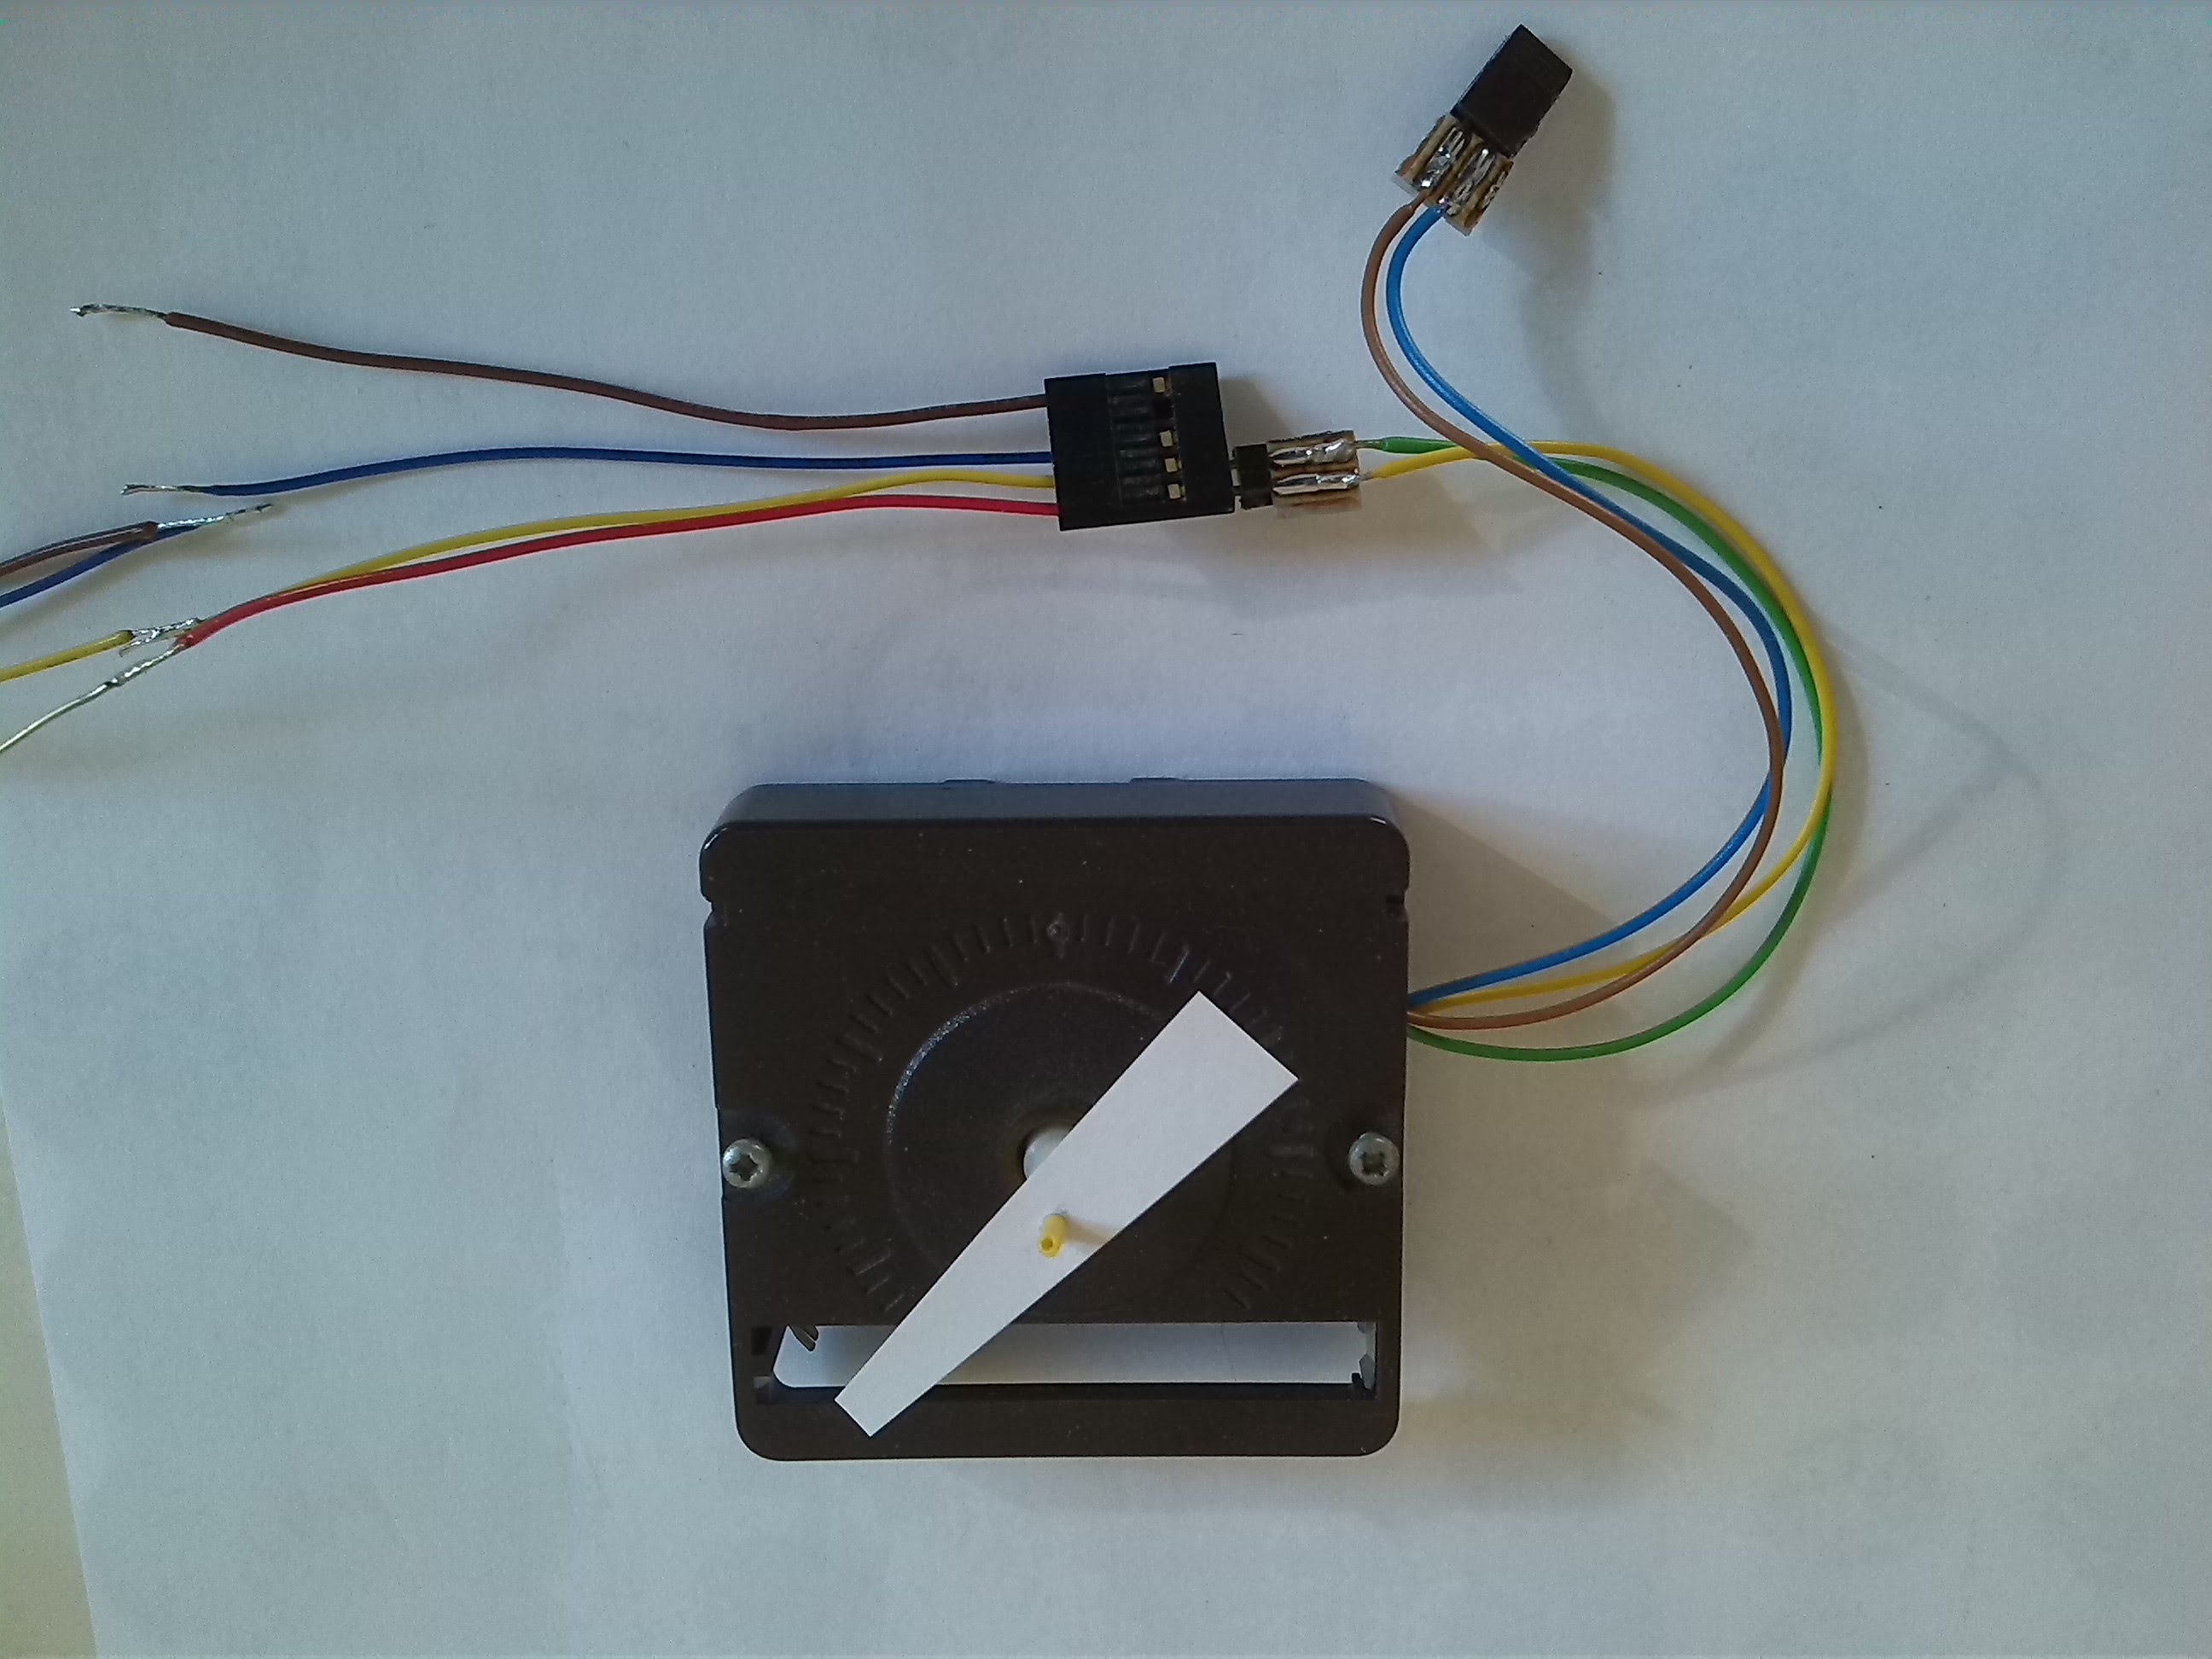
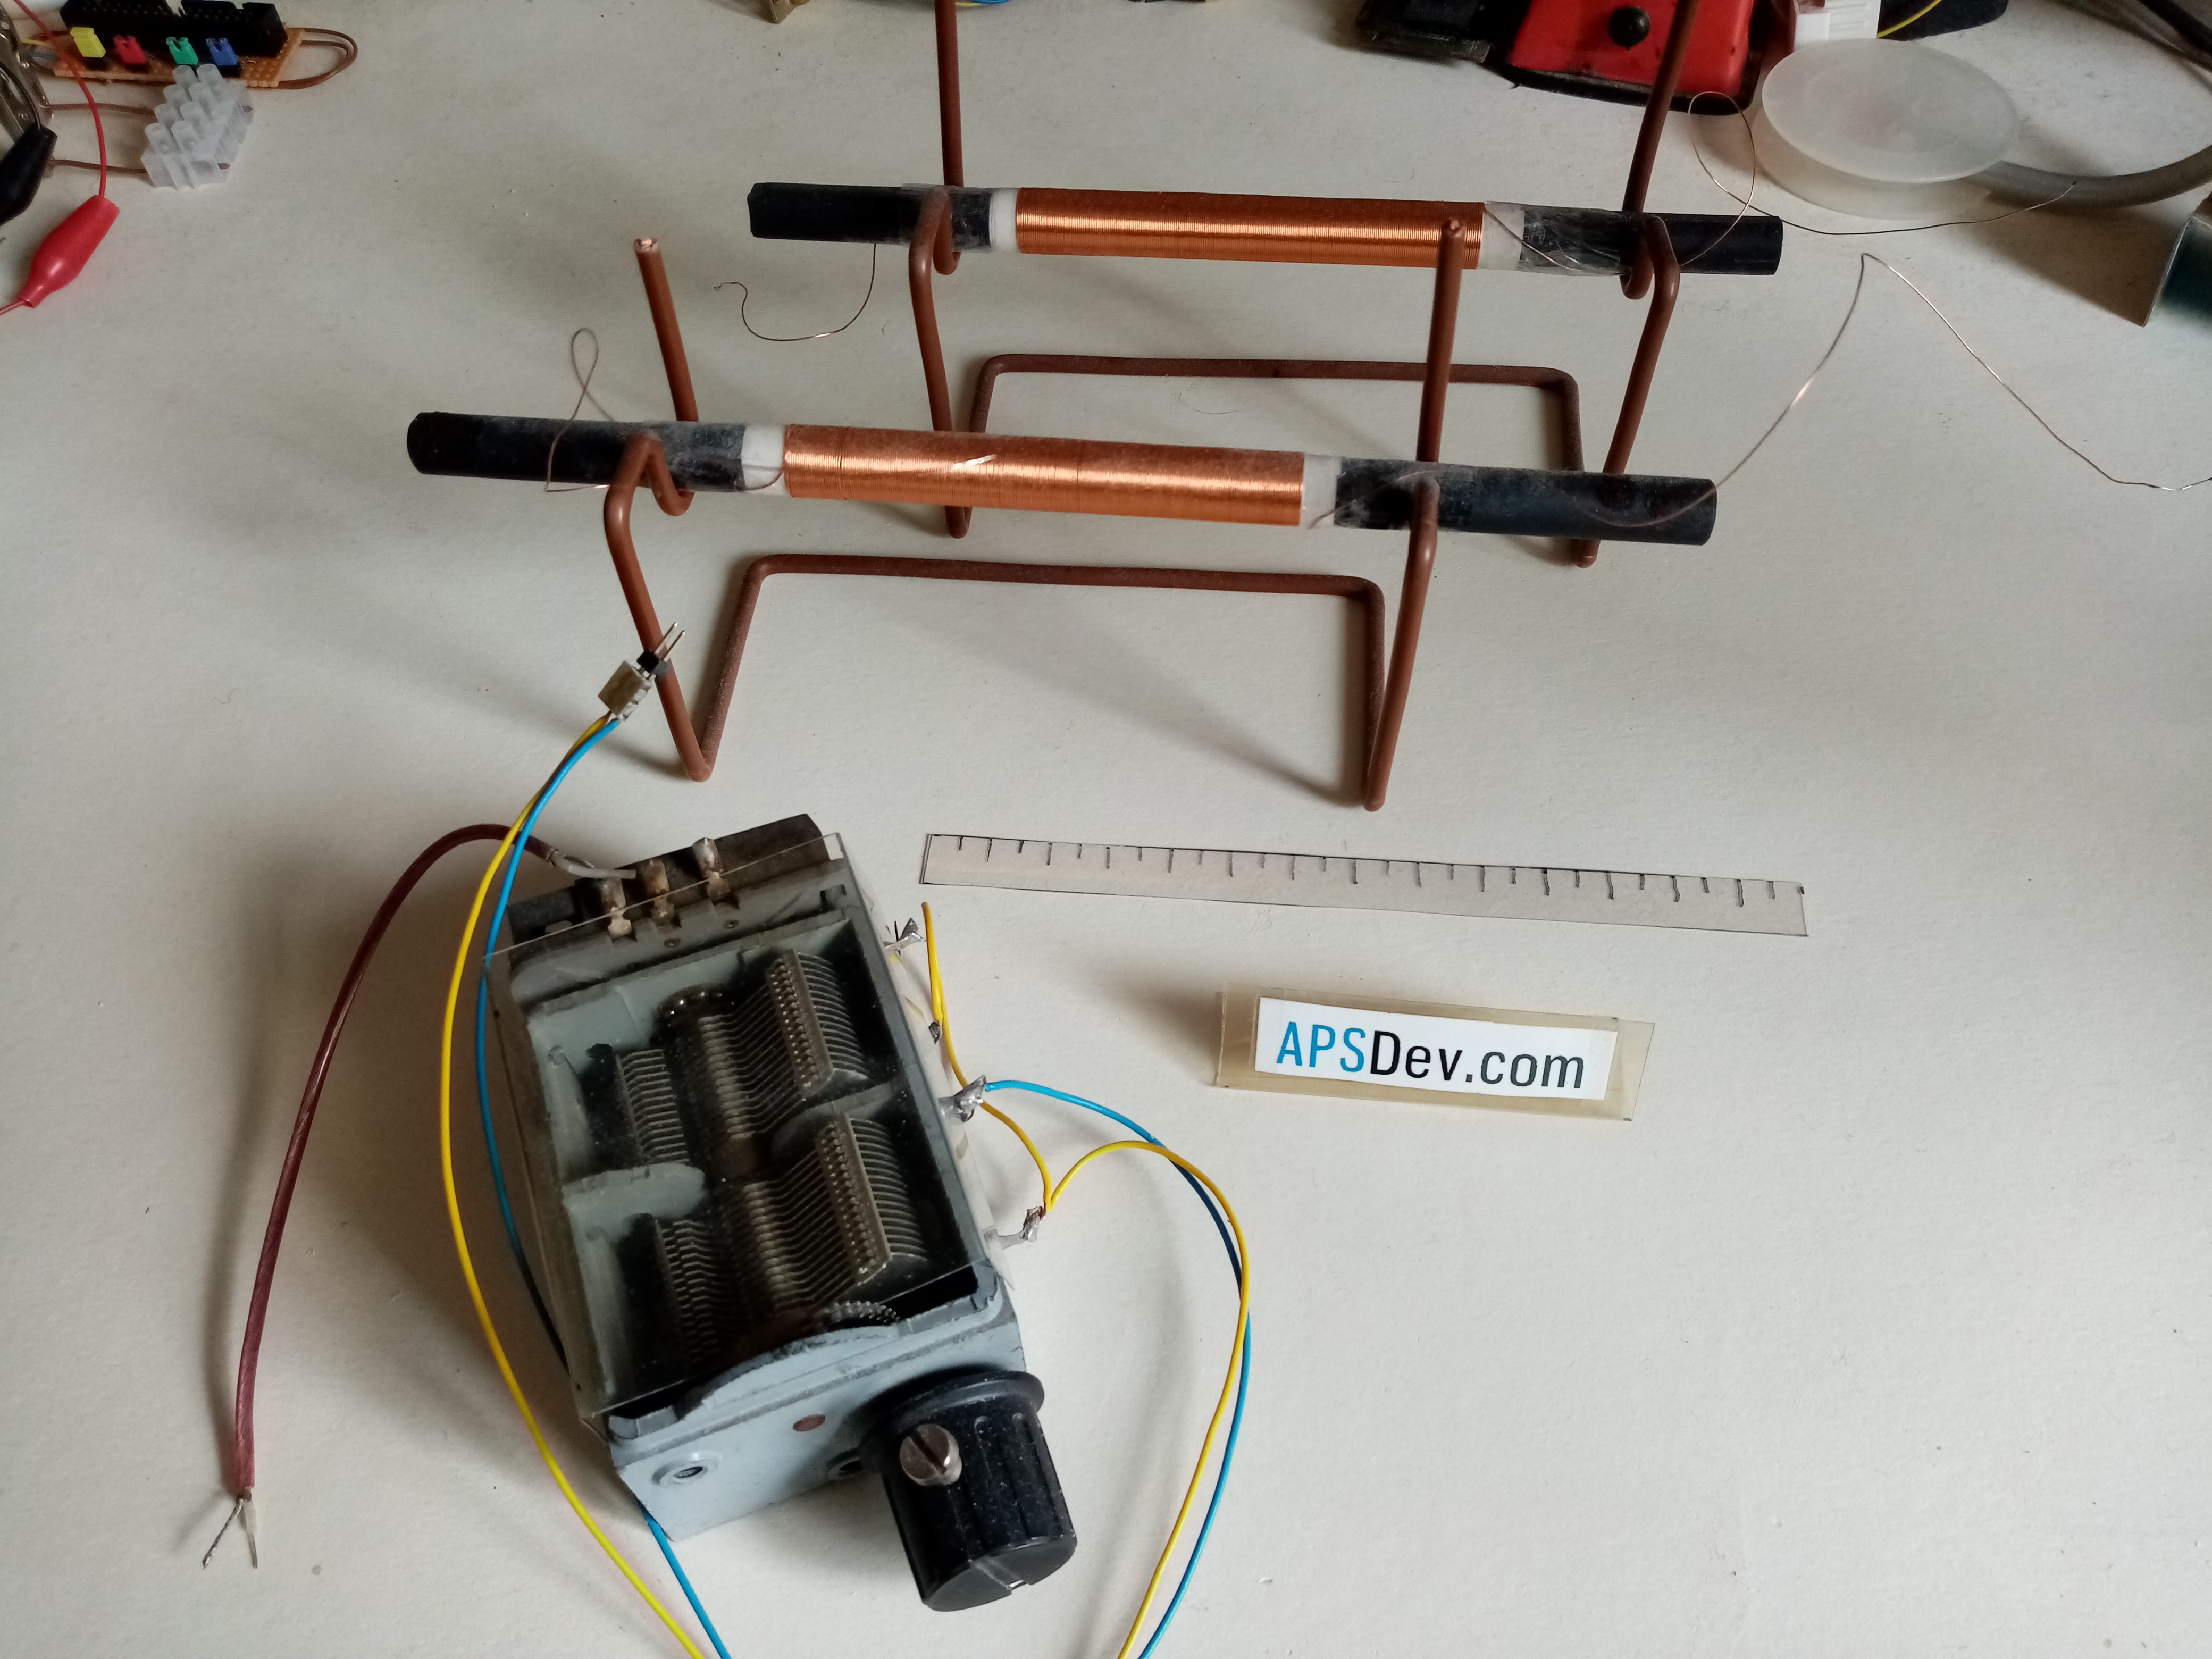
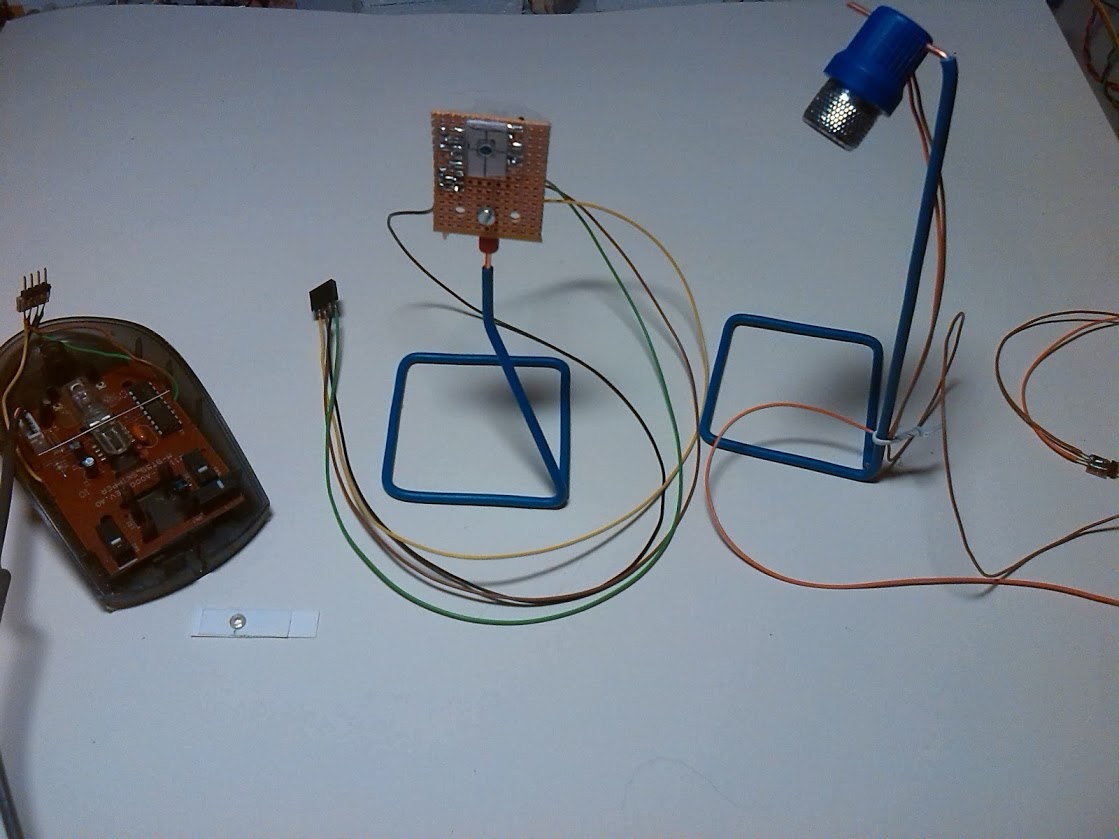
DCF 77.5 khz clock receiver. |
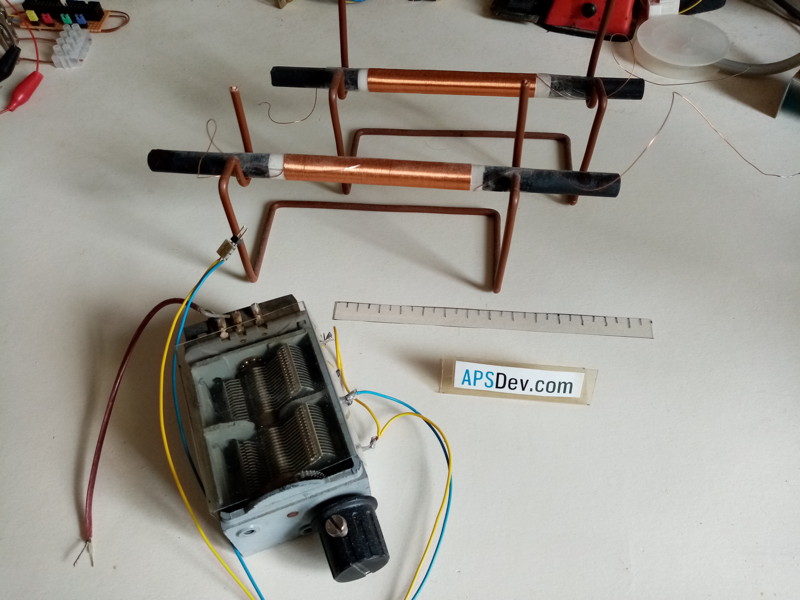 |
Can we receive the DCF 77 signals with just a coil a variable capacitor and an oscilloscope ?
|
---
VFD display as vacuum tube triode. |
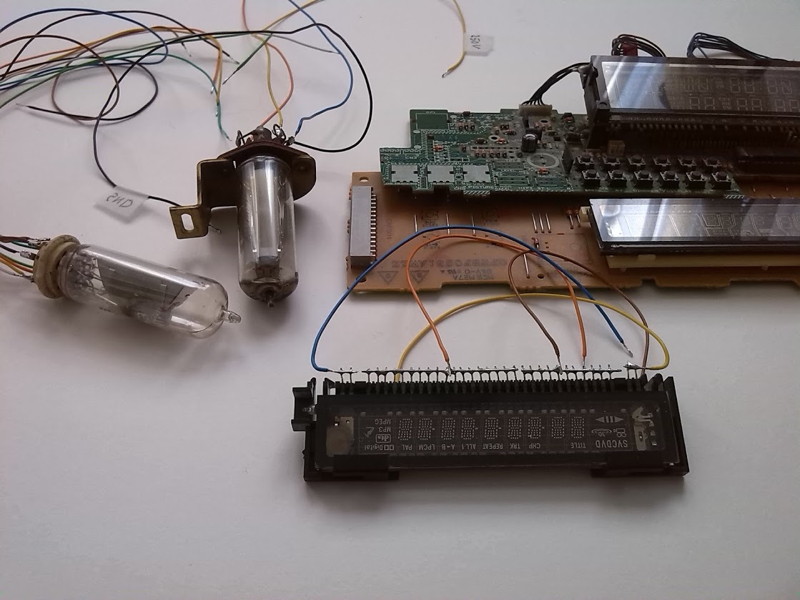 |
Before transistors radios and record players used vacuum tubes as active
elements to amplify signals. The VFD displays found in VCRs and DVD players use a
construction that is very close to the construction of a vacuum tube.
So you can use them to amplify signals. Actually Korg makes a components called nutube
That looks like a VFD display and is a couple of vacuum tubes makes with machines
to produce VFD displays.
(Video)
|
---
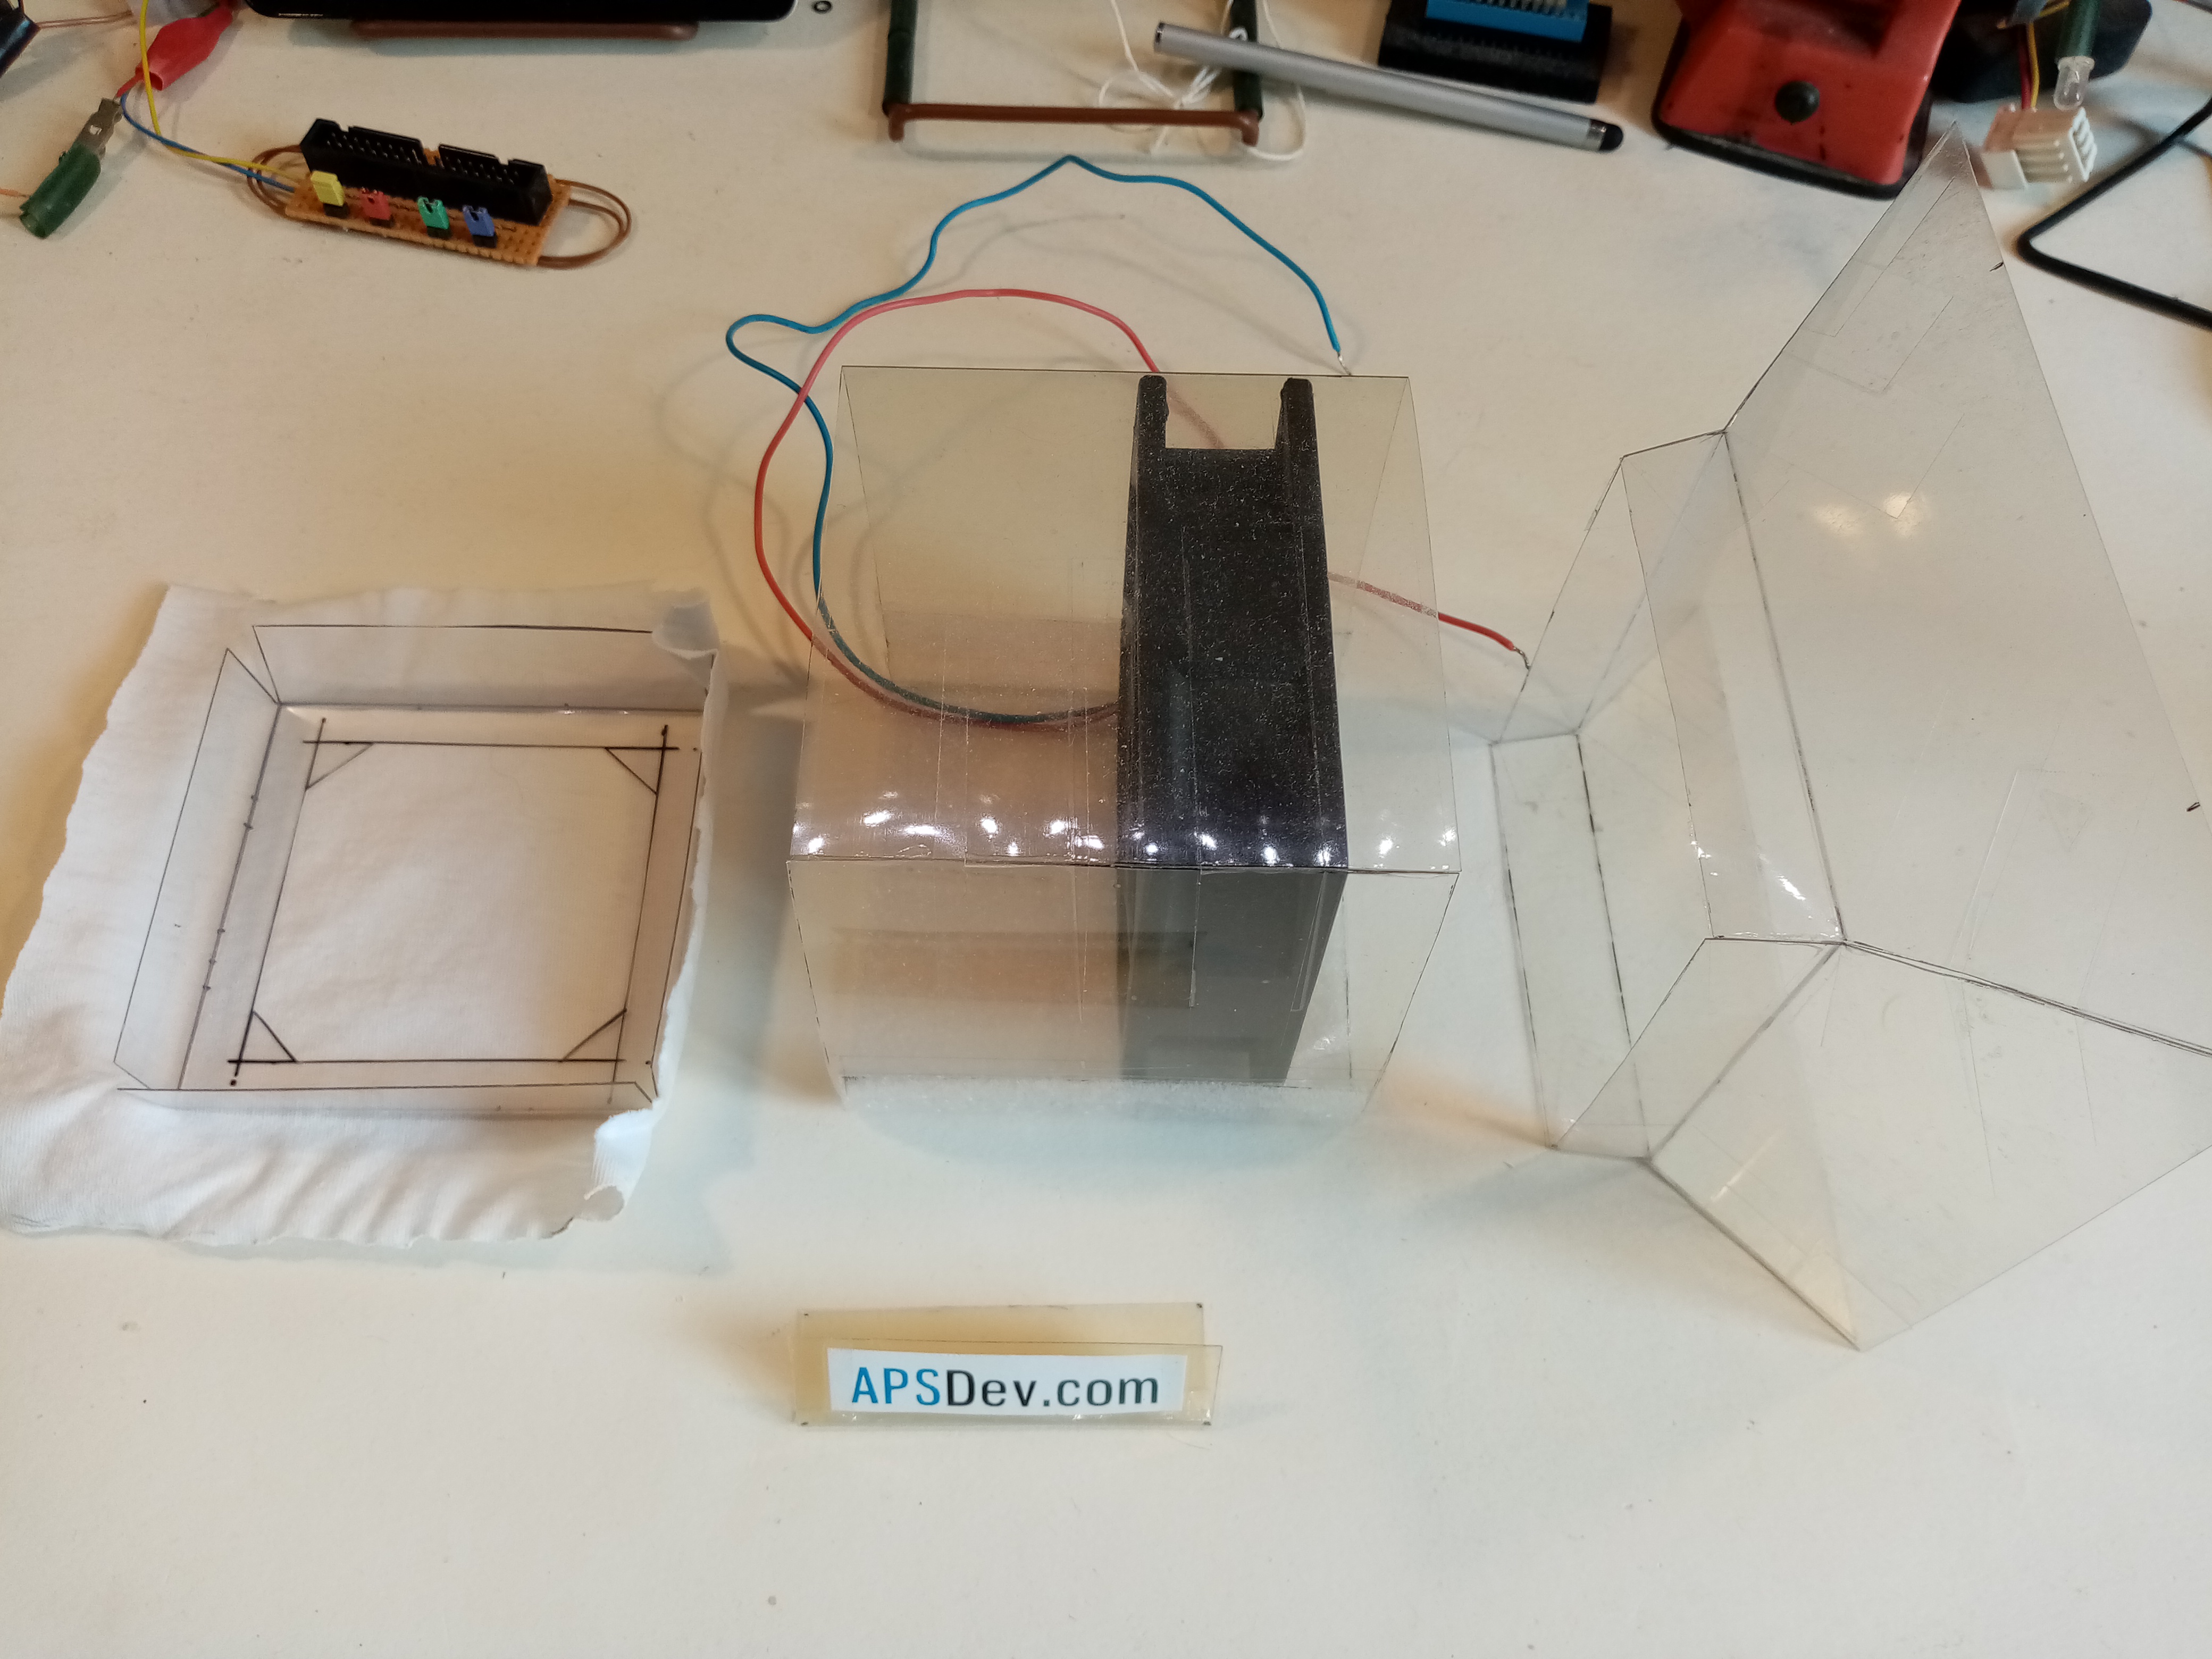
Fruitfly trap. |
 |
 |
So i read that you can trap moqsquitos efficiently with a fan and some fine netting.
So i wondered if it works with fruitflies too. It does seem to work, a problem is odours from
fruit are expelled from the netting. So part of the fruit flies collect behind the device.
But i guess if it is long enough on, it will trap most of them. To try to fix this i made an extension
that is supposed to lead the air around the device to the fan, but i havent tested it yet.
It doesn't seem to work on flies.
(Video)
|
Watches. |
 |
 |
A little experiment in operating low power devices on solar power.
In this case instead of microcontroller i used old watches that use about 1 uA at 1.5 volts.
I used an LED as a sort of voltage controller so the voltage doesnt get too high.
Problem is to store energy for when there is no sun, i used a 1F capacitor which worked great.
For the other watch i used a 1000 uF capacitor which only holds energy for 10's of minutes.
The other watches i tried to start in parallel for a different experiment, which proved very tricky.
They work at 3 volts and have a reset pin, if you switch them on at random often they dont run right
until you reset them. Adding a reset wire was tricky too.
So i added a switch with a resistor to try to discharge them so i could power them up several times.
|
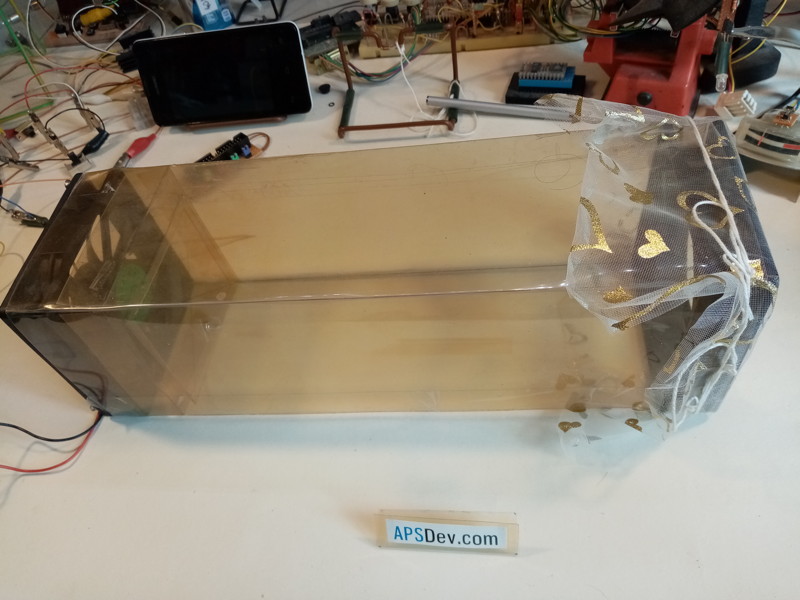
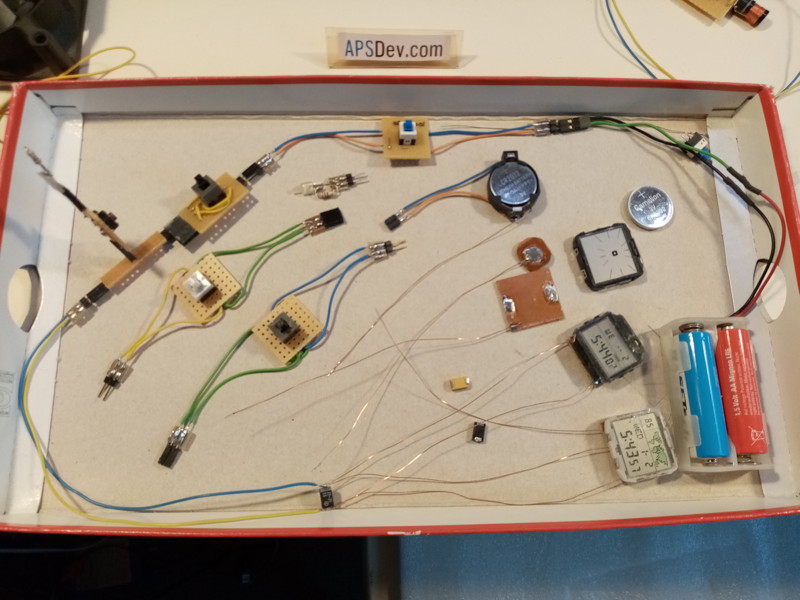
Wireless recharge. |
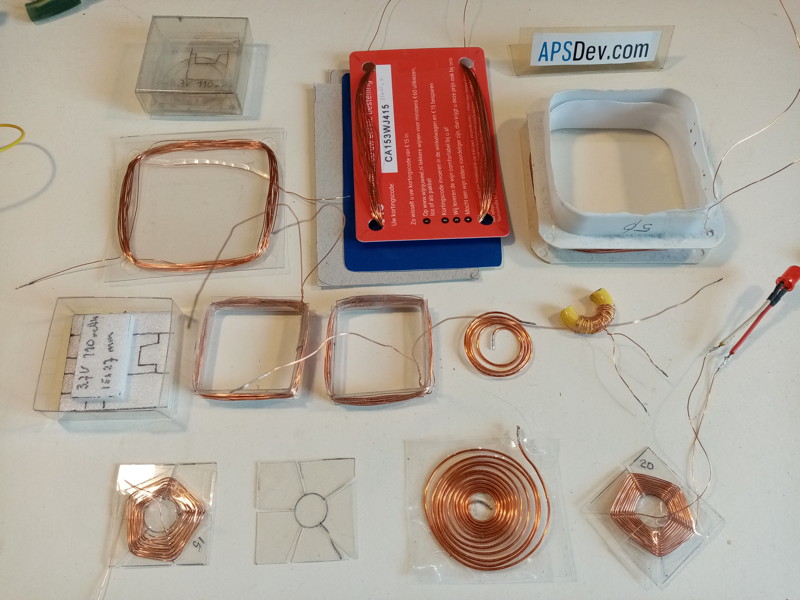 |
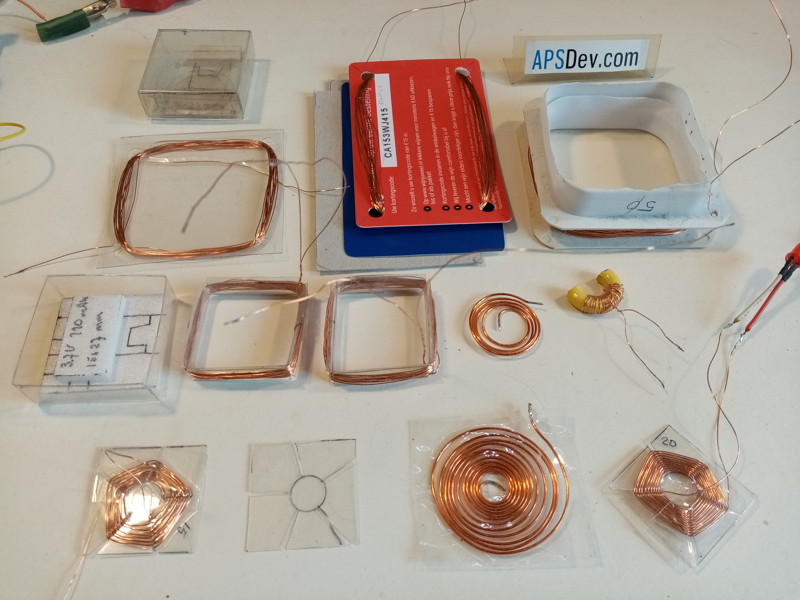 |
Experiments in trying to make a device with wireless charging.
|
Motors. |
 |
There is this old trick where you connect to stepper motors electrically and you turn the axle
of one and the other you dont touch turns in sync. In practice this isnt that easy.
You need steppers that produce a lot of steps and works best if you feed a high impedance motor (100 Ohms)
from a low impedance (5 Ohm) motor.
Tried the same with 3 phase or brushless motors but that didnt work well, also those dont have many steps.
Next step is adding an amplifier.
|
Pager. |
 |
 |
I have these old pagers i bought long ago from an electronics store with schematics and description of
how to turn them into FM radios. Way back they where use by fire brigades and things like that.
They work on the FM band, where one transmitter continously sends codes to all pagers.
The idea was to make a little FM transmitter and have the BBS send a code to the pager when someone pages the BBS.
But the golay error correcting encoding proves very tricky.
So maybe its easier to just make a custom pager with 433mhz modules and arduinos.
|
Radiation detection. |
 |
In the past geiger muller tubes where used to measure radiation. They are expensive and
tricky as they need high voltage and are filled with special gasses.
But there are other ways to detect radiation like with BPW34 photodiodes or ionization chambers.
Basically a metal can with a wire through them, you put 9 volts on them, and use some transistors
to measure the current.
|
---
Optical mouse camera. |
 |
 |
 |
 |
So the sensor in a mouse can be used as a small 18x18 pixel camera, i actually
converted a mouse once to be able as a camera. Problem is that the default lens only focuses
a few millimeter. But i found out that if you use the lens of a CD ROM drive it works fine.
So for use with robots i made it into a tiny device. Advantage is that as it is a DIP device
it is very easy to solder and has a very simple programming interface.
Also if the robot doesnt have much computer power 18x18 pixels is a lot already.
and if you angle the sensor at 45 degrees you have 25 pixels on a line.
I wonder if you use it with an RGB LED you can make a color picture, also as the mouse still
gives the 'mouse position' i wondered if the resolution was smaller as the size of a pixel
so you can overlay several puctures and get a higher resolution. But i have not been able
to get that too work properly.
(Video)
|
Wifi. |
 |
So as we are between hills its hard to get internet on a phone outside.
So i tought of making a directional Wifi antenna that i can point where i go.
The easiest to make is a yagi antenna. Which i made from 2.5mm2 installation wire
glued to two layers of thick cardboard. And where the dipole is stick a wifi stick antenna.
As those antennas have a dipole inside. You can actually turn a USB stick in a PC into a
access point with software settings. Big problem was that when i connected the stick with a
USB extension cord it didnt work ! So i figured it was because it use big pulses of current
to transmit and the device doesnt have a capacitor big enough to buffer the current.
So i made an adapter with a big capacitor from a USB-PS/2 adapter and an old USB cord from a
wireless keyboard receiver .. and it worked !
(Video)
|
USB case. |
 |
I was thinking about some usb cases to keep backups organized, i actually made some
sketches but did nothing with them. Then i showed them to Joke Belonje who makes all sorts of
boxes .. and she turned the design actually into some very sturdy actuall cases !
|
USB A. |
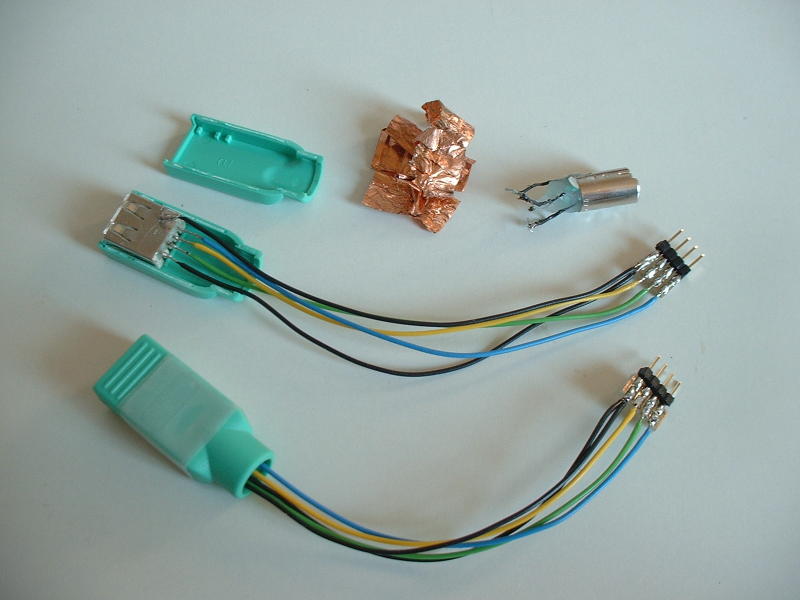 |
I wanted to use the USB port on an MBED controller on a breadboard, but did not want to pull
a HUB apart for a USB connector. So i rememberd i have some of the PS/2 to USB "converters"
from logitech mice laying about. So i pulled them apart and soldered some wires to them.
|
USB B. |
 |
These are USB B connectors i got from old printers, usefull for if you want to use an MBED,
or power a breadboard by USB !
And i made a little adapter so i can use the cord as a 2 wire battery adapter.
|
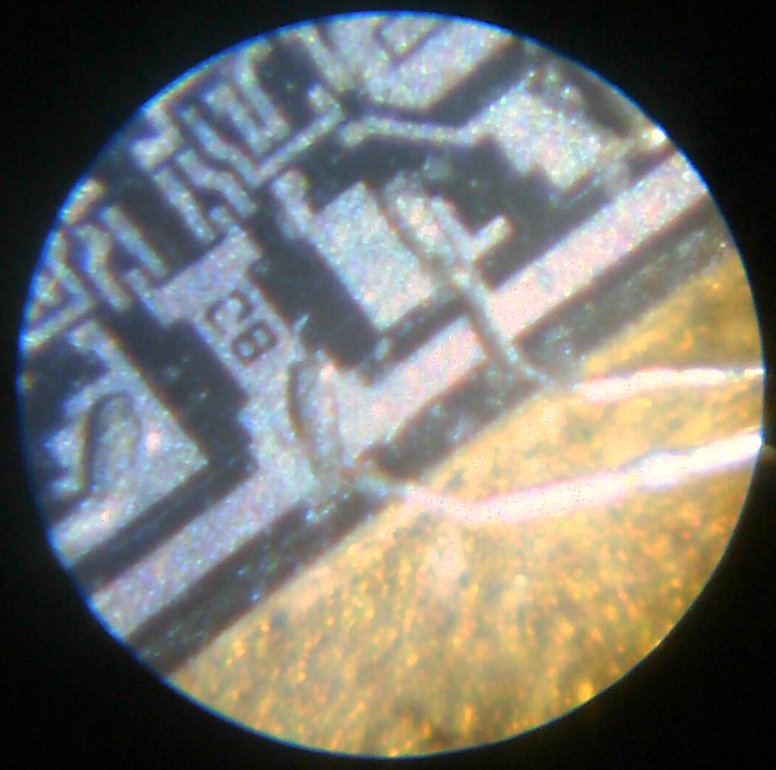
Microscope. |
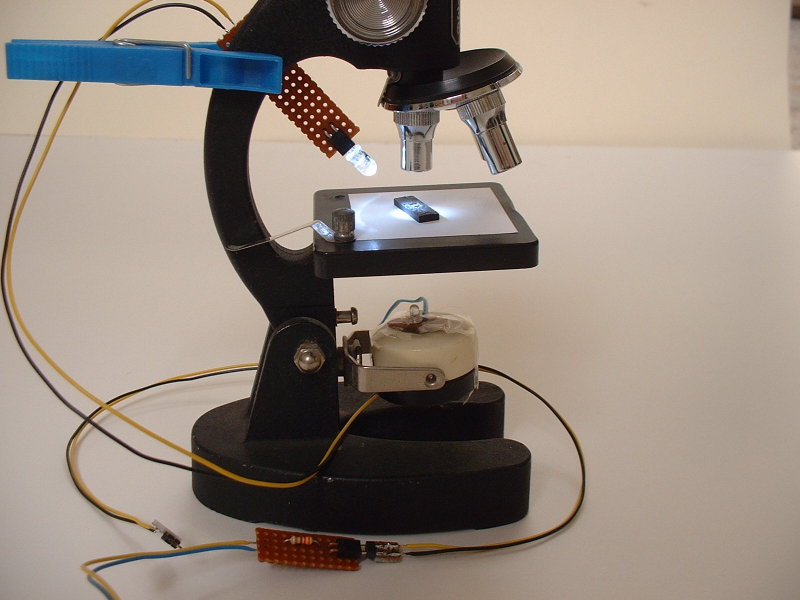 |
 |
I had this microscope for decades, it was powered by batteries and only had a small hard to replace
lightbulb on the underside. So you could only look at semi-transparant object .. or with a lot of difficulty
look at a chip by putting a powerfull desklight directly against it.
But now I put two powerfull white LEDs on it, which makes it very easy to look at objects like chips.
|
LPC800 mini board. |
 |
 |
NXP send me this nice LPC800 miniboard, but to be able to use it i made some changes.
At first i desolderd the controller and placed it in a socket, so i can use it in a project
Then i added a row of header pins to connect it to an LPCXPRESSO j-link, as i didnt have a 0.05"
cable for the default connector.
And finally i added header pins to plug it into a breadboard like a stamp like device.
Oh .. and of cause i needed to cut the connections on the LPCXPRESSO and add headerpins.
|
Arduino UNO with a twist. |
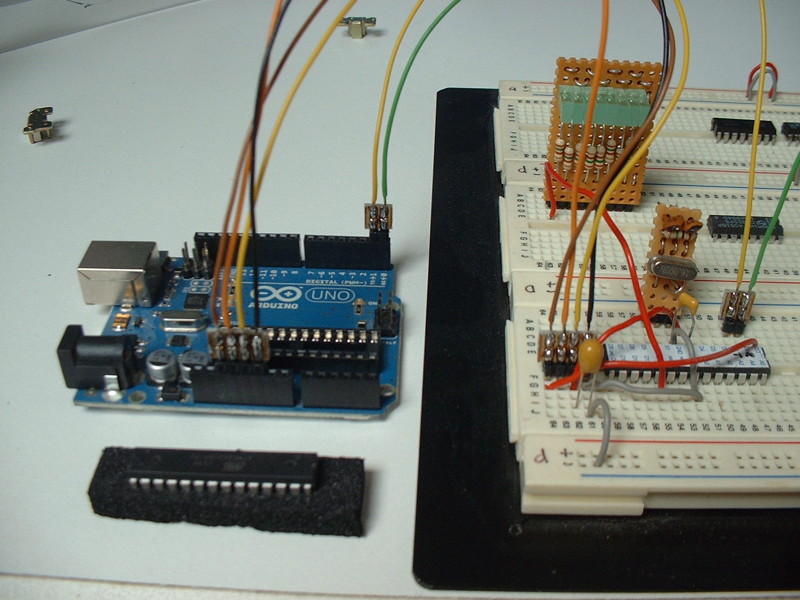 |
The Arduino is small (educational) computer which you can get in different formats, like this UNO
in which you can place shield boards to expand it. And versions with headerpins which you can plug
into breadboards. However .. with a little efford you can make the UNO 'breadboardable'.
Remove the atmega328p chip and insert it in a breadboard. Then you need some wiring to connect the
RX, TX, Gnd (,+5v) and reset pin. I made a 2 lead and 4 lead cable for that with header pins on both sides.
And as last you need to add a 16 mhz crystal with probably a resistor and a couple of small capacitors.
As wire length and capacitance between breadboard tracks can be very critical i soldered those all on
a piece of stripboard. Which also frees some breadboard space.
Dont forget a buffer and decoupling capacitor close to the chip or else it wont run right.
Update: This works fine to program and test an arduino program, but when i reconnected power
to the Arduino board the program didnt ran correct, unless i disconnected the reset wire.
|
Tablet stand. |
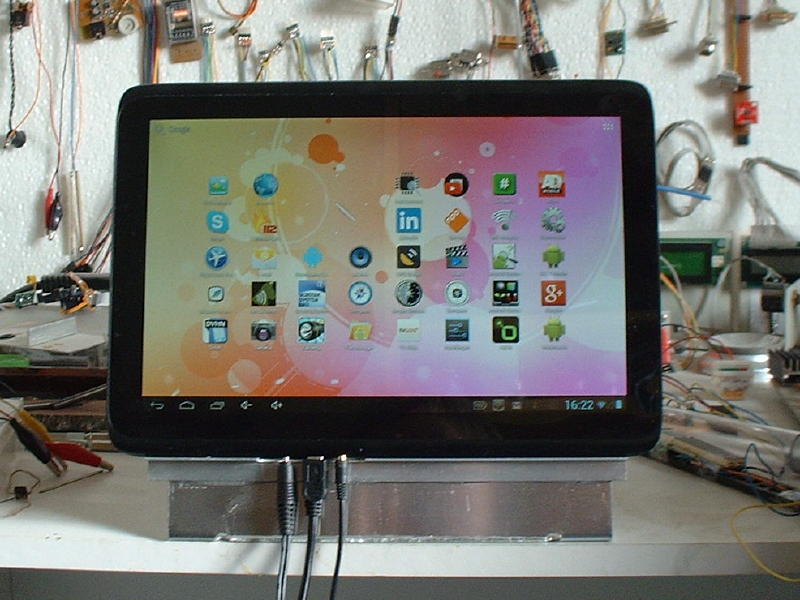 |
This is a little tablet stand i made, which makes it a little easier to develop
software for it. As you can put the tablet next to the monitor while it is connected to PC and power.
Shown with a 10" dual core 1280x800 pixel cherry mobility m-1038 kruidvat tablet on it.
|
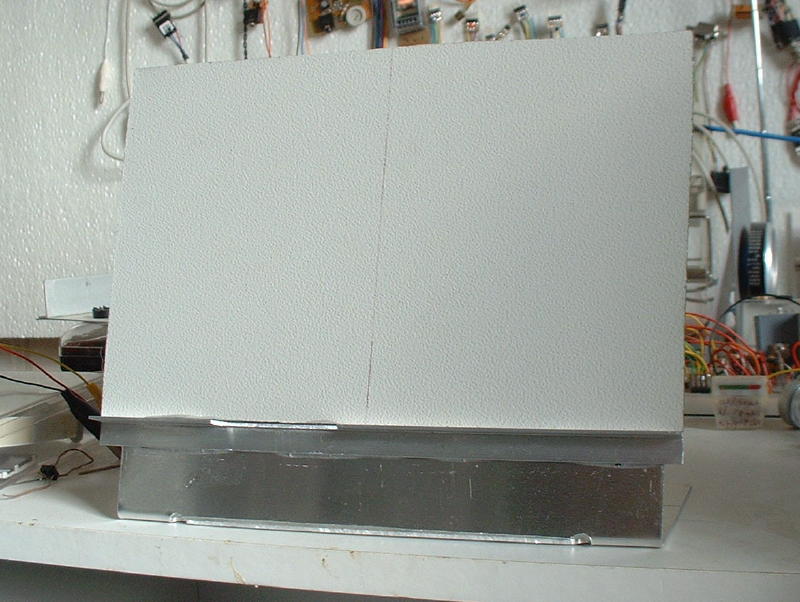 |
Made from a piece of PC case, some aluminium a bit of profile and epoxy.
|
---
8 cm solder fan. |
 |
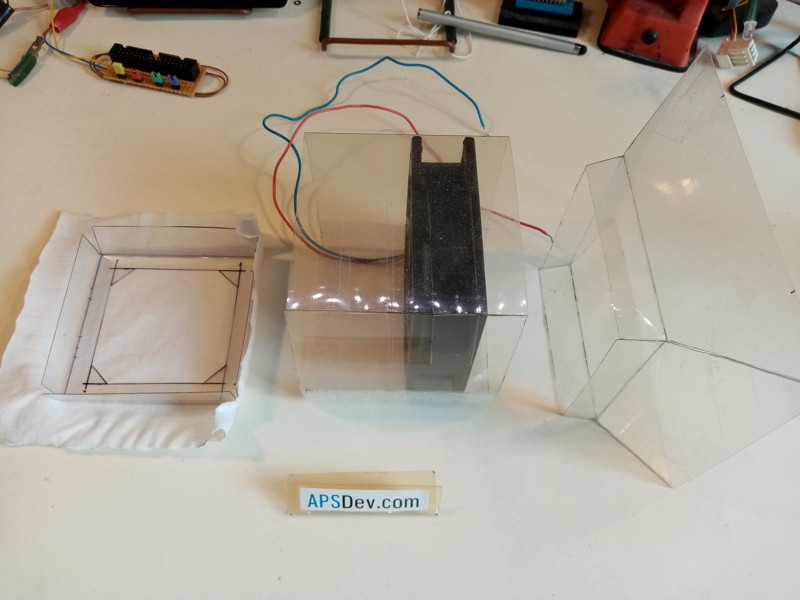 |
Sort of an attempt to make an old PC power supply into a solder fan.
Instead of using the whole case i took the fan and added plastic.
Problem is that these fans produce a very small pressure difference, so adding any sort of filter
will block most of the air flow.
|
---
Solder fan. |
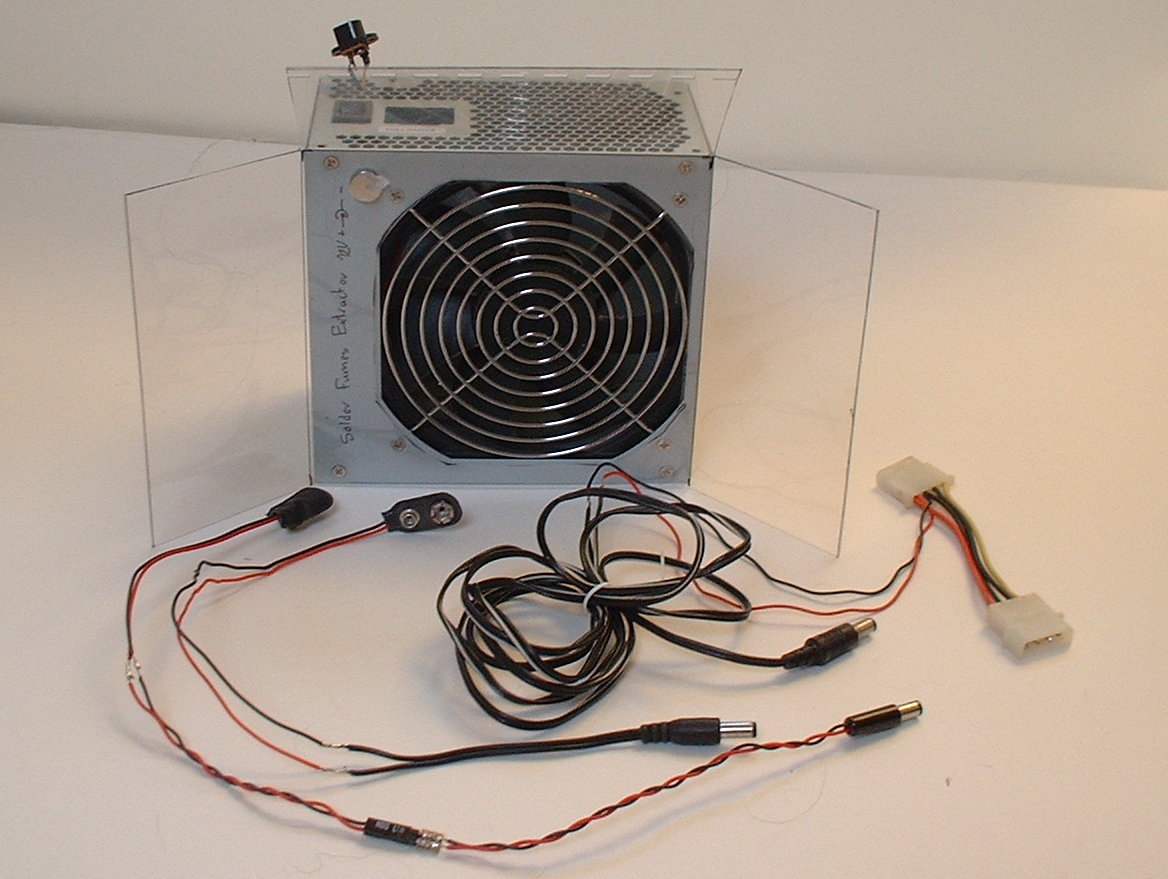 |
This might seem very obvious, its an emptied PC PSU with 12cm (5") fan to suck solder
fumes away. But when i started experimenting i only had a bunch of PC PSUs with 8cm fans and some loose 8cm fans.
The power switch still functions and it has a wal wart connector for power.
I made a little adapter cable with male/female molex connectors to daisy chain it with
other gear on the desk. And some 9v adapters for portable use.
Apparantly fans like this dont have enough power to use some kind of filter.
I also tried to use some PSUs with 8cm fans, but those take up a lot of space on the desk,
i ended up using thosw to blow a stream of air over the desk to blow fumes away from me
as the jet from the PSUs has a long reach .. while they only suck fumes away directly in
front of them.
(Video)
|
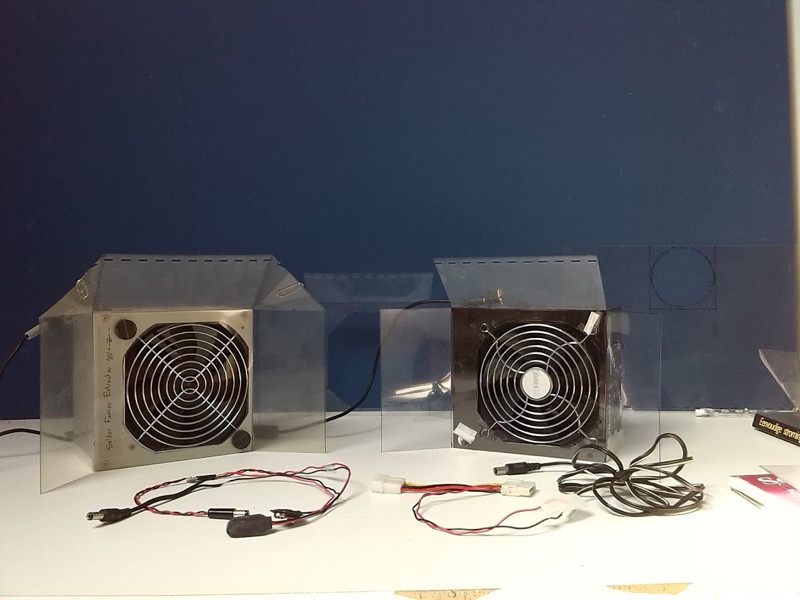 |
A second version with a slightly more advanced air guide.
|
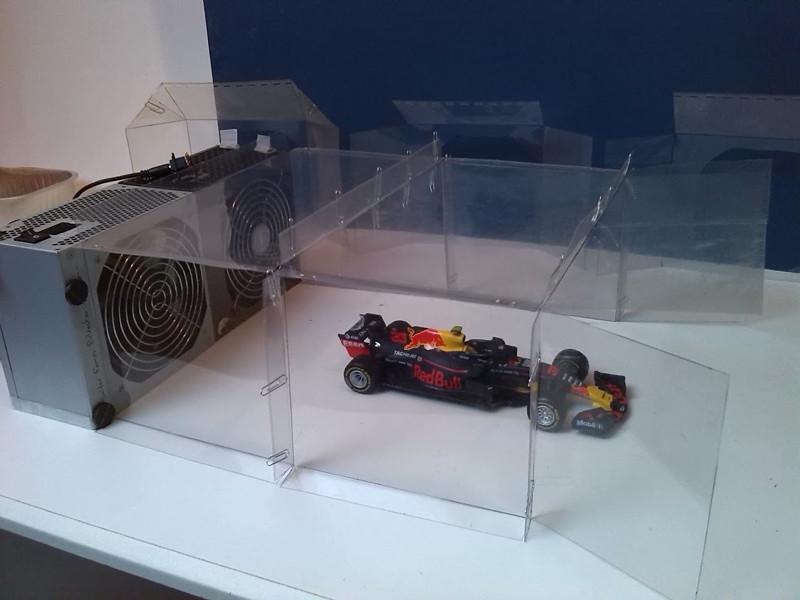 |
So if you have a couple of the these devices and take the air guide a bit to the extreme
you can make a windtunnel !
(Video)
|
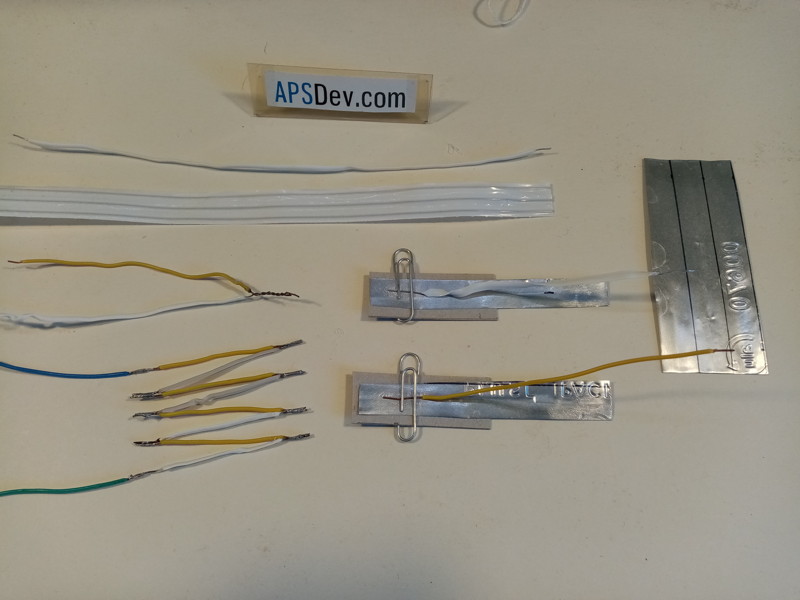
Soldering Iron. |
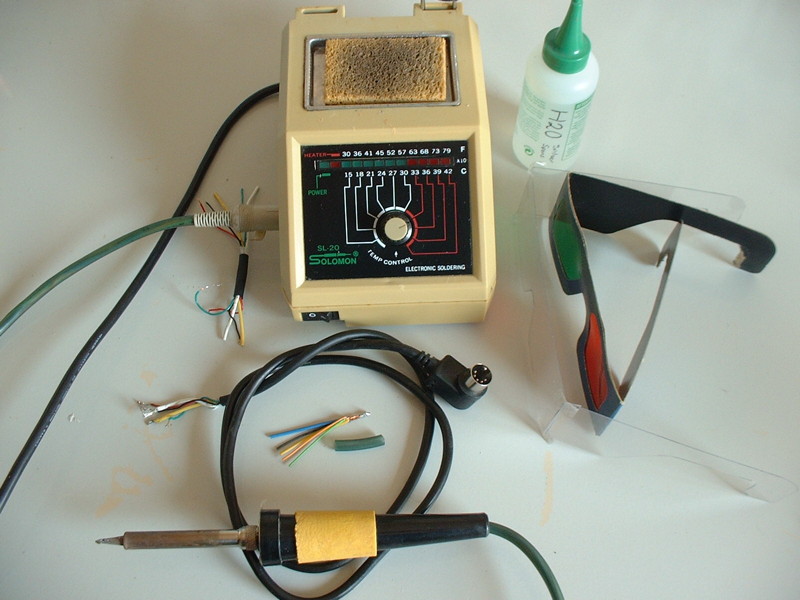 |
I have had this solder station for decades, still works great except that the cable is worn.
So i cut pieces of the cable, which improves it a bit. But there are still breaks in the cable.
So where to find a flexible cable with 2 thick wires and 3 thin wires ?
So i tried to make a cable
myself by pulling 5 wires with some use of talcum powder through rubber aquarium bubbler hose and it worked !
Also as i am very near-sighted i tend to take my glasses of during soldering which can be dangerous with springy wire.
So i sort of made instant safety glasses by tracing over red/green 3D glasses on 0.33 mm thick foil and taping the legs on.
|
---
Thermo couple. |
 |
trying to make thermo couples to calibrate a new solder iron for solder stations
.
|
---
Solder sucker. |
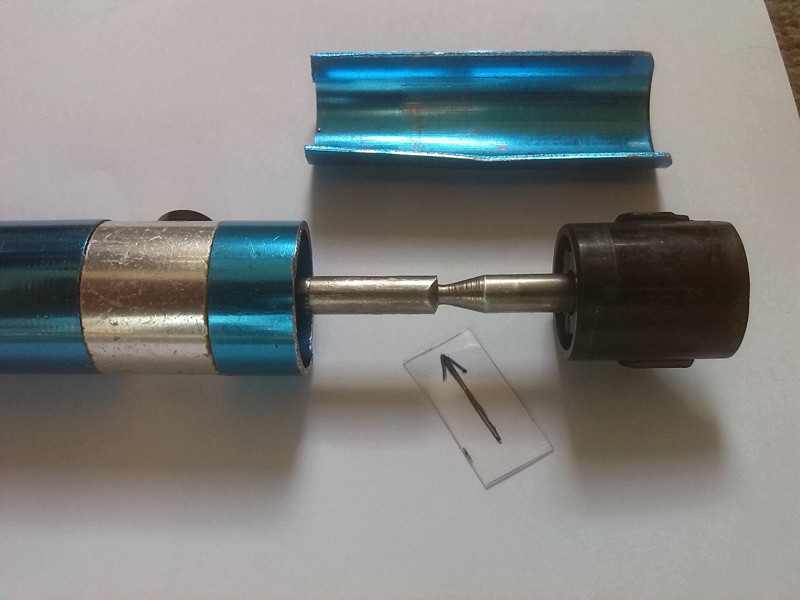 |
So i have been using this full metal solder sucker for decades, but after all this time the spot
where the release button catches on had worn away (see arrow). Now i have bought several different plastic suckers to
replace it. But after a short while the cylinder breaks in two, or the springmount breaks.
So i tried to fix the metal sucker by sawing of the metal back. Without the back the knob can rotate
so now the button catch can use a piece of metal that isn't worn. Also as now you can push the knob down
from the top instead of from the side it is a bit easier to use.
|
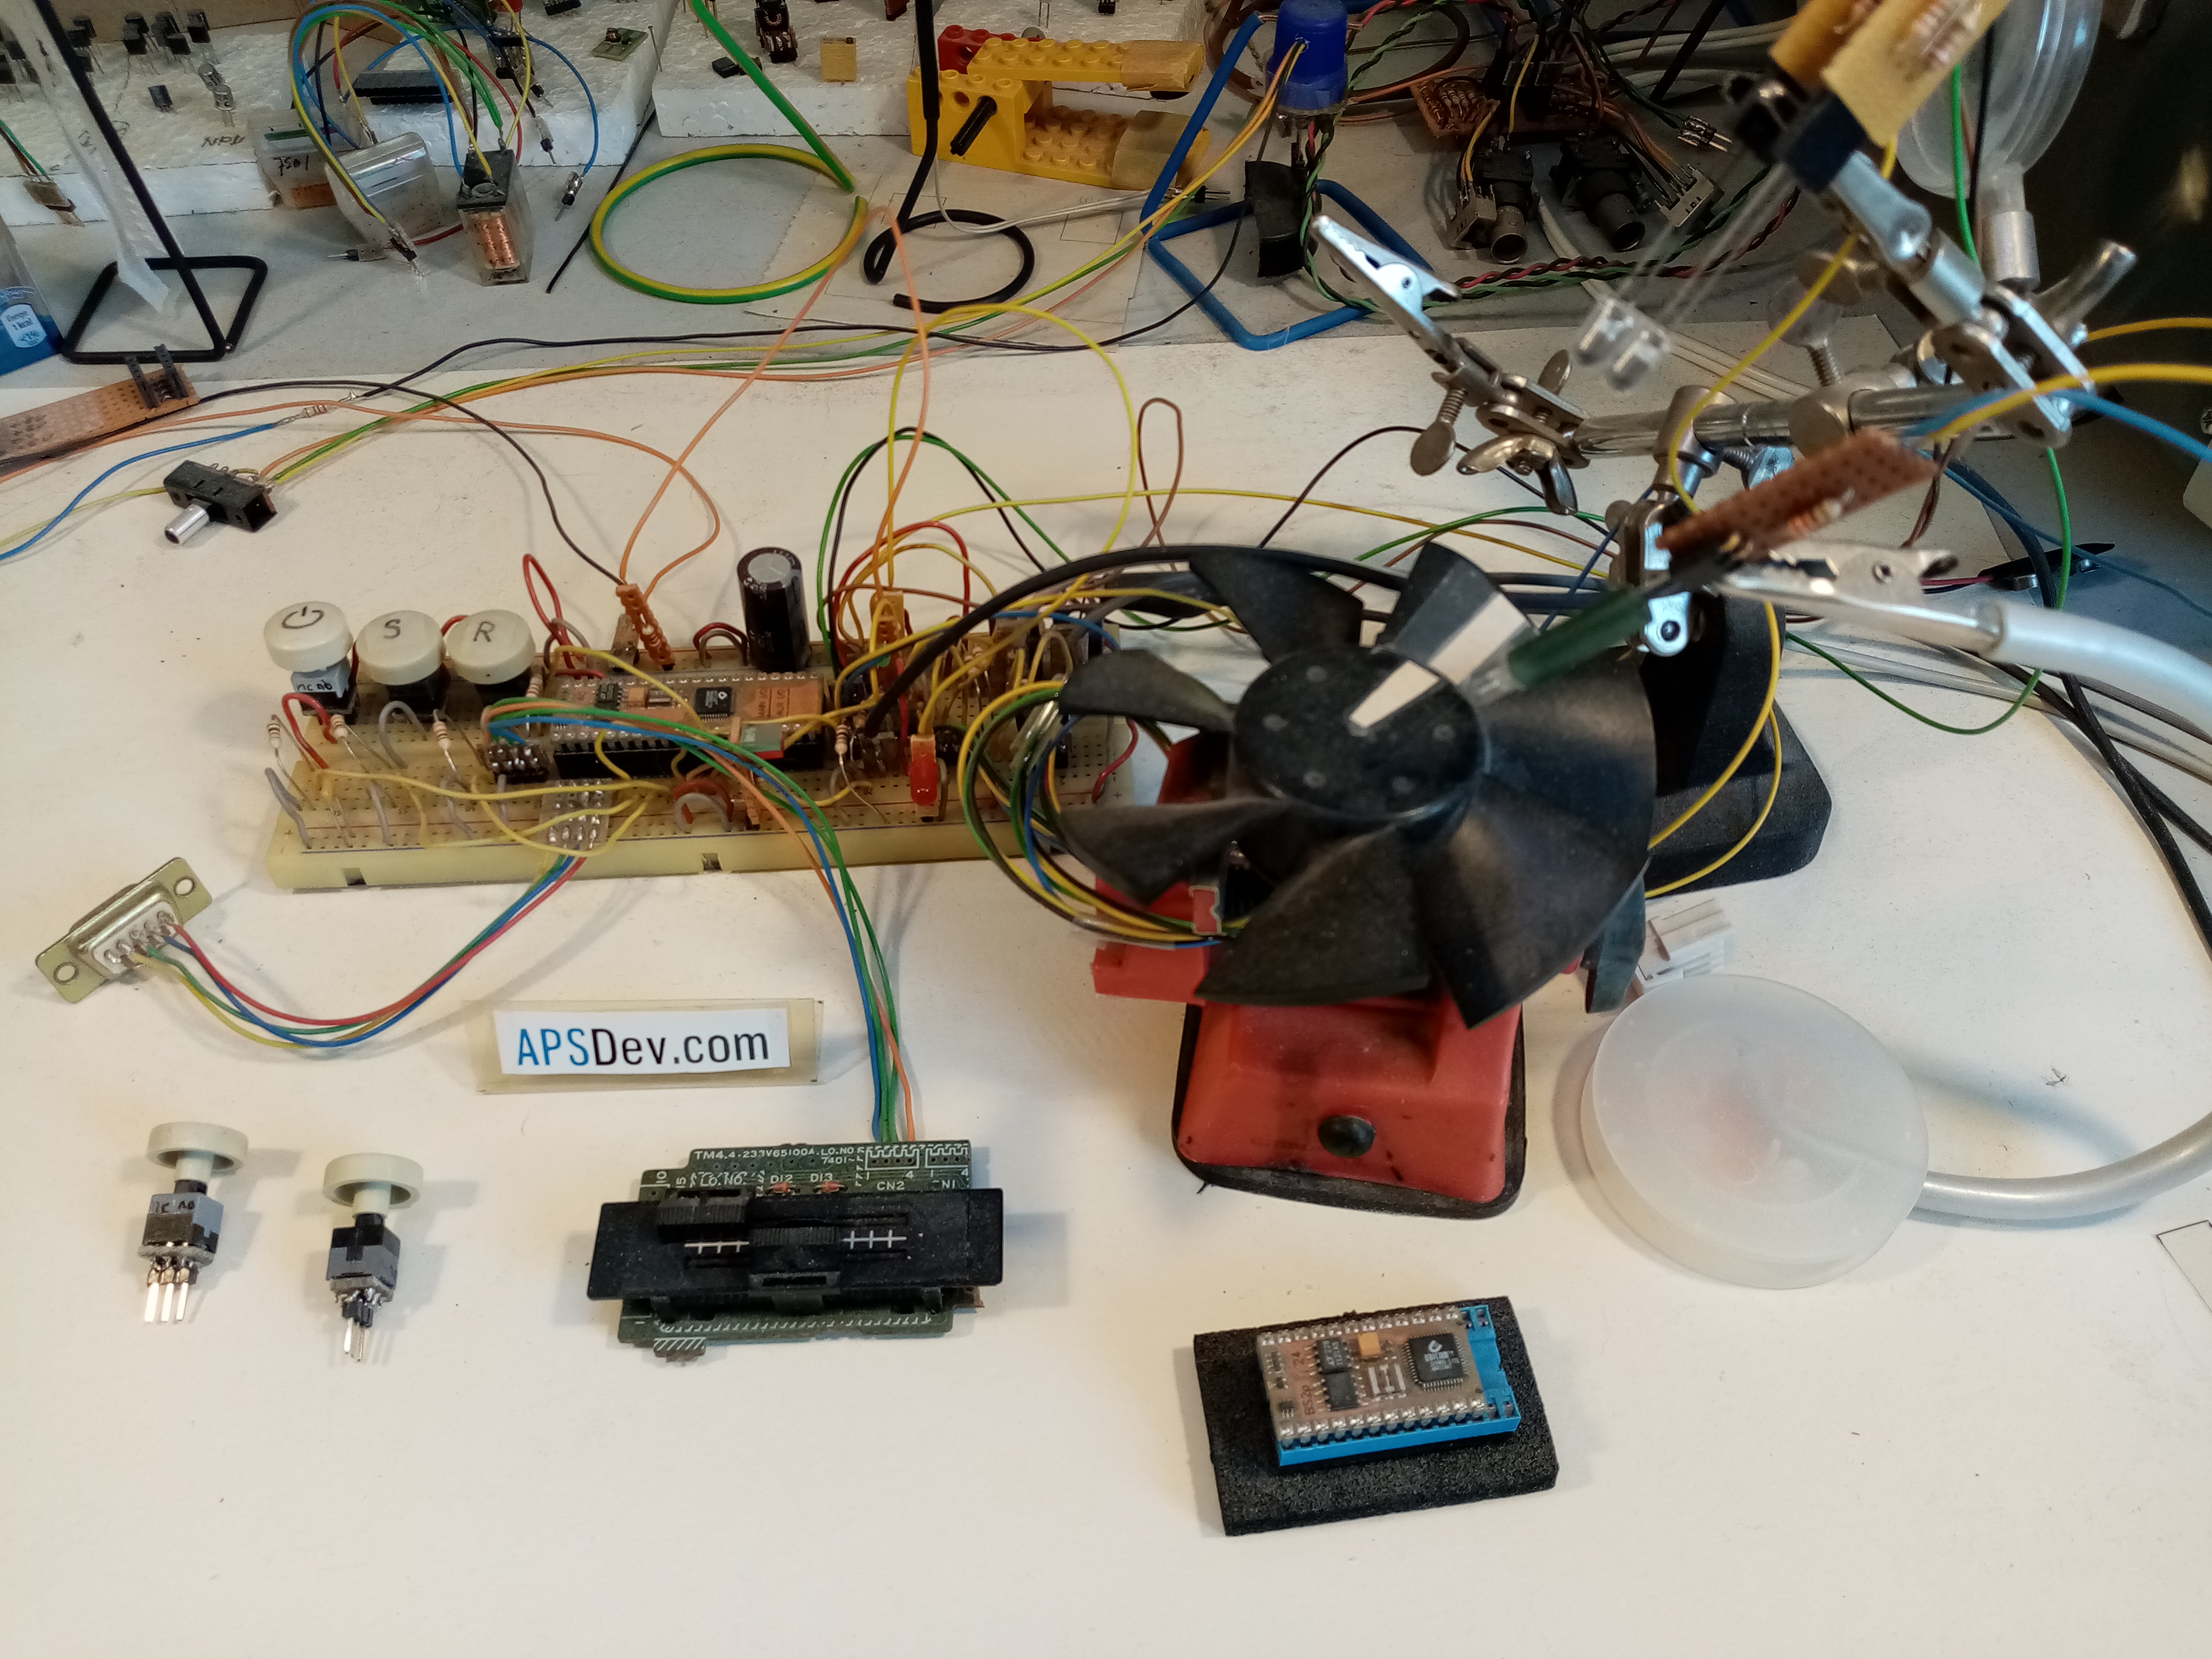
Soundcard oscilloscope. |
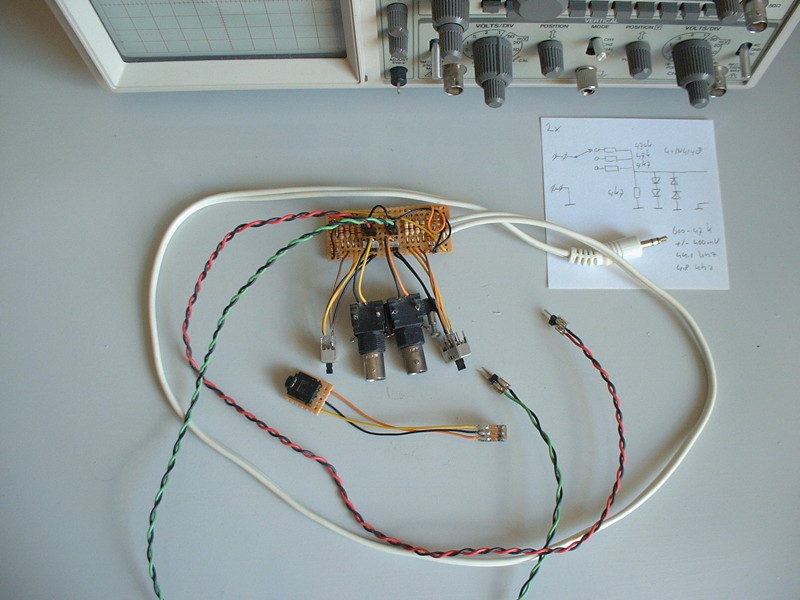 |
There are some great programs out there that turn the line input of PC soundcards into a sort of oscilloscope.
Of cause they have limitations as they can only show AC and have a limited sample frequency, but they also have options that
Analog oscilloscopes dont have like FFT analysys and measuring frequencies. So if you work with low frequensies a lot that can
be a helpfull tool. However .. no one seems to be making hardware for it to connect to anything.
So a long time ago i started making this (i planned to put it in a case but that didnt happen yet) .. it has a couple of 3-way
switches to select sensitivity. And each channel has a couple of female and male header pins for connections.
I made a couple of cable for the male header pins from cables found in old PCs to directly connect to breadboards.
And connected some BNC connectors from old ISA network cards to the female headers for oscilloscope probes.
I also made a little adapter so i can connect the hardware to a breadboard .. as i was experimenting using controllers
like MBED, LPCXPresso and xmos startkit to build a simple digital oscilloscope.
|
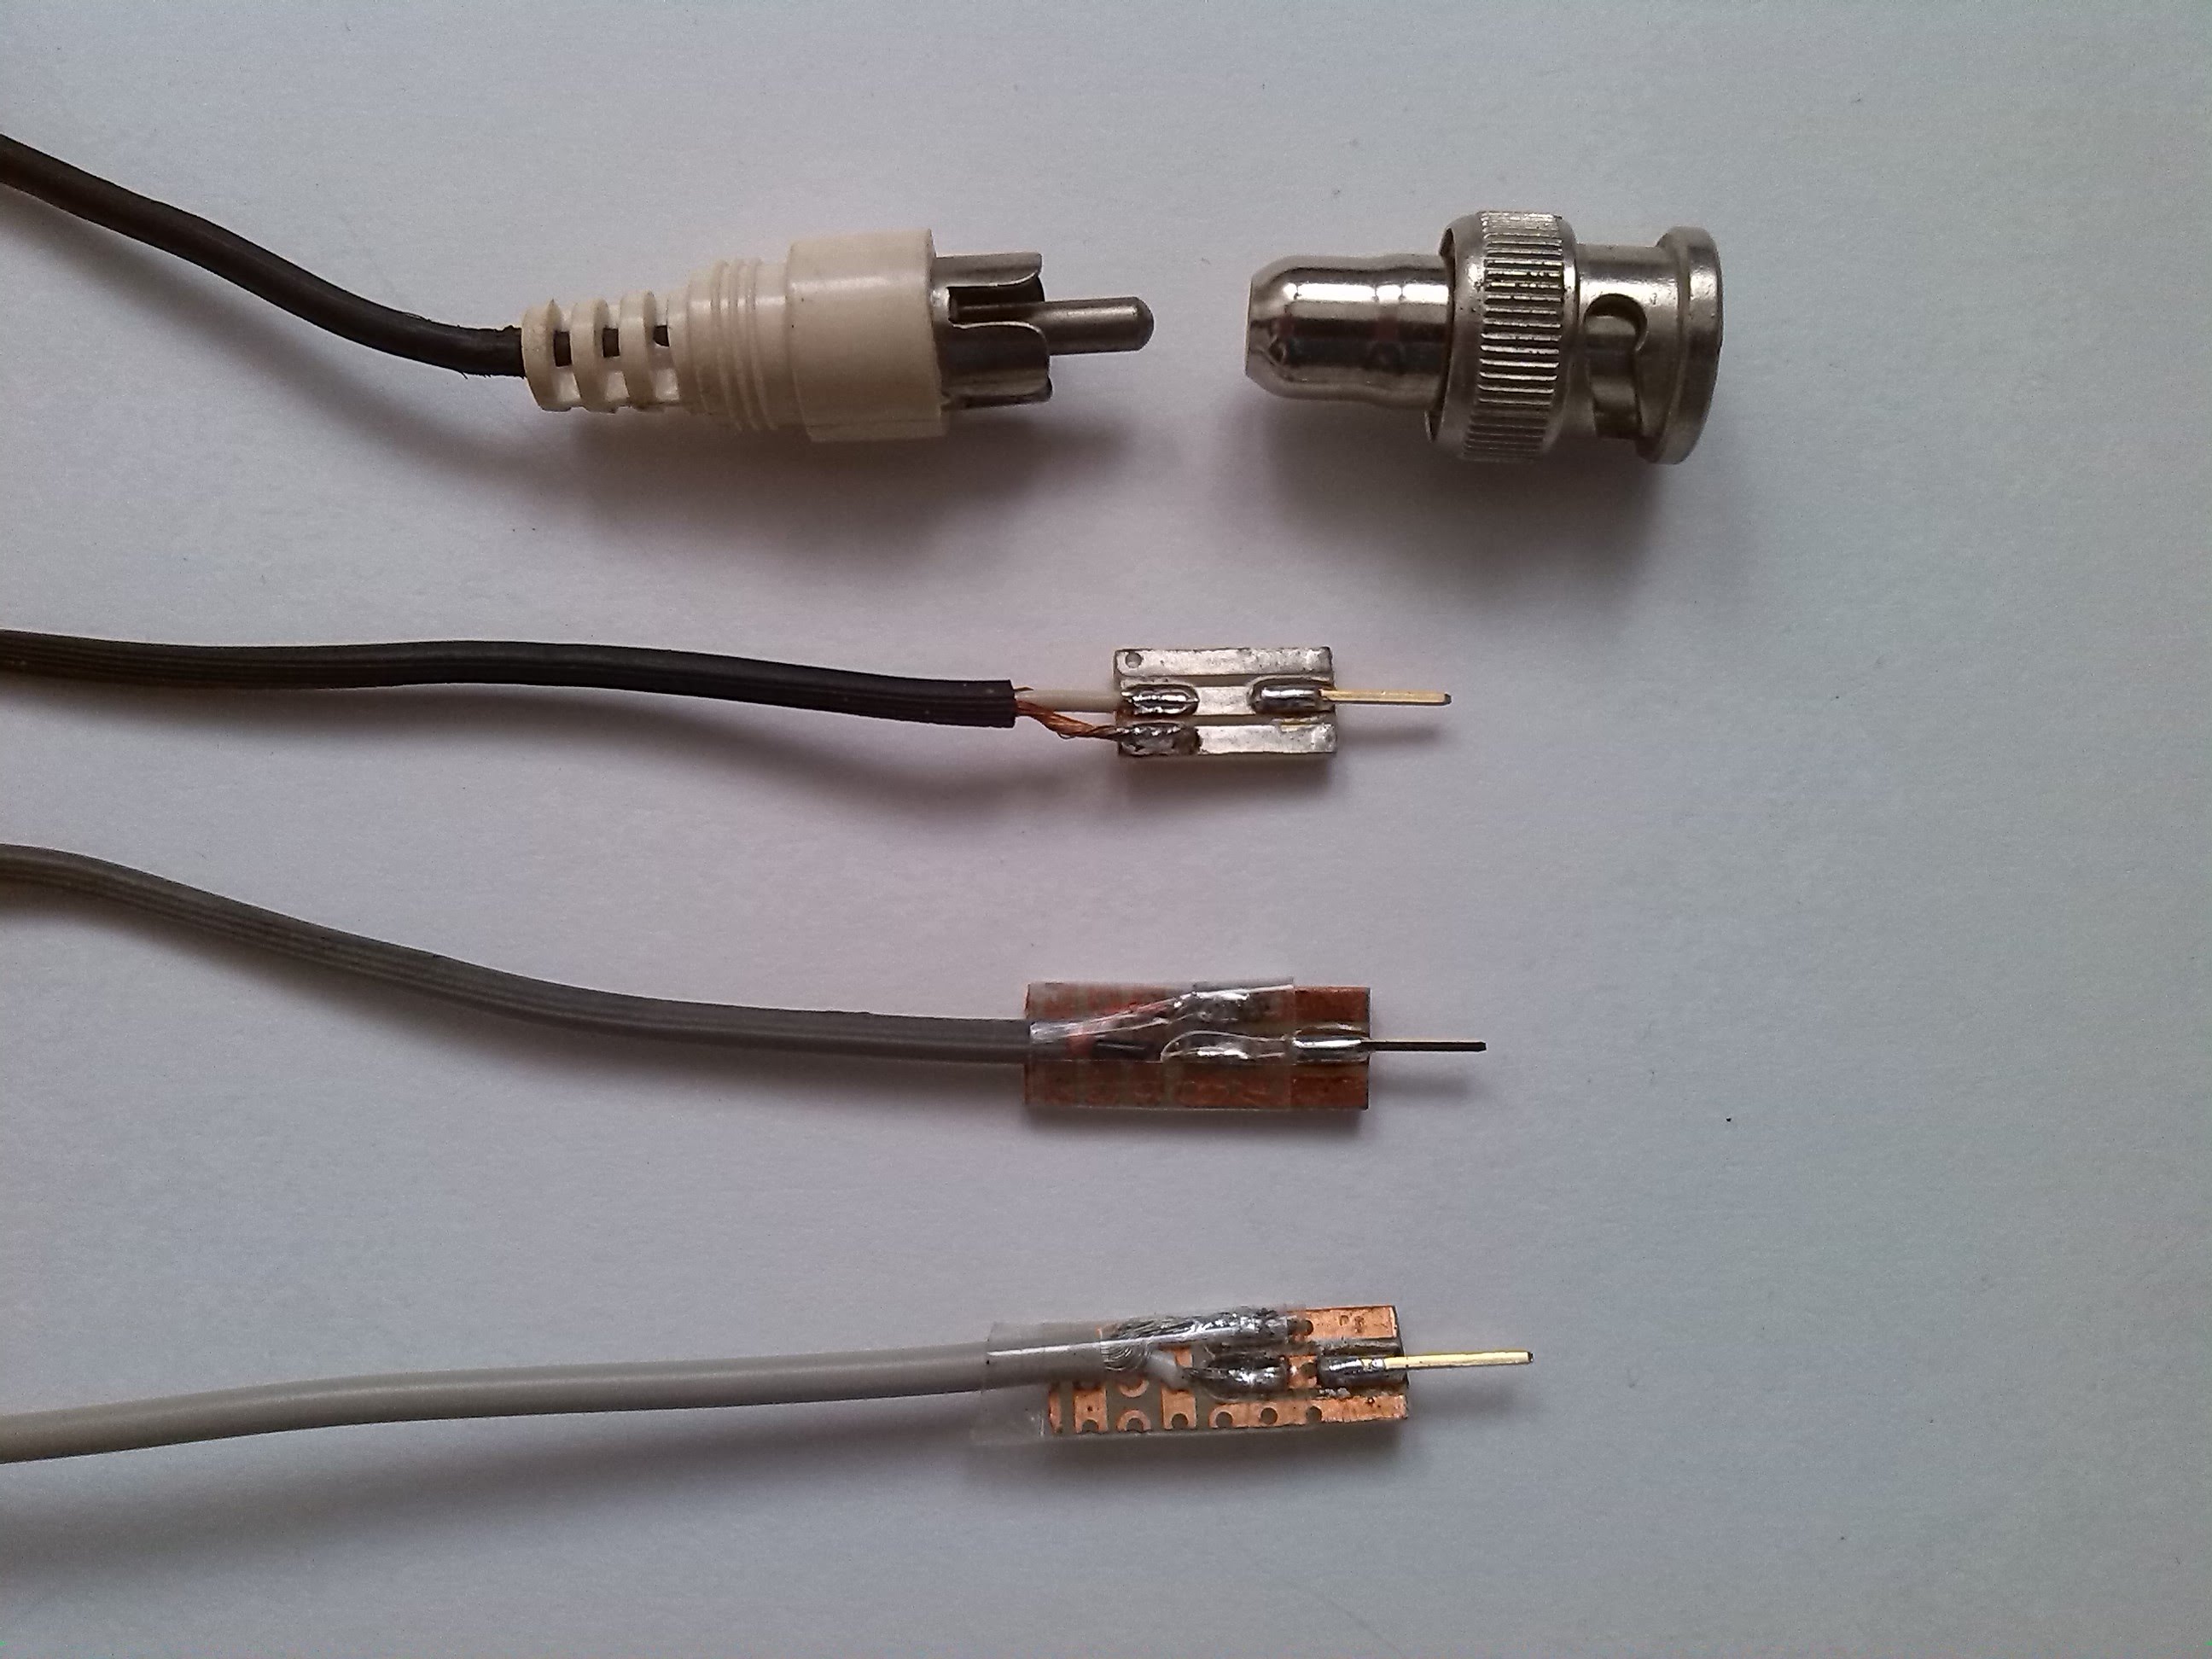
Breadboard probes. |
 |
Oscilloscope probes are big and tricky to use on breadboards. So i had these RCA to BNC adapters
and a lot of RCA cables. So i experimented a bit with little PCB boards with a headerpin that easily inserts
in a breadboard. Also i made some with small crocodile clips.
|
Battery adapter. |
 |
Measuring current on things like remote controls or mice can be tricky.
However if you take a piece of double sided PCB shape it so it can fit between a couple of
AA-batteries, tin it and solder on some wires then you can do things like measure current.
Also if you want to check a battery or use a battery you dont have an adapter for you can just
press some wires on. But then you have one hand less to do measurements.
So i took a couple of tracking/focusing magnets from an old CDrom drive, and connected some wires them.
Actually they are U shaped piece of metal with a strong magnet in them.
As there are already holes in you can twist a piece of wire through those, and if you tin it after
you have a pretty good connection.
|
Resistor/capacitor tester. |
 |
Measuring a lot of resistors because you want to match some, or put resistors that came out
of breadboards in boxes can be tedious. Putting alligator clips on, or pushing them against the leads of
the multimeter. So i had this box of weird PCB test point (normally they have a round loop) for a very long time
in a drawer .. and seems they are ideal to solder on a piece of pcb to measure resistors.
As you can measure components by pushing them with one finger on the test points.
|
vacuum pump. |
 |
This is a little (FAILED) hack to try to make a continues solder sucker.
It consists out of a centrifugal fan from a popcorn maker, some desert packaging, an old solder sucker
a semi transparant plastic bottle from a cycling suplement i found at the road and some tubing.
The original solder sucker failed as some plastic parts broke. Useally suckers with plastic parts
break after a short while while all metal ones work for decades. So i tried to connect the
business part to a vacuum pump. But there is almost no vacuum. Probably because the tubing is to long
and far to thin. Perhaps some foot operated bicycle tyre pump would be better.
|
Foam. |
 |
Normally you stick chips in MOS foam .. bigger parts like transistors or regulators don't seem
to stick in that. So i found that you can stick them in thick plastic foam. And also write down connections
on that. So i have a lot of pieces of foam with transistors. Also great for bigger breadboard modules.
|
--
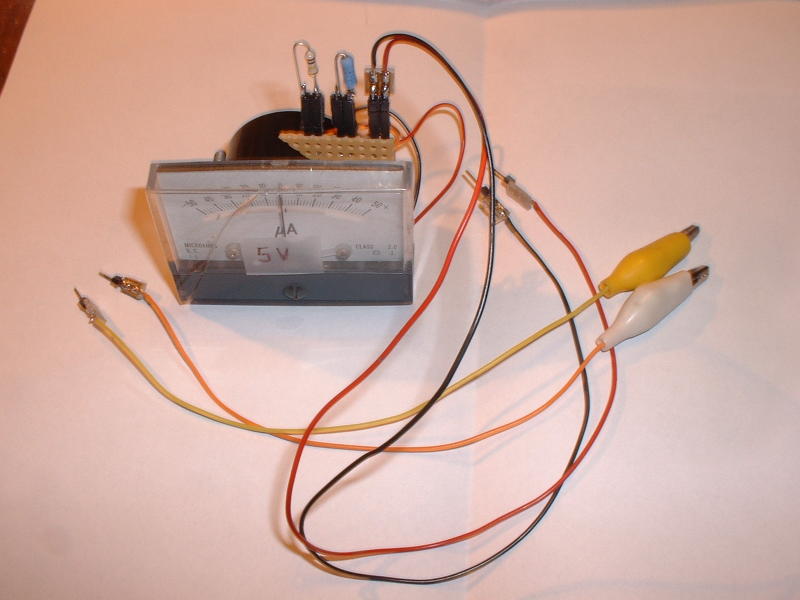
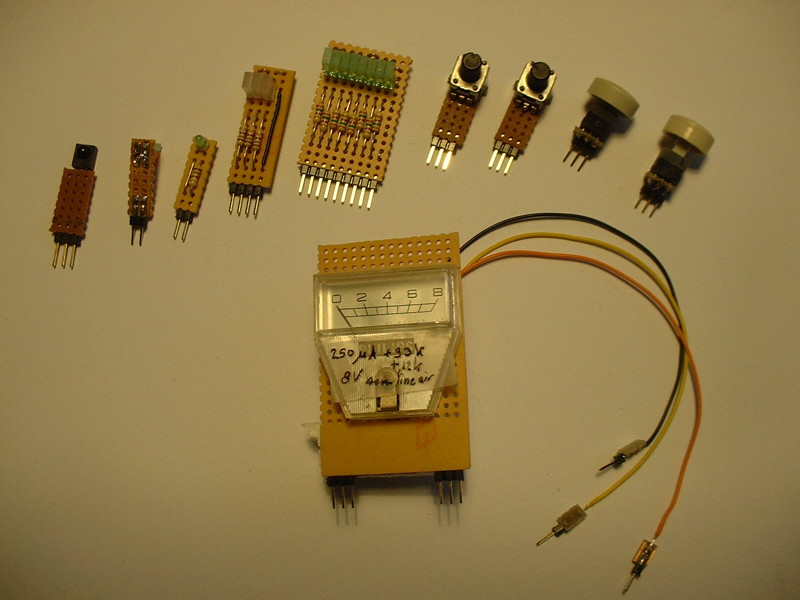
Meter tools. |
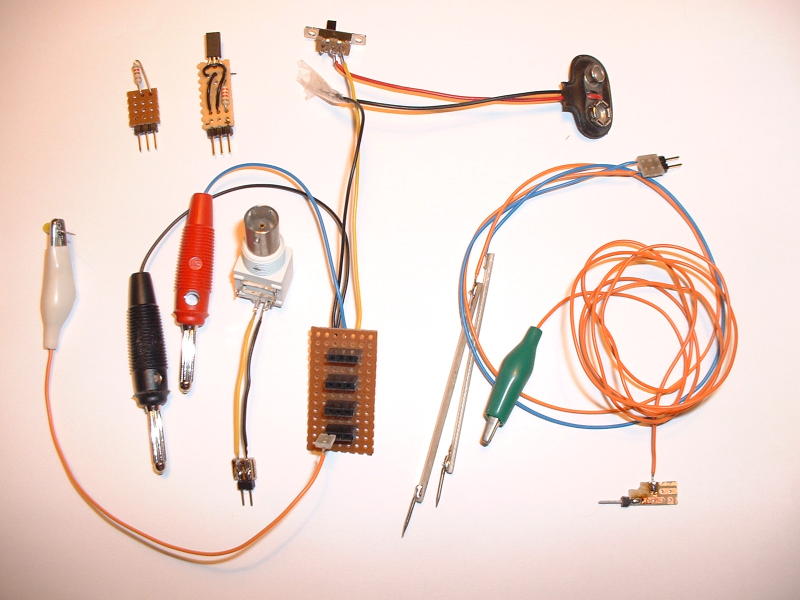 |
 |
 |
I still have an analog multimeter that i have had for decades now and that survived several
digital multimeters. It is still very usefull and might have advantages over digital meters, like it doesnt
need a battery, the read out doesnt jump all over the place and it doesnt have electronics that break.
Over the years i made some small tools for it.
First is an adapter so i can connect 4 devices to it using female headers, each header has ground, signal and 9v.
So i can connect active probes to it to measure things like temperature or magnetic field.
But als connect a scope probe with an adapter, crocodile leads, or leads with very thin needles
(made with pushpins) that actually fit in holes of breadboards .. as normal leads dont fit.
Also i can insert a resistor adapter so you can measure diodes or LEDs.
There is a board with a TL431C from an old PC PSU that acts like a 2.5volt reference source.
And not shown is a BPW34 photodiode adapter to measure IR LEDs (remotes) or UV LEDs to check
how much UV glasses filter.
|
---
Adapters. |
 |
Some time ago i got a HP vectra PC with severe PSU problems, but as it was a desktop case
with an odd shaped PSU i decided to transplant it to an old server Tower case.
However there was a problem with the motherboard, it only had a custom HP header for buttons and leds.
The normal header with more pins wasnt populated.
With the HP header there werent ground pins next to signal pins or the cables needed 3 pins, while there
was spacing for 2 pins on the motherboard so i made some adapters to connect up all the signals.
|
RS232c nullmodem cable. |
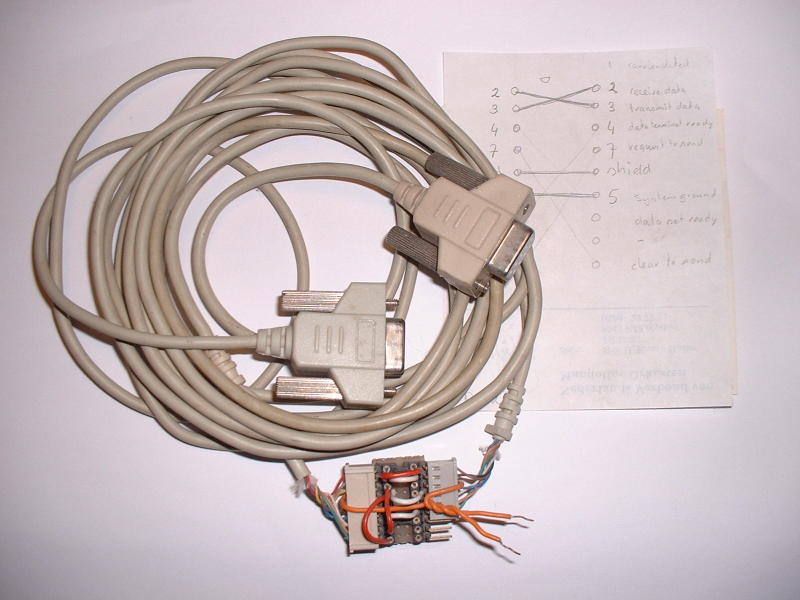 |
This is a little changeable serial nullmodem cable i made from some discarded serial
mice decades ago. As i needed one and couldnt find one locally.
|
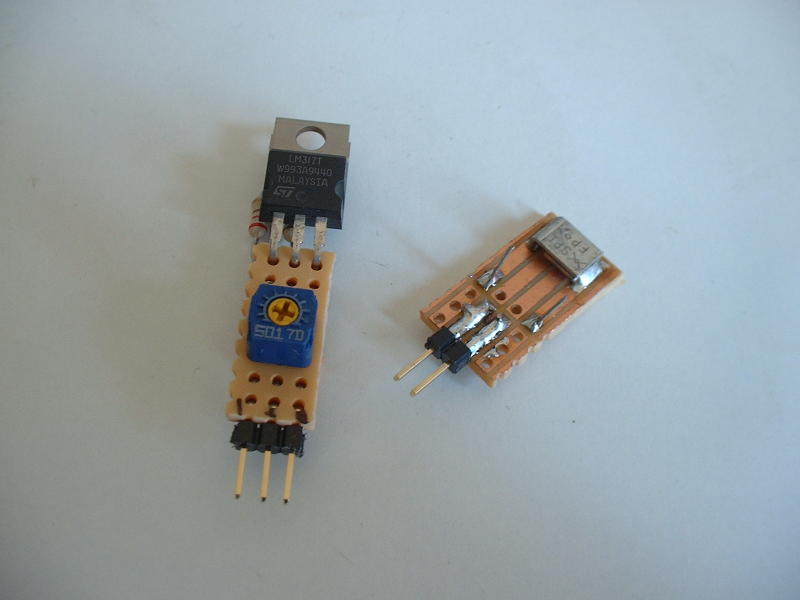
Fans. |
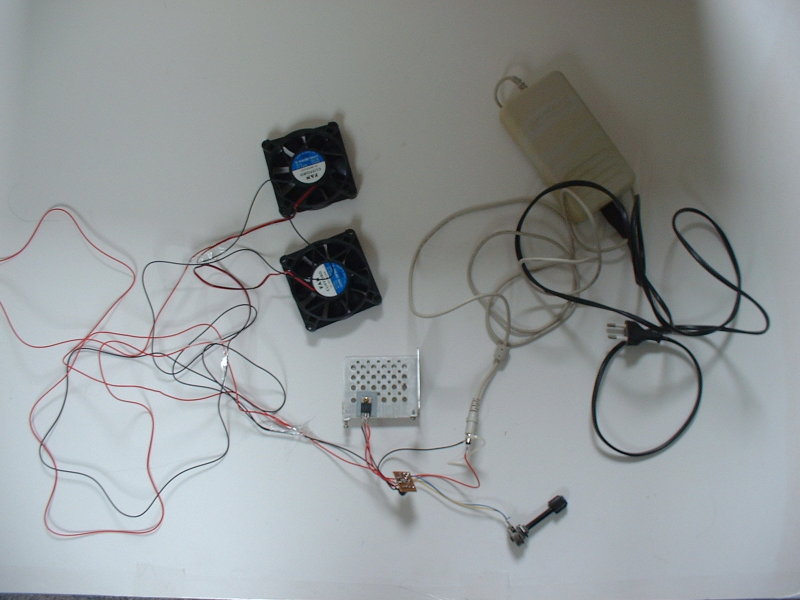 |
Someone needed some fans with their wood stove, to blow warm air in the room.
Also the speed needed to be changeable and there was no budget.
So everything is recycled, fans from PCs, an 18V PSU from a very old HP printers.
And an LM317 to control the fan voltage from 7v to 14v. Where R1=100 Ohm .. and R2 is a 540
Ohm resistor and a 470 Ohm potmeter. And of cause a couple of capacitors.
|
Pinnacle remote. |
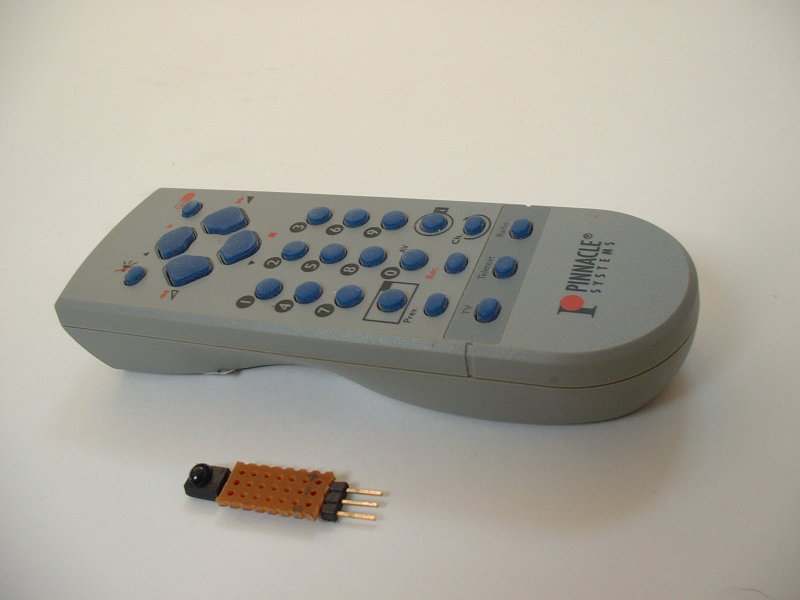 |
I was testing a bunch of infrared remotes, and while most give a sort pulsewidth
codes which are tricky to decode, i noticed that the pinnacle one gives normal serial signals
with 1200 baud. Which isn't that odd as it was used to control a PC PCI-TV tuner card. And the
receiver used to be connected to the serial port of a PC. So its very easy to use it as input
on a microcontroller. Just connect it to serial port. However reception seems slightly worse
as a normal remote. Looks like it sends 3 bytes at 1200 baud with one stop and no parity bits.
|
logic probe. |
 |
I wanted to make a logic probe for breadboards, but figured that if i use a VU-meter module
i get something like a fast solid state meter that is more versatile as it can display differences
between 5v and 3v.
Now the big trick is to mount it in the transparant cylinder, which was the packaging of a pen.
|
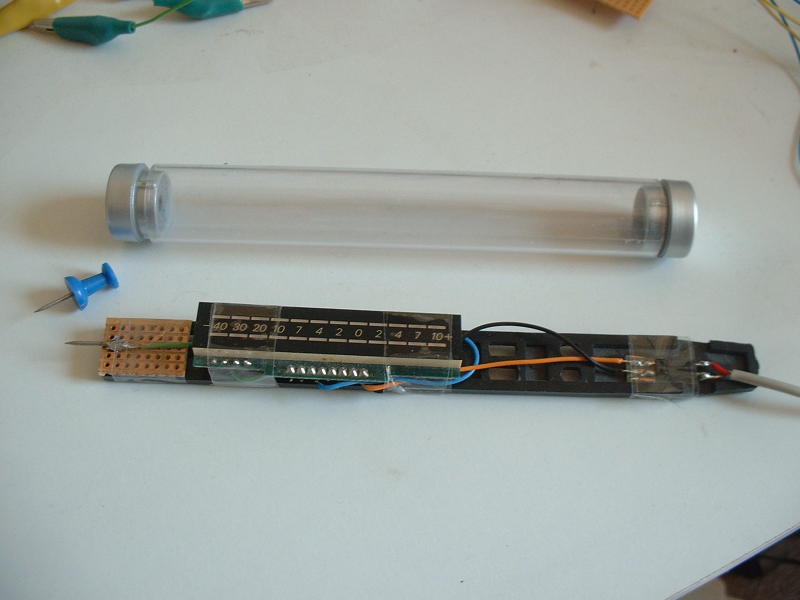 |
This is how it ended up.
|
Stepper motor. |
 |
Stepper motors can be great to move things like mirrors fast and accuratly, however connecting
something to the thick axle might be a problem. Not with a fuse holder !. It holds very tight
|
Custom regulator. |
 |
A lot of devices like controllers or displays need a voltage of 3.0v or 3.3v, to not need to
remember the LM317 connections or find matching resistors i made this variable regulator with
the same pinout of the old 7805
The device next to it is a resetable fuse from an old network card solderd to some board
Basically if you put more then 1Amps through it it heats up, and increases its resistance
so the current to the circuit is cut off.
|
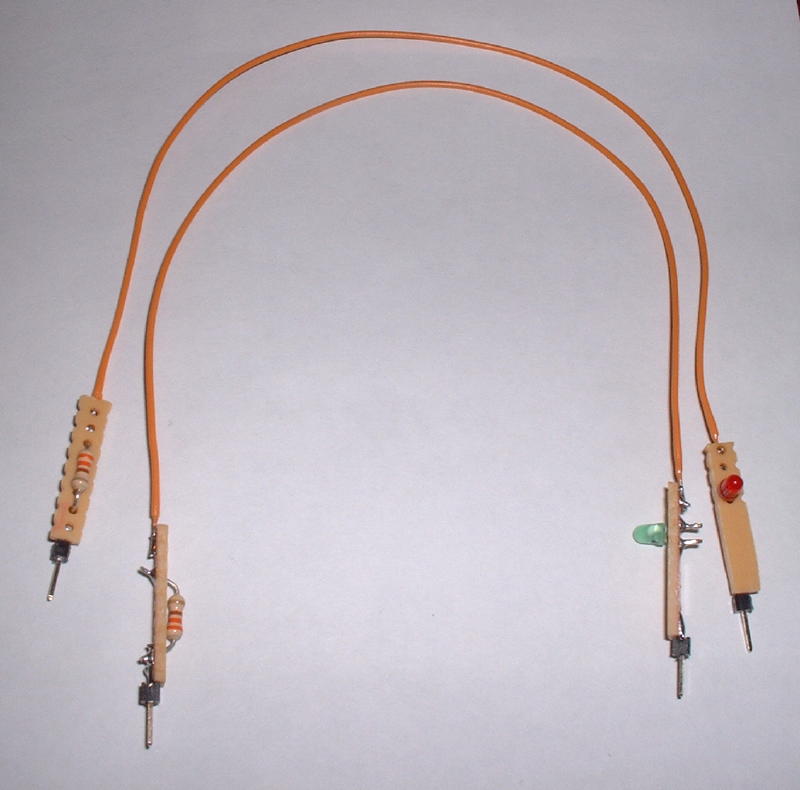
LED Tester. |
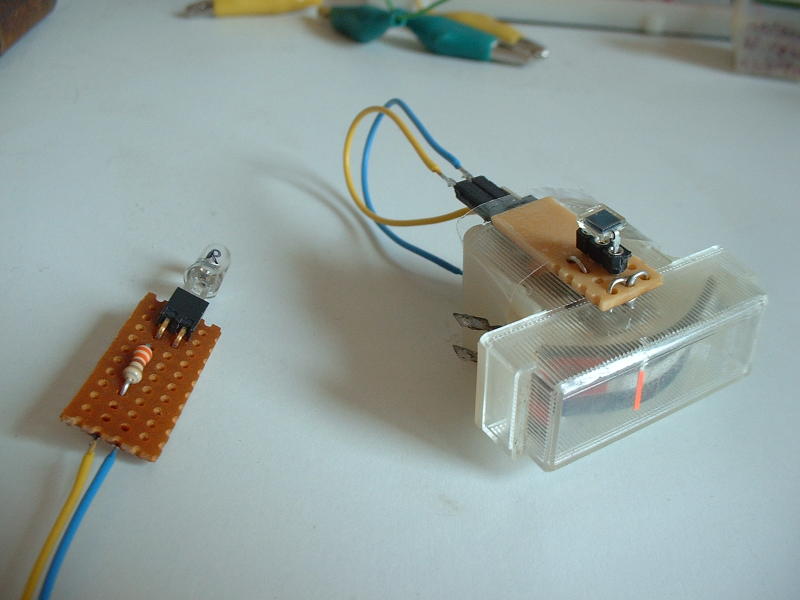 |
This is a little passive device to test remote controls, basically its a light meter made from a little
battery/field strength meter i got from an old radio a long time ago. Its connected to a BPW34 photo diode.
It can also be used to test infrared diodes or photo diodes.
The device next to it i use to test LEDs in, it just connects to a 9V battery or a power supply.
You would think testing LEDs is easy with a breadboard, but you need to find the right resistor and voltage
and its hard to point a breadboard at a test target
|
9V battery Hack. |
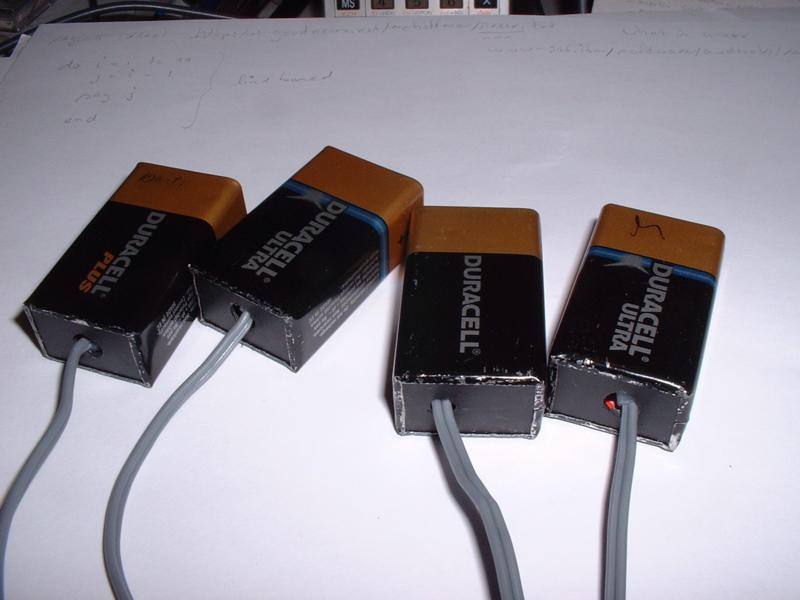 |
Someone had the problem that wireless microphone receivers need 9V batteries, and have no means for external power.
So they asked me to showehow hack some adapter together, like screw the top of a battery to some wood.
After some experimenting this was the result, a battery with its inerts replaced with cardboard and a wire
soldered to the poles.
|
I2C. |
 |
Just a little I2C bus i made so i can test I2C sensors like the compas or gyro
without having to turn a whole breadboard.
|
Phone LCD. |
 |
Most phone LCDs have impossible small connectors or copper traces for which its hard to make a connector
so after a while a gave up trying to connect a display just found one with huge copper tracks and soldered
wires to it.
|
Power adapter. |
 |
This might be a bit obvious, these are adapters so i can power a breadboard with
Wall wart adapters. Usefull when you don't want to take a lab power suply with you.
I think the sockets came from a very old calculator and a fax machine.
Note that i added a power switch to a wall wart. Might have been more practical to add one
to the adapters too.
|
basic stamp. |
 |
Some little adapters to program basic stamps and javelin stamps in a breadboard.
Note that they have two capacitors on the reset line.
|
basic stamp. |
 |
One of the basic stamp adapters in use.
|
lpcxpresso. |
 |
A little adapter to add a serial port to a LPCXpresso on a breadboard.
Note that the adapter at the bottom is almost the same as the basic stamp adapters i made,
but this one is to program a basic stamp on a PCB with 4 headers pins (or other pins with the small
adapters) it connects to the little board which inverts the serial signals to 3.3v or 5v depending
on the jumper. You can find the circuit here.
I made it so i can connect an lpcxpresso to a PC and use it with the stampdock software.
|
serial. |
 |
I only had some short serial cables but some long phone cables. So i soldered some rj-45
connectors to serial connectors so i can have cables as long as i want.
The cable at the bottom was a null-modem cable i used to connect basic stamps with earlier mentioned
adapters to things like palm pilots.
|
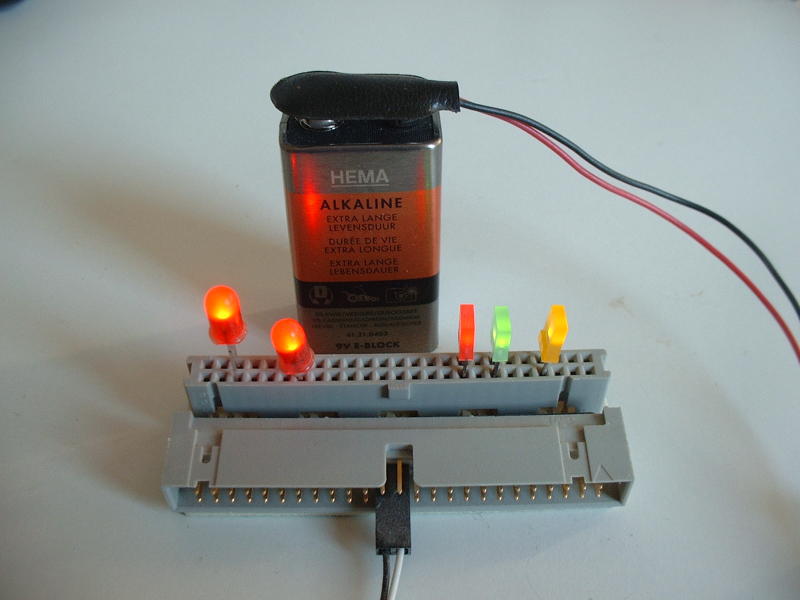
leds. |
 |
I made these so i can quickly add a number of LEDs to a breadboard while they take
very little space on the breadboard. And of cause its lets work to wire them up.
|
 |
 |
And some quick connect LEDs/logical probe for breadboard.
|
terminator. |
 |
I you put voltage on the right pins of a SCSI terminator you can use it to test LEDs.
|
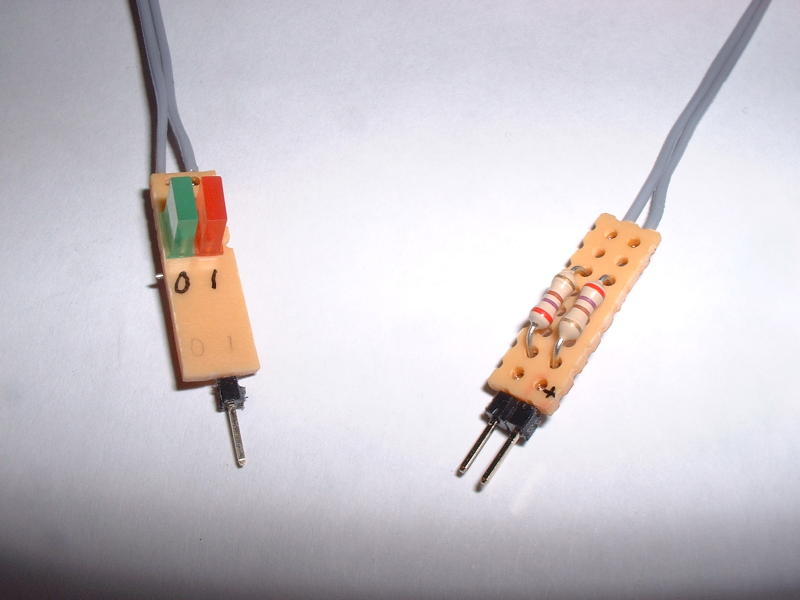
little meters. |
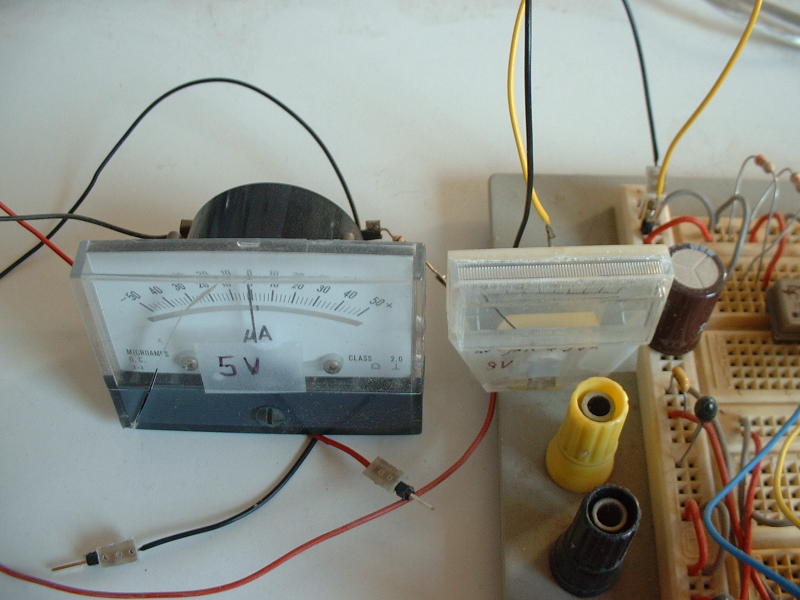 |
Multimeters can take up a lot of deskspace next to a breadboard, so i remembered
i have some small meters from old radios and such. So i added a resistor and replaced the wires
with more flexible ones and header pins to use them on a breadboard.
|
 |
 |
Long ago i used to have this Radio Shack (tandy) 150in1 electronics kit which had
a small meter build in, and of cause buttons, switches, potmeters and LEDs.
Things you don't standard have on a breadboard, so i tried to create a little meter
(and other bits) that can be used on a breadboard.
|
battery clips. |
 |
This might be obvious, but is a little development. I started with soldering header pins to a 9v battery clip.
So you could plug a 9v battery to a breadboard when you need power. But after a number of times plugging it in
the wires started to fray. And i plugged it in once wrong, shorting the pins. Making the battery boil.
So i added a switch !. And after a while just soldered female header pins to battery adapters so the pins dont
short out when they touch metal on your desk. So i made some cables with a switch and male header pings
to connect battery adapters to breadboards. The thing in the middle is a PCB that came from a 9V battery,
it is much sturdier as normal 9v battery clips, and might make a nice 9v battery clip.
|
batteries. |
 |
These are battery adapters i tried with a 5v step up board to make a very light power suply.
i didn't have an AAA battery adapter, but i had a very cheap radio which seems to work fine as an adapter.
i also tried a CR2032 battery. but it seems to have to much current to power anything with the converter.
|
recycling. |
 |
Instead of taking devices apart to separate parts it can be interesting to check what
function parts have. These are a 30v to 5v converter from a printer and a headphone amp. from a CDrom.
|
recycling. |
 |
This is a part of an old printer, the buttons each have a wire. While the LEDs are connected
to a shift register. Actually there was space for two more (hidden) LEDs in the corner left under which i added.
|
crocodile clips. |
 |
For use on a breadboard crocodile leads are often to long and to stiff. And to connect them
you have to clip them to a resistor or a pin. So i made some custom leads that take less space on a
breadboard and are easier to use.
Also by default a lot dont work as they where clamped badly, so i reworked them to these but with
soldered connections.
|
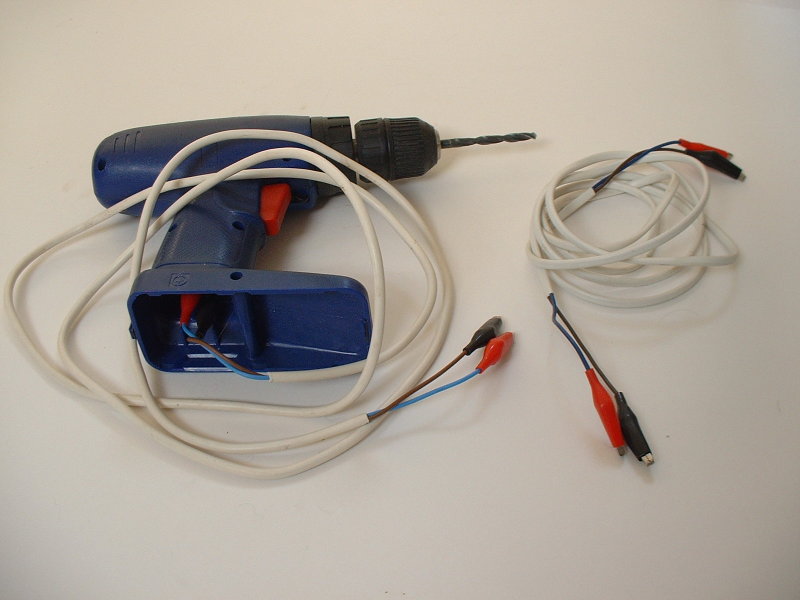 |
I have this very old rechargeable drill and the NiCd's gave out completely.
Without the battery its a nice very light drill, so i tried it on a lab. supply with
some sets of crocodile leads. It worked, but the leads got warm and shorted.
So i made some long crocodile leads with thick wire. Great to connect anything to the lab. supply
|
pc case. |
 |
The metal of cases of old PCs can be very usefull. But you need some nibbler (knabbelschaar) to cut it
and don't cut to much at a time or you get blisters.
I made half a dozen of display stands that way, which makes them easier to use with breadboards.
|
iphone. |
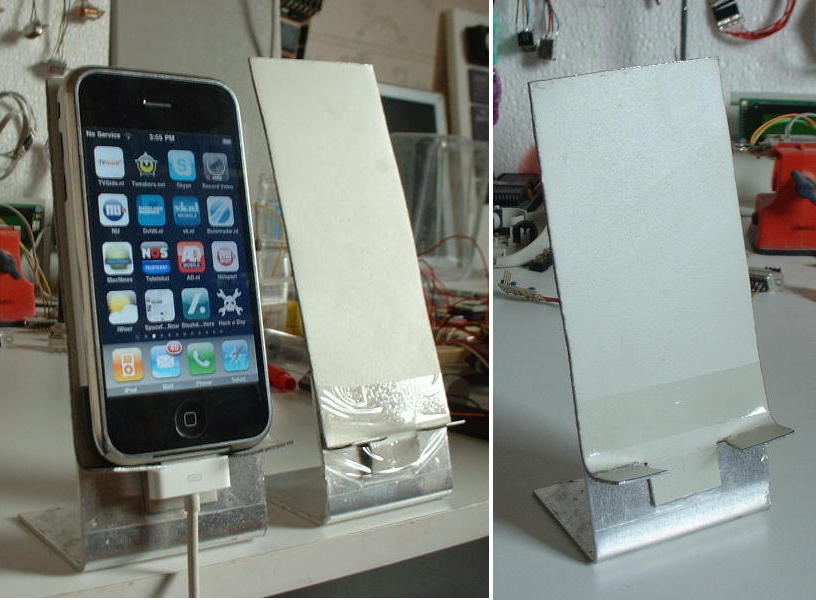
|
This is an iphone stand from 2 pieces of PC case and some tape.
Its usefull with programming, as you can take the iphone out and its still connected with the
debugging Mac. In a normal dock you would have lost connection. I also made a taller one for an ereader.
|
soldering. |
 |
Just a little jig i use to make connectors with headerpins for use on breadboards.
I use experiment board where 3 holes are connected, and solder header pins to that.
|
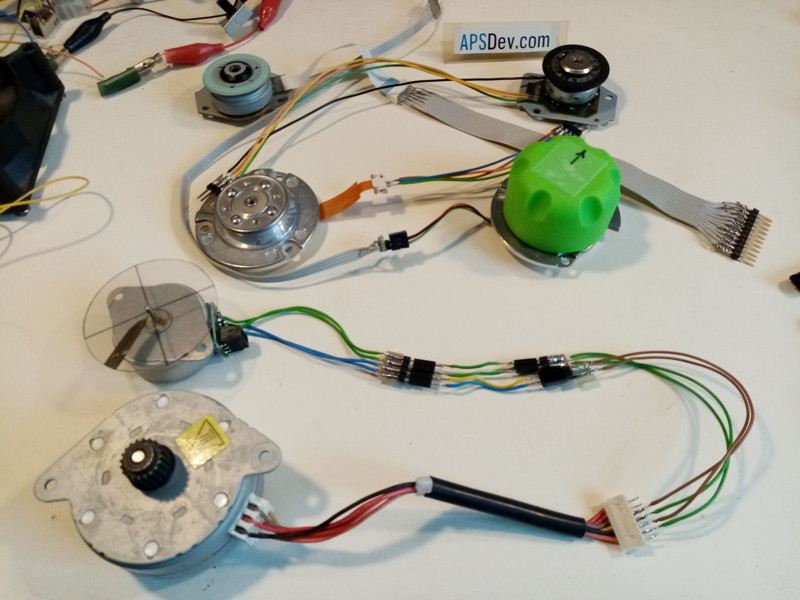
cd rom motors. |
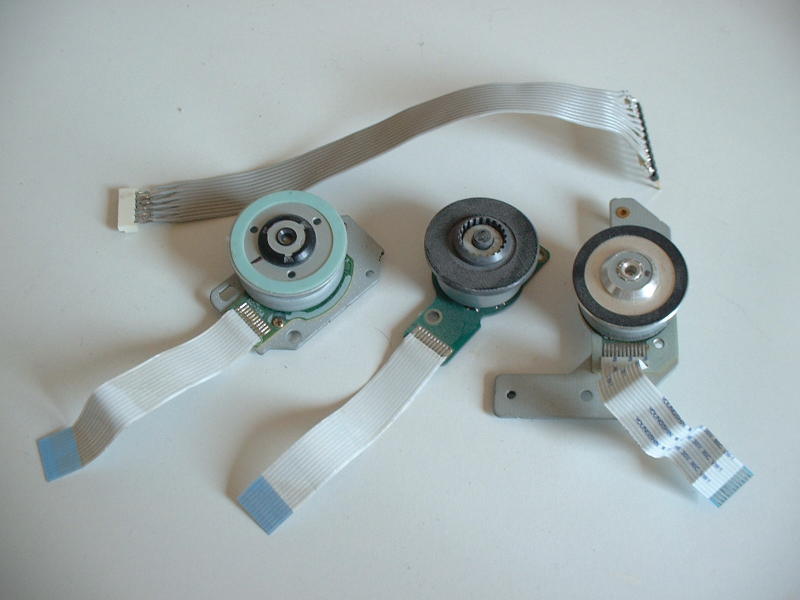 |
I got some motors from old CDrom drives, and wonderd if i could use them as a sort direct drive in a robot.
By just putting wheels on them, as they should have more torque as normal motors.
So i made some adaper cables for these flex cables from connector from old drives and printers.
I tried to use a motor by connecting them to 3 phases made with 6 transistors and a basic stamp and that seems to work.
I did not use the HAL sensors in the motor, but with low rpms and low acceleration it seems to work.
Also you could use the HAL sensors in the motor as some sort of position indicator, or use the cable with
other devices like displays from phones.
|
cd rom tray. |
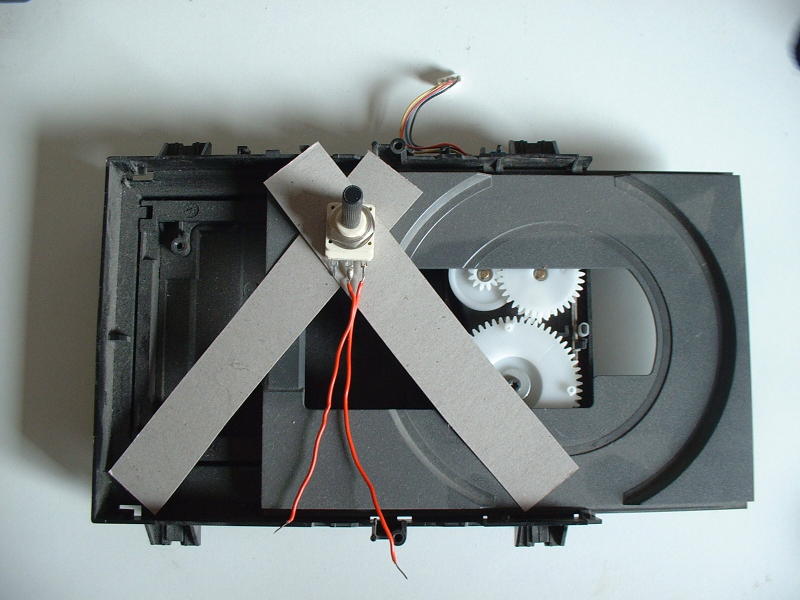 |
I was figuring to make servos from CDrom trays by adding a potmeter or some optical sensor.
so i can use them in a robot or scanner or plotter. With three of these connected to each other
it should be possible to move a device in 3D. You might not even need the potmeter but send
pulses with a specific lenght to the motors but you would have to go back to the start position
a lot to make sure the position is calibrated.
|
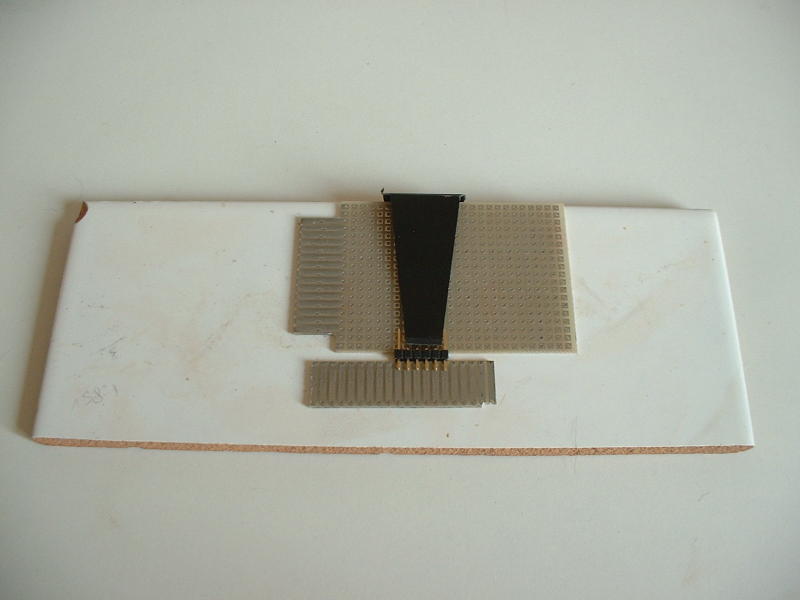
scenix. |
 |
Little adapter to be able to program Scenix/Ubicom SX28 processors on a breadboard.
Using a parallax serial in circuit programmer.
|
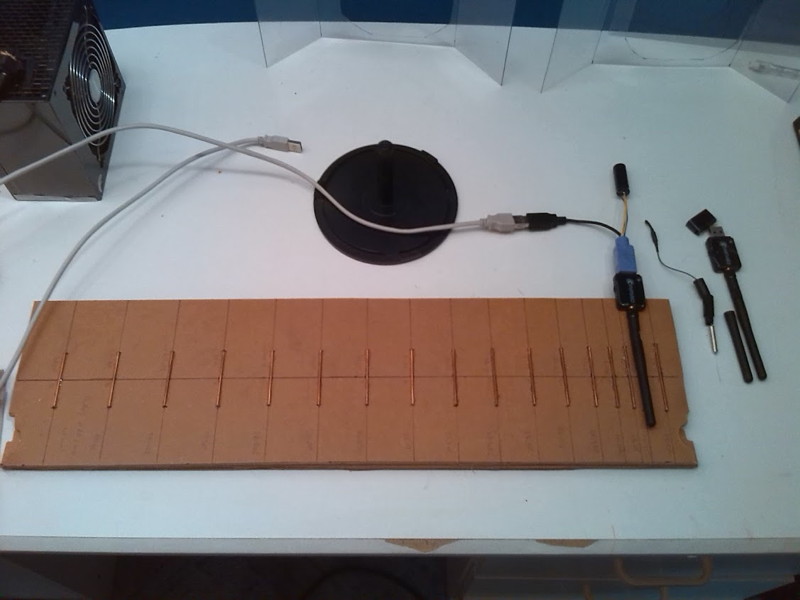
scanning tunneling microscope. |
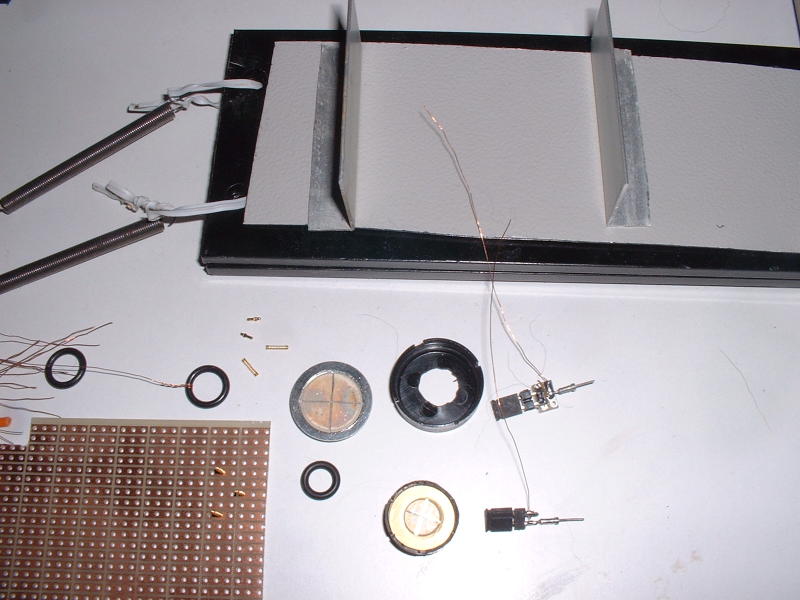 |
I was thinking about making a scanning tunneling microscope, i took some heavy metal plates
which where supposed to hold the arms rests of a desk chair and connected them to some springs as a
base without vibrations.
Took some piezo buzzers and make some very fine scratches on them to divide them in 4 parts.
I glued a jumper to the piezo, so i can insert a tiny PCb with header pins as a scanner.
From some old HP printers i got a lot of tiny tiny springs that connected the heads to a board, which
might be fine to make connections to the piezo.
Now i need some mechanism to move the sample. I am thinking of the motor that moved a CDrom head.
To move the piezo i want to use an mbed that charges and discharges a capacitor to move it with steps,
and use the ADC of the mbed to check the actual position.
Still a big experiment.
|